
 Monika Lazarevska

Average cost of Botox per state, from 562 practices’ price lists
The average cost of Botox per state runs from $12 to $15 a unit, and the nationa...

Last Updated: Nov 5, 2026
Free PDF 2 pages, print-ready Clinician-reviewed
A face piercing chart names each facial piercing and shows where it sits. It lets you and the client agree on a placement before anything gets marked. Clients often arrive with a screenshot and the wrong name, and the chart settles that in seconds.
Ours lists 14 numbered placements, from the septum and bridge to the medusa, anti-eyebrow and tragus. Each one carries a typical gauge, an initial healing range and a note on what to watch. It also includes a pre-piercing checklist and a procedure record.
A two-page chart with a 14-placement reference table of typical gauges and initial healing ranges. It also holds a 10-point pre-piercing checklist, a procedure record and guidance on when to decline.
Start from scratch, or upload this PDF or any form you already use, and Pabau's AI Form rebuilds it with tick boxes, text fields and a signature. Attach it to the treatment once, and every patient gets it on time.
AI Form rebuilds the consent, history and aftercare forms you already use. You review each one, then publish.
Patients complete forms on their phone before they arrive, so the front desk stops retyping paper.
Every signed form is versioned and attached to the treatment record, ready when you need it.
Set how long a consent stays valid. Returning patients skip forms they have already signed.
Supports HIPAA and GDPR compliance AES-256 encryption 4.8 on G2 4.7 on Capterra Trusted by 4,000+ practices worldwide

The chart numbers 14 placements, each with a typical gauge, an initial healing range and a note on what to watch.
Cartilage placements like the nostril and tragus take four to eight months to heal, about twice as long as most lip piercings.
Eyebrow and anti-eyebrow placements carry the highest migration and rejection risk, so discuss it before you mark.
Fit a longer post on lip placements and book a downsize once the swelling settles.
The 10-point checklist and the procedure record make each piercing traceable if a client returns with a problem.
Each numbered placement on the sheet comes with a typical gauge, an initial healing range and one note on what to watch.
The PDF asks you to “mark the agreed site on the diagram” (its wording), but the file has no diagram. The face map below fills that role, so every number points at a spot on the face.
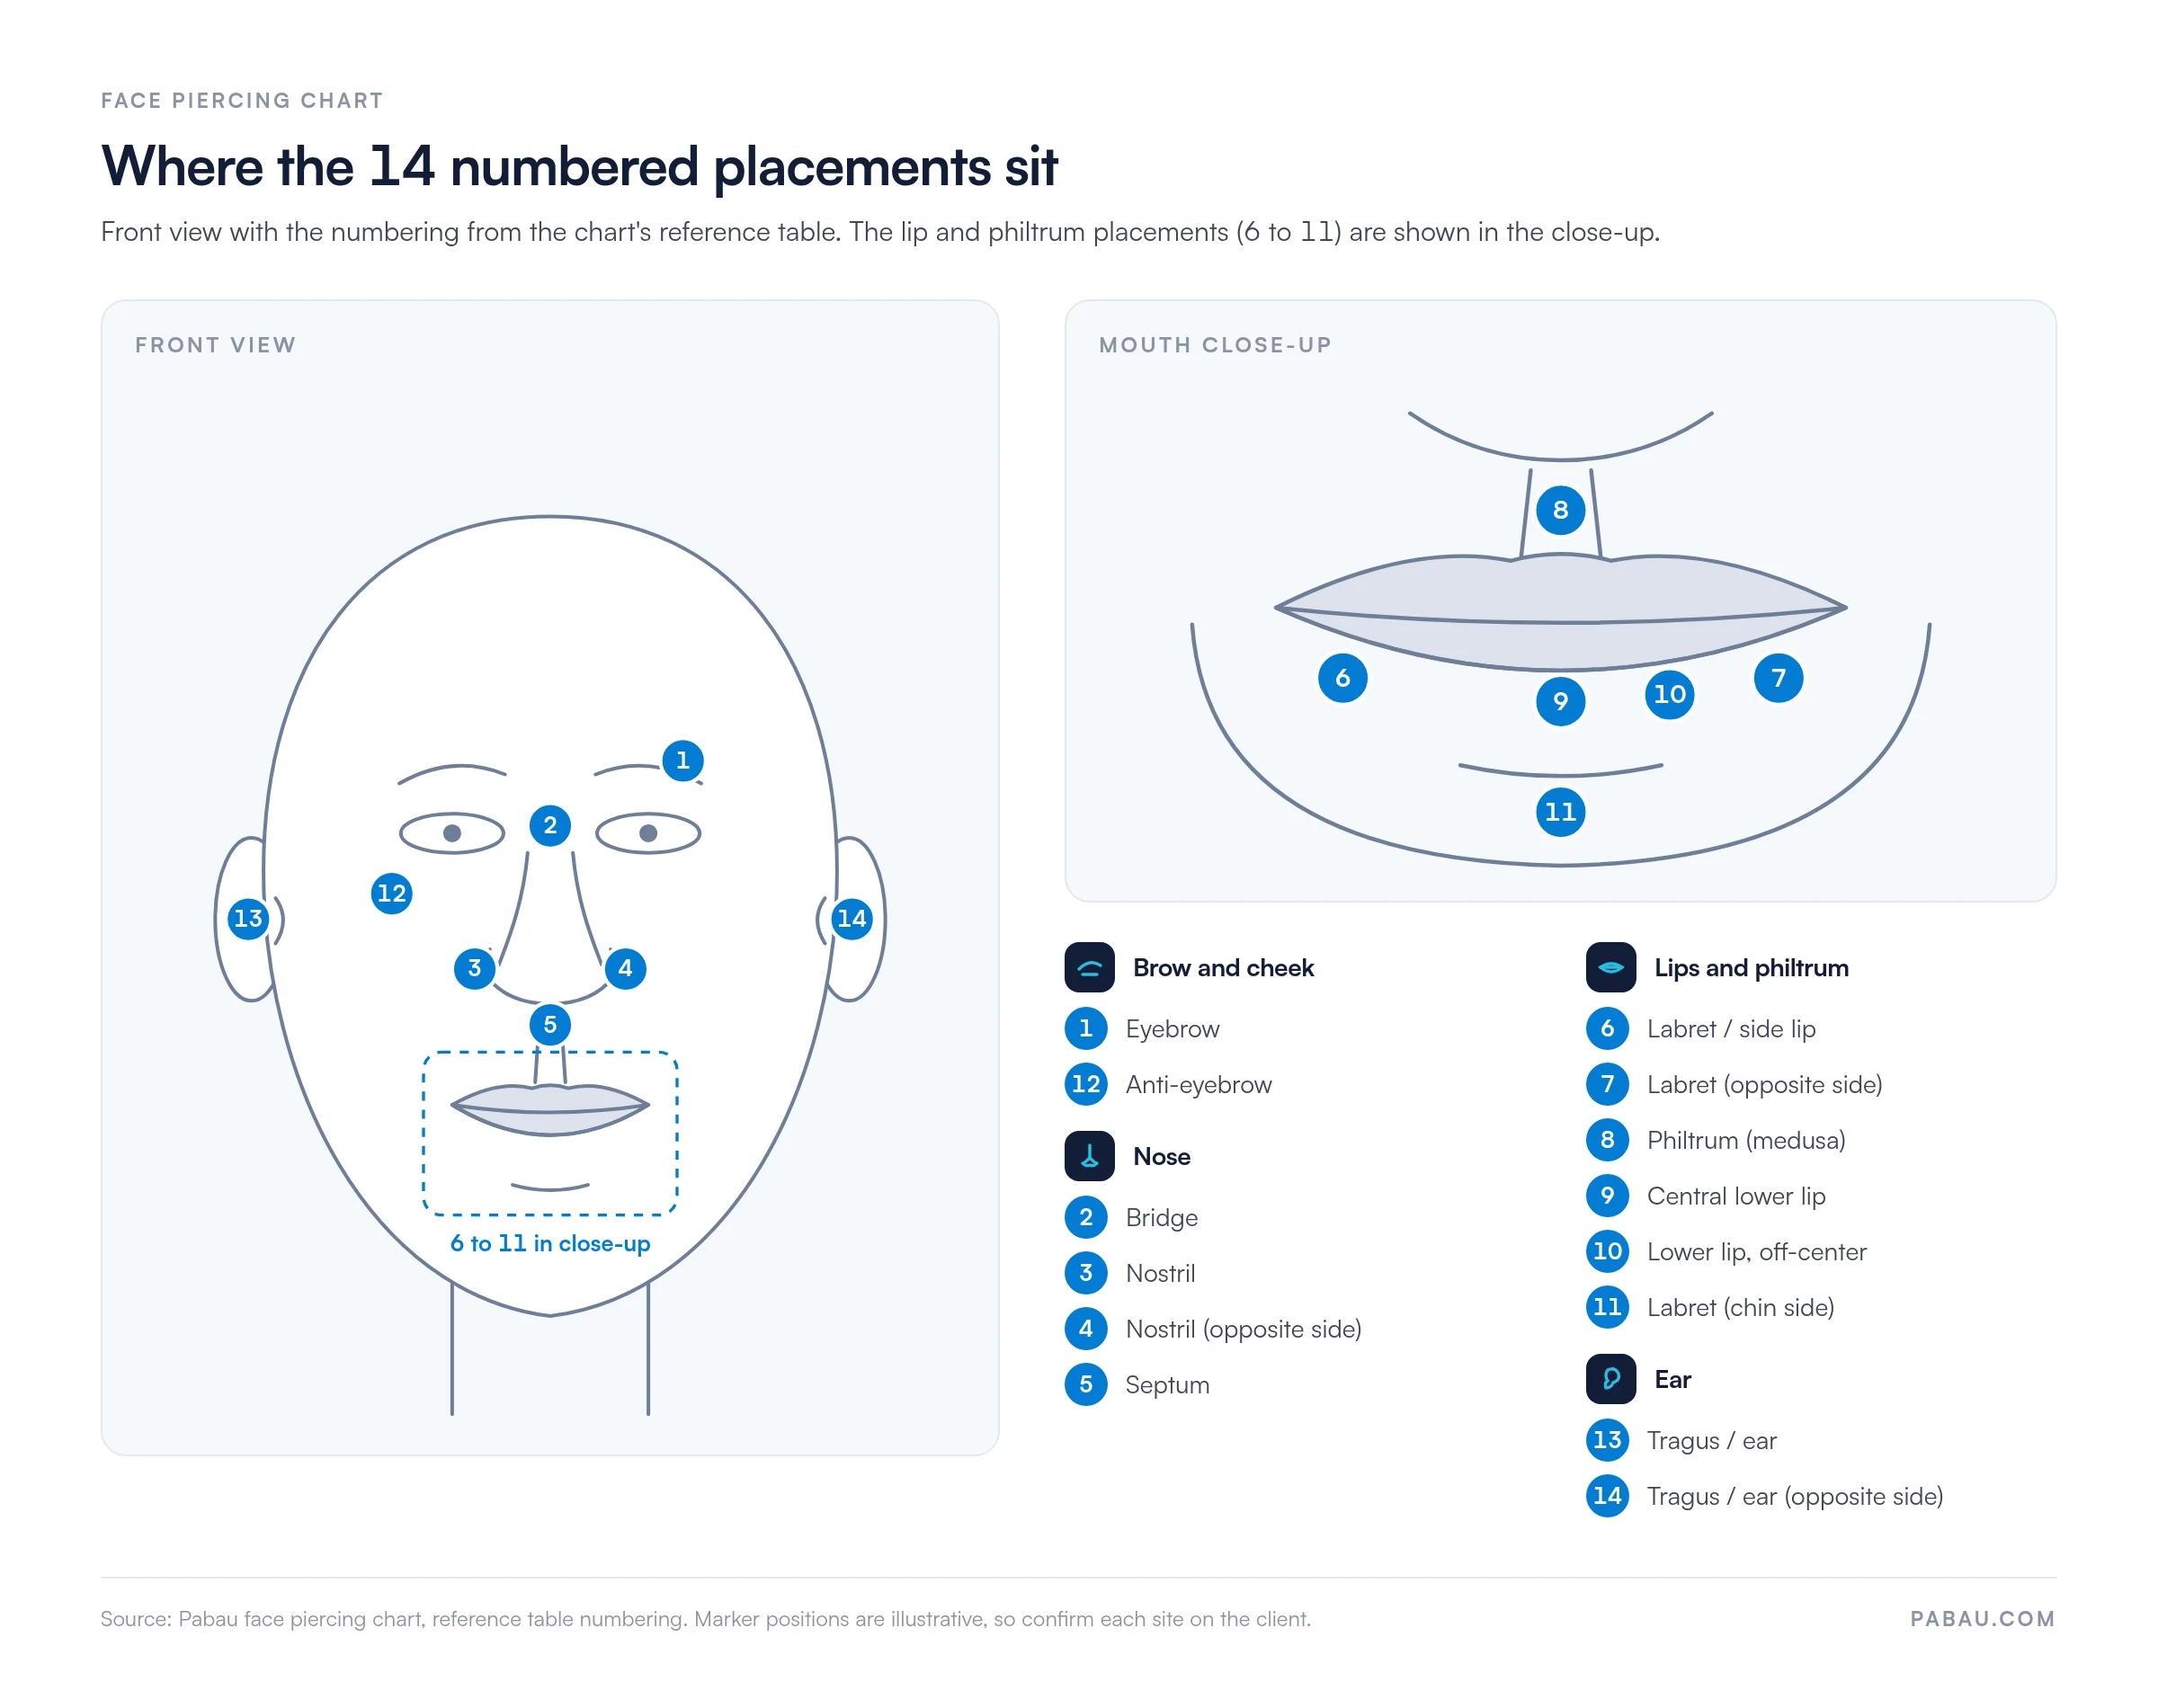
For marking on the day, print a plain face outline to go with the sheet and circle the agreed number on it. Some studios mark the placement on a photo the client has approved instead. Either way, the marked copy goes in the client’s record.
Here is the full reference table, with the same numbers, gauges and healing ranges as the PDF.
| # | Placement | Typical gauge | Initial healing | What to watch |
|---|---|---|---|---|
| 1 | EyebrowBrow and cheek | 16g | 2 to 4 months | Surface piercing with a higher migration and rejection risk |
| 2 | BridgeNose | 16g or 14g | 2 to 3 months | Passes through the skin over the nose, not the cartilage |
| 3 | NostrilNose | 18g or 16g | 4 to 6 months | Cartilage heals slowly, so avoid early jewelry changes |
| 4 | Nostril (opposite side)Nose | 18g or 16g | 4 to 6 months | Measure the pair rather than eyeballing it |
| 5 | SeptumNose | 16g or 14g | 6 to 8 weeks | Goes through the thin tissue in front of the cartilage |
| 6 | Labret / side lipLips | 16g or 14g | 2 to 3 months | Watch for gum and tooth wear, and use a flat-back disc |
| 7 | Labret (opposite side)Lips | 16g or 14g | 2 to 3 months | Measure symmetry against the midline |
| 8 | Philtrum (medusa)Lips | 16g or 14g | 2 to 3 months | Sits in the groove above the top lip |
| 9 | Central lower lipLips | 16g or 14g | 2 to 3 months | Flat-back jewelry reduces dental contact |
| 10 | Lower lip, off-centerLips | 16g or 14g | 2 to 3 months | Check it against the client’s natural lip line |
| 11 | Labret (chin side)Lips | 16g or 14g | 2 to 3 months | Assess tissue depth before choosing the post length |
| 12 | Anti-eyebrowBrow and cheek | 16g | 3 to 4 months | Surface placement, so discuss rejection risk openly |
| 13 | Tragus / earEar | 16g | 4 to 8 months | Cartilage, slow to heal |
| 14 | Tragus / ear (opposite side)Ear | 16g | 4 to 8 months | Cartilage, slow to heal |
| Dark healing chips mark cartilage placements, which take four to eight months. Lighter chips heal in about two to four months, or six to eight weeks for the septum. | ||||
The tragus isn’t strictly a face piercing. Clients often book it in the same session, though, so the sheet keeps it in view.
Three nose placements sit on the sheet: the nostril, the septum and the bridge. They heal on very different clocks. A nostril goes through cartilage and takes four to six months, while a septum often settles in six to eight weeks.
Paired nostrils fail on symmetry more often than on technique. Mark both sides, step back, and have the client check them in a mirror before you pierce. If a client asks what 16g or 18g means in millimeters, our body piercing gauge chart converts every size.
Six of the 14 placements involve the lips, so swelling is the problem you’ll plan for most. The sheet’s advice is to fit a longer post first and downsize once the swelling settles. A post that’s too short in those first days can embed in the tissue.
That swelling note also mentions tongue piercings. The tongue isn’t one of the 14 charted placements, so this note is the only place it appears on the sheet.
Lip jewelry also rests against teeth and gums. Flat-back discs reduce that contact, and a quick look at the gum line at each check-up catches wear early.
Strictly, a labret is the central piercing just below the lower lip. The PDF uses the word more loosely, so several rows describe close neighbors. Read the lip numbers like this:
The PDF also spells #10 the UK way, as “off-centre”. Write the number in the procedure record, and the overlap stops mattering.
The sheet flags both as surface placements, where the jewelry sits in flat tissue rather than through a fold. That makes migration and rejection more likely, and rejection can leave a scar. Name the risk before you mark, then note in the record that you discussed it.
The PDF’s note for #12 calls the anti-eyebrow a “surface anchor”, which blends two techniques. Depending on technique, it’s either a surface piercing or a dermal anchor, so record which one you used.
Group the 14 placements by tissue and a clear pattern appears. Soft tissue settles in weeks or a few months, and cartilage takes the longest. The ranges below come straight from the chart’s reference table.
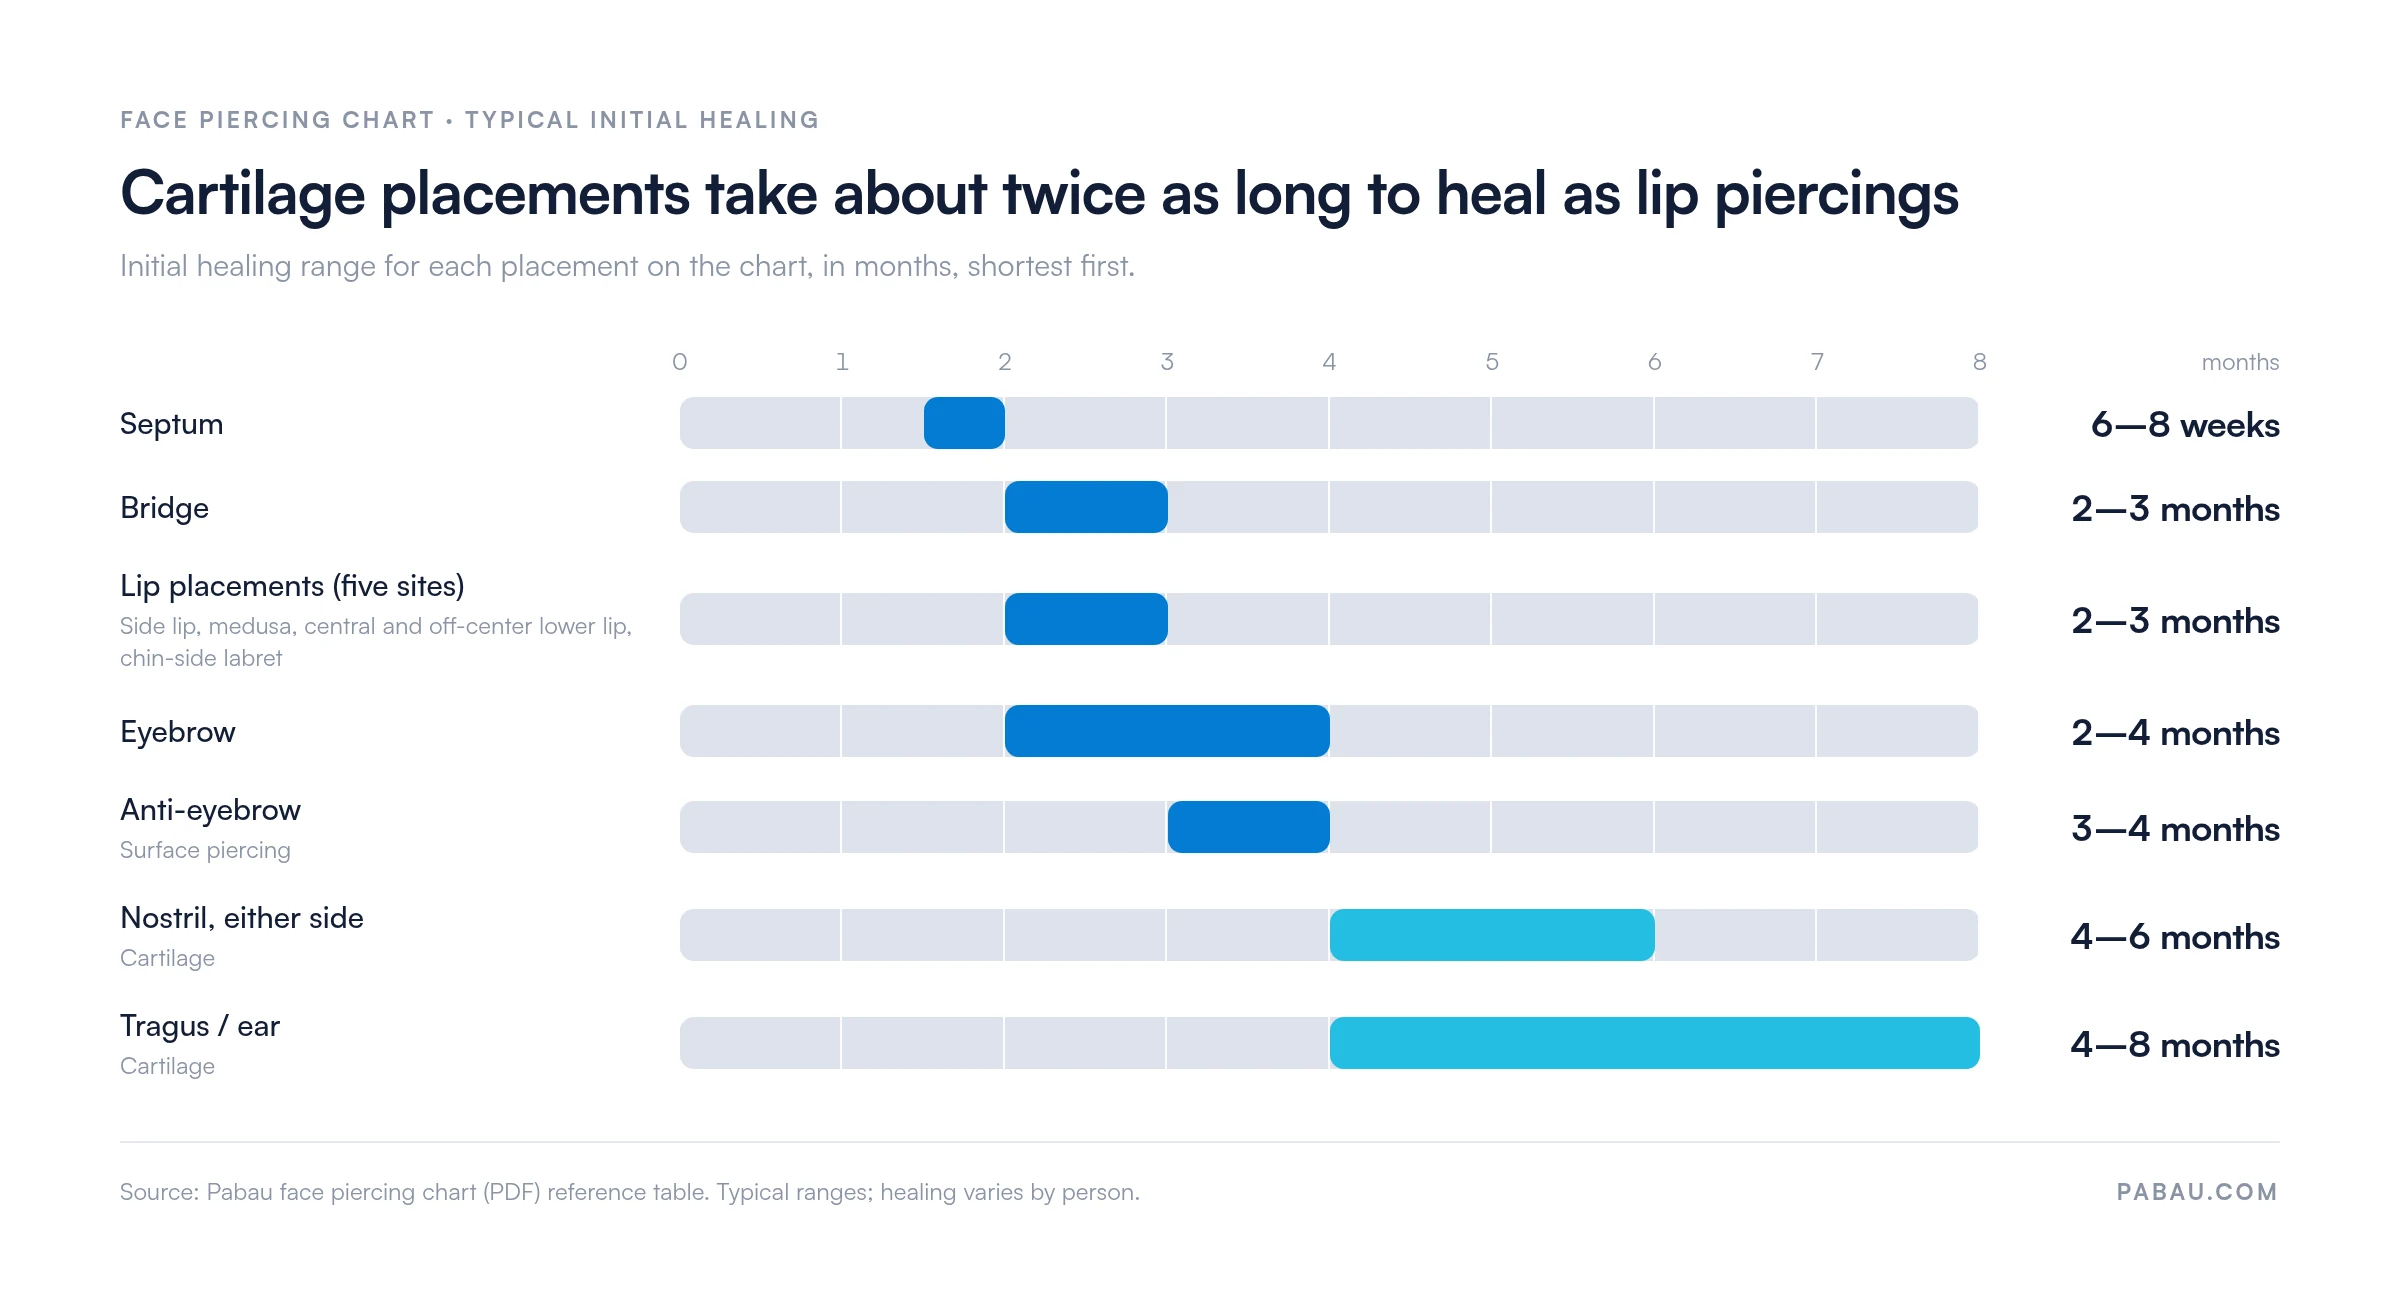
Treat every range as typical, not a promise. Healing shifts with anatomy, jewelry, aftercare and the client’s general health, so let the piercer set expectations for each client.
Jewelry choice matters as much as the timeline. For initial piercings, the checklist allows implant-grade titanium, implant-grade steel, niobium, or solid 14k gold and above. Implant-grade titanium is made to ASTM F136, and implant-grade stainless steel to ASTM F138. Hand every client written aftercare, such as our piercing aftercare instructions, and tell them who to contact if something changes.
For general infection prevention, the CDC publishes guidance on hygiene and wound care. A client with spreading redness, heat, swelling or discharge should see a healthcare professional.
A surface piercing uses a barbell that enters and exits the skin on the same plane. A dermal piercing uses a single anchor with a base under the skin and a visible top, so no jewelry passes through.
The Association of Professional Piercers (APP) publishes safety and educational materials for the industry. APP educational materials describe the anti-eyebrow as a surface piercing with a rejection risk. Placed with a single anchor instead, it becomes a dermal piercing, as with the teardrop and chin below.
Clients will also ask for names the sheet doesn’t number. Add these to your own copy if your studio offers them.
Dermal anchors shouldn’t be removed at home. Tell clients up front that removal is a studio appointment.
The chart does its best work in the first few minutes of a consultation. A typical run looks like this.
Step six is the one studios skip when the queue is long. It’s also the one you’ll need if a client comes back with a problem three months later.
The sheet’s checklist has ten points, and each one prevents a specific problem.
Most of these cost a minute to avoid and a lot more to fix after the fact.
| Mistake | Do this instead |
|---|---|
| Marking from the table alone | The PDF has no diagram, so mark on a printed face outline or a client-approved photo. |
| Trusting the client’s name for a piercing | Slang names vary between studios, and the chart’s lip names overlap. Point at a numbered placement instead. |
| Fitting final-length jewelry on day one | Lip placements swell, and a short post can embed. Fit long, then book the downsize. |
| Eyeballing pairs | Measure nostril and labret pairs against the midline before you mark. |
| Changing nostril jewelry early | Cartilage heals slowly, and an early swap can irritate a piercing that’s still healing. |
| Skipping the record | Log the needle lot and jewelry material every time, so you can answer a question about a reaction later. |
| Printing the chart unedited | Strike placements your studio doesn’t offer, and add the names your team uses. |
The sheet tells you to decline when the anatomy won’t support the placement, the client can’t consent, or a medical condition makes healing unsafe. Explain why, and offer another placement where one exists. Refer anyone with signs of infection to a medical professional.
Licensing rules for piercing studios vary too. In the US, each state sets its own body art rules, and counties often add their own. In the UK, local councils handle registration. Check yours before you open or add a service.
Pabau is an all-in-one practice management system for aesthetic and healthcare teams, covering bookings, client details and forms. Piercing studios use the same tools to keep one record per client.
On paper, the chart, the consent form and the procedure record end up in three places. With Pabau, clients complete intake and consent forms on their phone before they arrive, and the signed copy lands on their record.
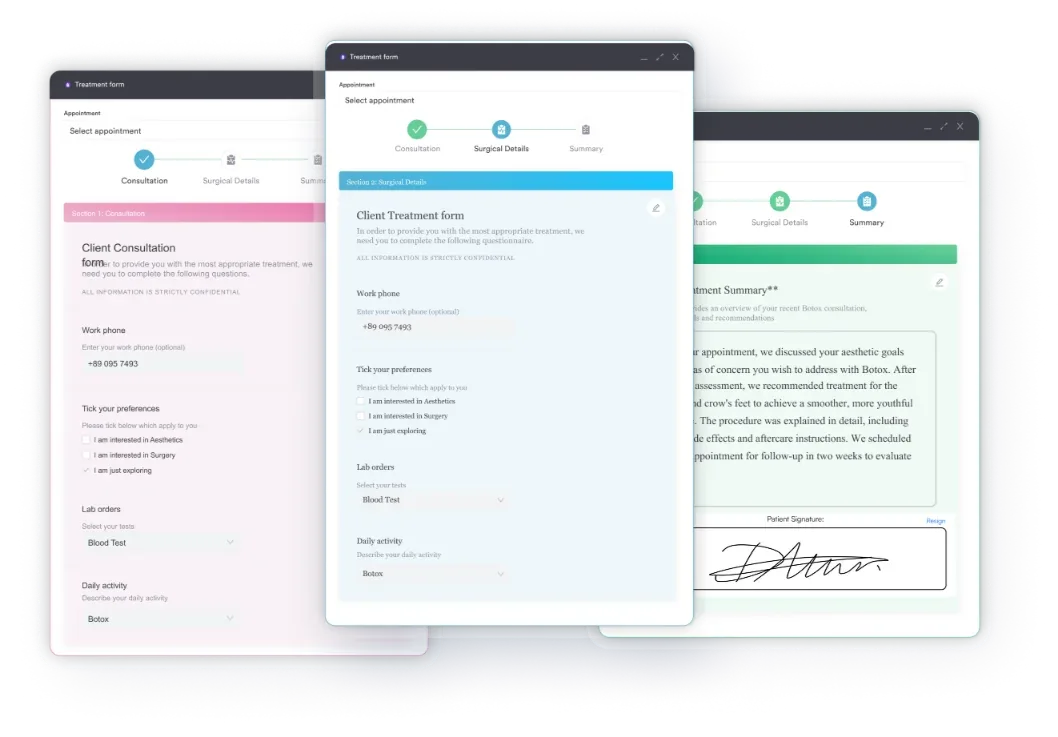
The client record then holds the placement, jewelry, needle lot and your notes, so a follow-up starts from what was done. Studios that also offer spa or wellness treatments run the same setup through our spa software.
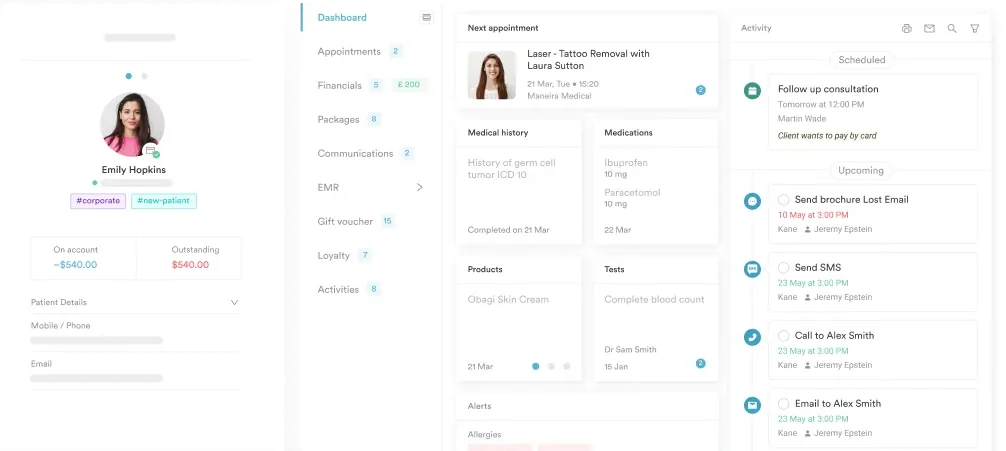
Automated appointment reminders then bring clients back for their downsize, which every lip placement depends on.

Pabau sends consent forms before the appointment, stores each client’s placement and jewelry details, and reminds clients when their downsize is due.

A face piercing chart earns its place when it settles the conversation before the needle comes out. Agree the numbered placement, name the risk and the healing range, then write down what you did.
Skipping that saves a minute on the day and costs far more later. A client who returns with a migrating eyebrow bar or an embedded labret will want to know what was agreed. The signed checklist and the procedure record answer that for you.
Book a demo to see how Pabau keeps consent forms, piercing records and downsize reminders on one client record.

Planning the next piercing after a face session? Ear piercing pain scale ranks ear placements by how much they tend to hurt.
Running a studio that also does tattoos? Tattoo aftercare instructions gives clients a printable healing routine to take home.
Choosing software for a spa or body art studio? Best software for spas compares booking and record systems built for spa teams.
Snake bites are two piercings on the lower lip, one near each corner of the mouth. They’re usually done in one session and measured like any paired labret.
Both sit above the upper lip, off center, like a beauty mark. A Monroe goes on the client’s left side, and a Madonna goes on the right.
Often, yes. A circular barbell or septum retainer can be flipped up inside the nose, where it’s hard to spot. Check with the piercer before flipping a fresh septum regularly.
They can, and a fresh piercing may start shrinking within hours. Healed piercings usually stay open longer, but there’s no reliable timeline. Clients should keep jewelry in until they’re ready to retire the piercing.
It depends on the state. Many US states let minors get pierced with a parent or guardian’s written consent, and some restrict facial placements for minors. Check your state and county body art rules.