
 Tanja Lepcheska

OT SOAP note sample: Free template and worked examples
Download your free OT SOAP note sample A four-page form with an identifying head...

3
Last Updated: Nov 5, 2026
Free PDF 2 pages, print-ready Clinician-reviewed
A body piercing gauge chart converts a jewelry gauge number into a diameter in millimeters, so studios can size, compare and record piercings accurately. The scale runs backwards: a lower gauge number means thicker jewelry, so 16g (1.2 mm) is thicker than 18g (1.0 mm). Most lobe piercings start at 18g or 16g, nostril piercings at 18g or 20g, while nipple and navel piercings usually start at 14g (1.6 mm). This page sets out the gauge to mm conversions, the standard gauges for each piercing type and an ear stretching progression. It also links to a free PDF for the studio wall or the client file.
A printable chart with gauge to mm and inch conversions from 20g to 1 inch, plus safe stretching rules and warning signs. It ends with a client record for sizes, materials and aftercare notes.
Start from scratch, or upload this PDF or any form you already use, and Pabau's AI Form rebuilds it with tick boxes, text fields and a signature. Attach it to the treatment once, and every patient gets it on time.
AI Form rebuilds the consent, history and aftercare forms you already use. You review each one, then publish.
Patients complete forms on their phone before they arrive, so the front desk stops retyping paper.
Every signed form is versioned and attached to the treatment record, ready when you need it.
Set how long a consent stays valid. Returning patients skip forms they have already signed.
Supports HIPAA and GDPR compliance AES-256 encryption 4.8 on G2 4.7 on Capterra Trusted by 4,000+ practices worldwide
A body piercing gauge chart matches each gauge number to a jewelry diameter in millimeters, so piercers can pick a starting size without guessing. The scale runs backwards, so 14g (1.6 mm) is thicker than 18g (1.0 mm).
Most lobe piercings start at 18g or 16g, and ear stretching moves up in small steps. What follows covers the gauge to mm conversion table, standard sizes by piercing type, a stretching progression and how to record each client’s size.

A body piercing gauge chart translates gauge numbers into millimeter diameters for accurate jewelry sizing.
Lower gauge numbers mean thicker jewelry, so 16g (about 1.2 mm) is thicker than 18g (about 1.0 mm).
Standard lobe piercings are usually 18g or 16g, while nipple and navel piercings usually start at 14g.
Stretching moves up in small steps, and a lobe may not recover its shape beyond about 0g or 00g.
The free PDF gives studios one printed reference and a client record for gauge, size and aftercare notes.
A body piercing gauge chart is a reference table that lists each gauge number alongside its diameter in millimeters and, usually, its fractional inch equivalent. Piercers use it to choose starting jewelry, check that a client’s existing jewelry matches what they are recording, and plan a stretching progression without guessing.
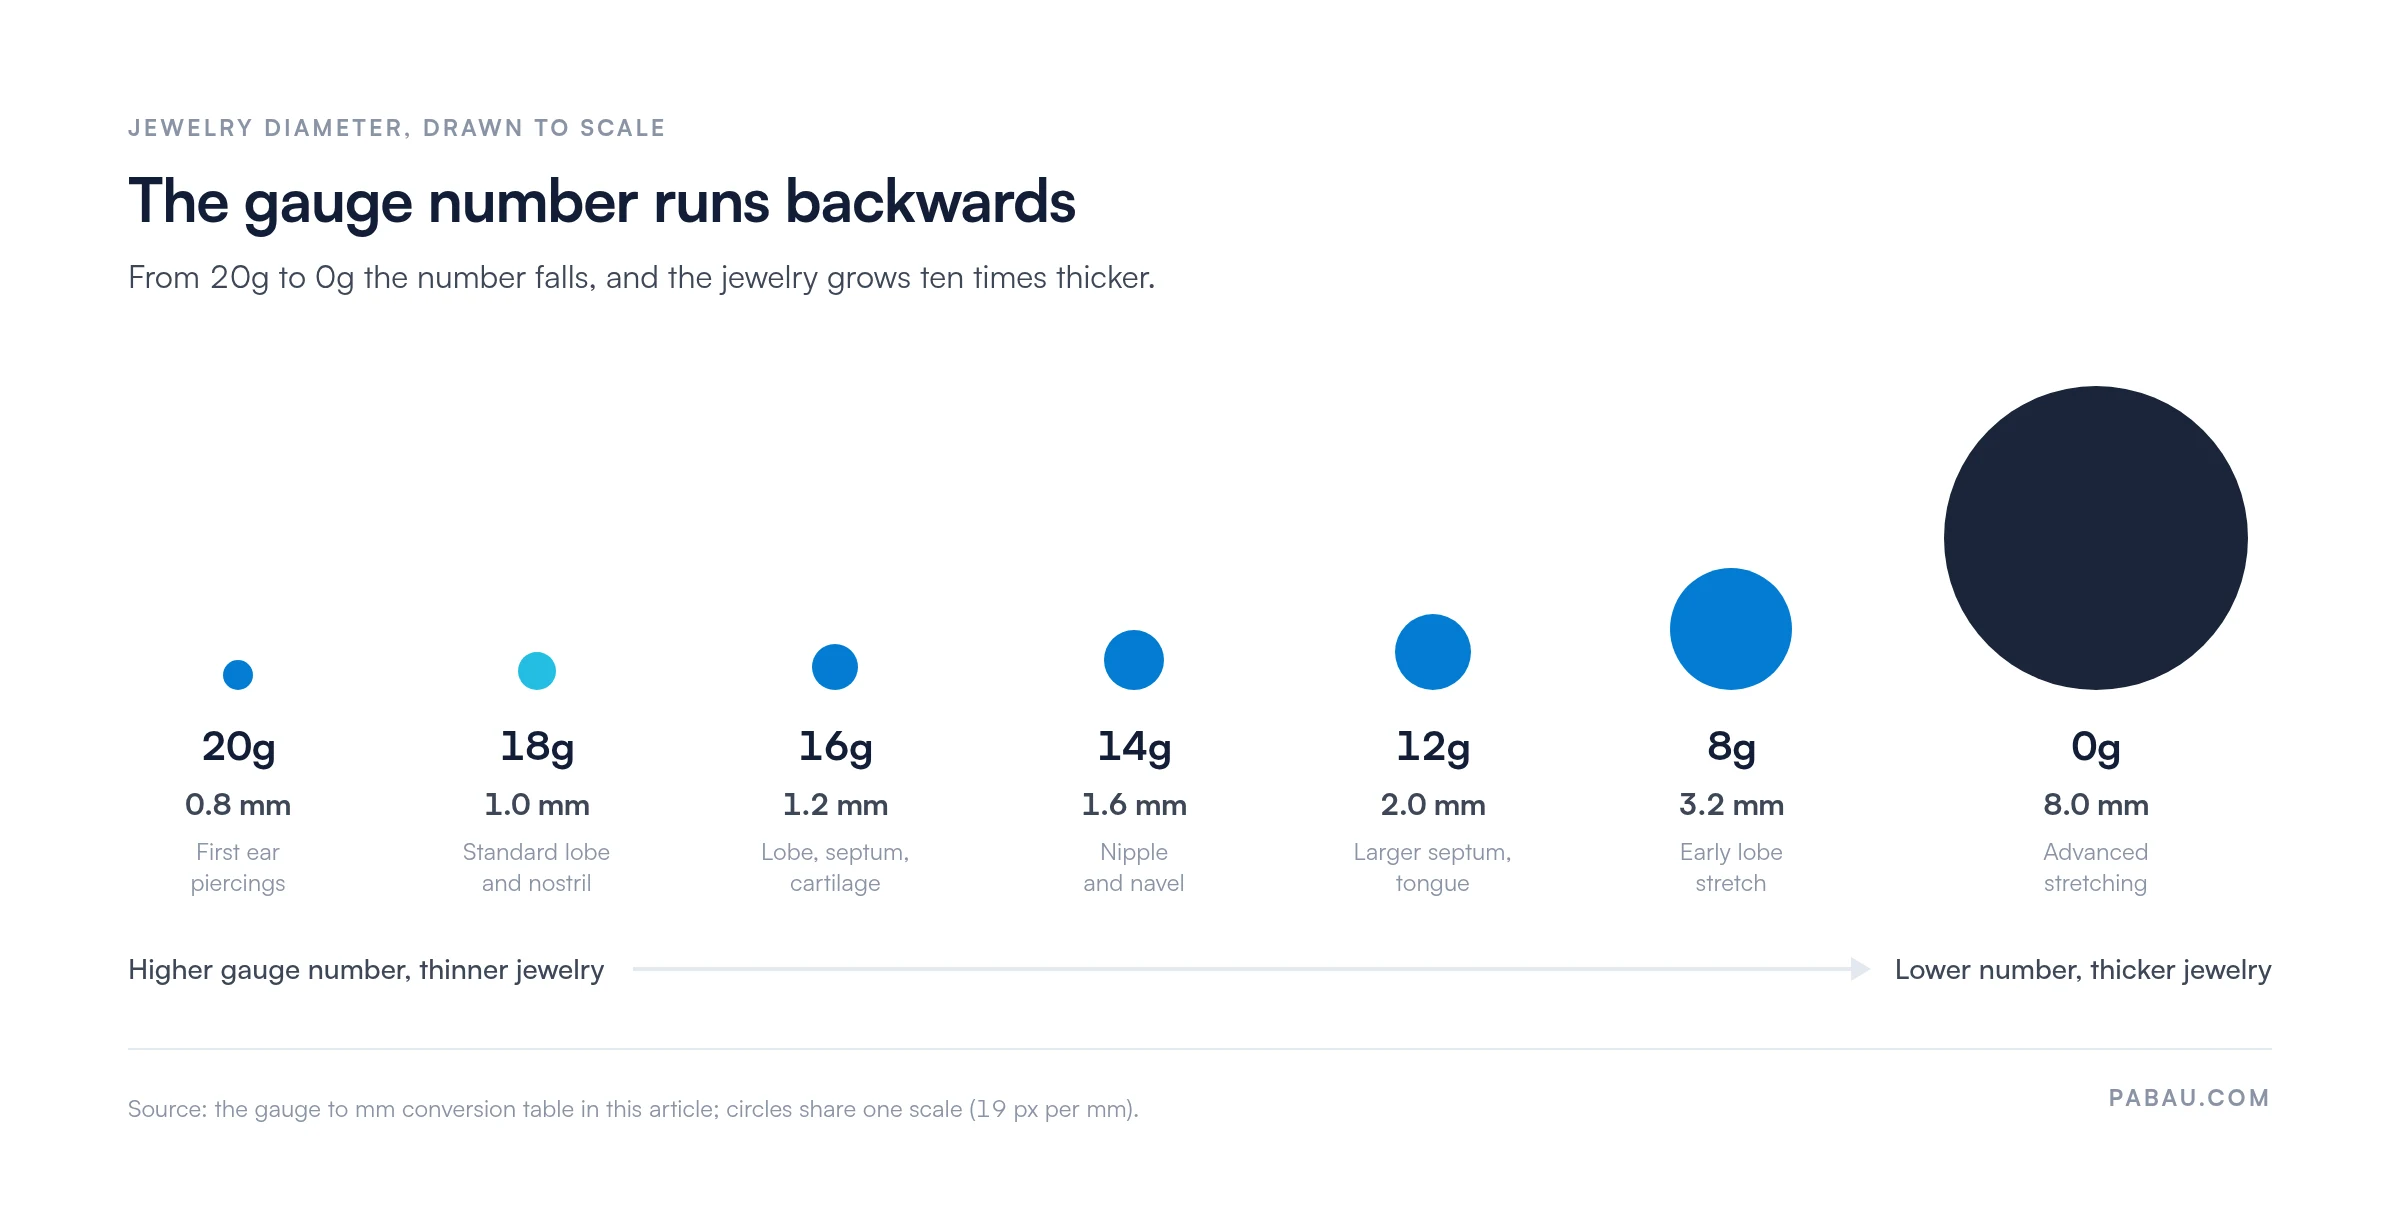
The gauge system is inverse. Gauge 18 is thinner than gauge 16, and gauge 00 is far thicker than either. Gauge also measures the diameter of the post, never its length. Explaining both points to a first-time client prevents most sizing mistakes at the front desk.
The chart earns its place when it is part of the consultation and the client record. Work through it in this order for each client.
The table below gives the millimeter diameter for the gauges piercers use most. Values are rounded to one decimal place for everyday use, so check the exact figure against your jewelry supplier’s specification when fit is critical.
Drawn to one scale, the same gauges show how quickly thickness climbs once the number drops below 12g.
Each body site has a typical starting gauge. These are industry norms rather than fixed rules, so the client’s anatomy, the jewelry style and the piercer’s judgment all shape the final choice.
Most professional studios start lobes at 18g and move to 16g once the piercing has settled. Retail chains often pierce at 20g, so a client who was pierced there may already be at a smaller diameter than the chart’s standard. Record the gauge and mm value on arrival rather than assuming the standard applies.
Cartilage is thicker and slower to heal than lobe tissue. Jewelry there is usually 16g or 18g, with a flat-back or a slightly longer post. Clients should expect a different aftercare timeline from lobe piercings.
Nostril piercings are commonly 18g or 20g, while septum piercings are commonly 16g or 14g. Confirm the client’s preferred jewelry style before ordering, because clickers and rings differ in gauge range.
Nipple and navel piercings are commonly 14g, and labrets are commonly 16g or 14g. These sites are often pierced at the thicker end of the standard range, so check jewelry length as well as gauge.
Stretching moves a lobe through a sequence of gauges over weeks or months. Each step should be measured, not guessed. The client moves up only when the current size sits comfortably, with no tearing, thinning or persistent soreness.
The point of no return is the size beyond which the lobe may not recover its original shape. Professional piercers commonly place it around 0g or 00g. It varies with each person’s tissue, so treat it as guidance rather than a fixed threshold. Stop and seek advice if the lobe thins, tears or stays painful.
If the jewelry is unmarked, a digital caliper gives the most reliable reading. A gauge wheel also works for quick checks, though it is less precise at the thicker sizes.
Home measurements are only a guide. A piercer should confirm the size before any change, particularly for stretched or healing piercings.
Sizing errors start when a client’s gauge is split across a paper card, a booking note and a piercer’s memory. The printed chart fixes the reference at the piercing station, but the record still needs one home.
Pabau, the software built for spas and studios, stores the gauge, mm size and jewelry style on each client record. The next piercer sees the last size before the client sits down.
Digital forms collect consent before any piercing or stretch, and the signed answers save to that record. Our piercing consent form gives you the wording to start from.
After the visit, pre and post care messages send aftercare instructions automatically. Build them from a template such as our body piercing aftercare instructions, so every client gets the same advice.

Book a demo to see how Pabau supports client records, digital consent and aftercare for piercing studios.

Gauge numbers only cause trouble when a studio treats them as obvious. Write the mm value next to every gauge, check the standard for the site, and move a stretch up in small steps.
Do that at every visit and the record answers the next piercer’s first question before anyone reaches for a caliper. The cost is a minute of measuring at check-in, far less than a torn lobe or a returned jewelry order.
Book a demo to see how Pabau keeps gauge sizes, consent and aftercare on one client record for your studio.

Need signed consent before you pierce? Piercing consent form covers the risks, aftercare duties and signatures to collect.
Sending clients home with a new piercing? Body piercing aftercare instructions gives you cleaning and healing advice ready to hand over.
Fielding questions about how much it hurts? Ear piercing pain scale rates each ear placement so clients know what to expect.
Planning a nipple piercing consultation? Nipple piercing pain chart sets out pain and healing expectations for that placement.
Running a tattoo and piercing studio? Tattoo aftercare instructions give tattoo clients the same consistent written advice.
A piercing gauge is a measure of jewelry thickness, where a lower number means a thicker post. Gauge 18 is about 1.0mm and gauge 16 is about 1.2mm.
16 gauge is bigger, because it is thicker. It measures about 1.2mm against 1.0mm for 18 gauge.
The standard lobe size is 18g, about 1.0mm, with 16g, about 1.2mm, also common. Retail chains often use 20g, about 0.8mm.
Claire’s does not publish official gauge specifications, but 20g is widely reported for its standard ear piercing. Check the size on arrival rather than assuming it.
Use a digital caliper to measure the post thickness in mm, then match the reading to the conversion table. Confirm with a professional piercer before changing size.