Sulcus Test: Shoulder Instability Assessment
The sulcus test is an orthopedic special test that checks for inferior glenohume...

3
Last Updated: Oct 22, 2026
The rib spring test is a manual assessment that checks mobility at the costovertebral and costotransverse joints, where each rib meets the thoracic spine. The clinician applies a gentle posterior-to-anterior pressure over the rib angle and feels whether the rib springs back or resists. A rib that resists, or a push that reproduces the patient’s familiar pain, is a positive finding for rib hypomobility at that level.
Physical therapists, osteopaths, and manual therapists use it as a quick, hands-on screen for posterior chest and thoracic spine pain. It helps them decide whether joint mobilization or manipulation at a specific rib is warranted.
This guide covers the anatomy behind the test, the technique for ribs 2-10 and the first rib, and how to read the findings. It also gives you a 0-4 grading scale, so your notes compare cleanly at reassessment.

The rib spring test assesses costovertebral and costotransverse joint mobility across ribs 2-10, with a separate technique for the first rib.
A positive finding is reduced or absent spring (rigidity) or reproduction of the patient’s familiar pain, indicating rib hypomobility.
The first rib is tested in sitting, not prone, because it sits beneath the clavicle and upper trapezius.
Spinal motion palpation shows poor-to-moderate inter-rater reliability, so treat a positive finding as an indicator rather than a diagnosis.
Practice software such as Pabau lets physical therapists and osteopaths record spring test grades and link them to treatment plans in one patient record.
The rib spring test is a passive accessory movement assessment of the posterior thoracic cage. It detects restricted or absent mobility at the costovertebral and costotransverse joints. The clinician applies a short, oscillating posterior-to-anterior (PA) pressure over the rib angle while the patient lies prone. A rib that yields with an elastic rebound is normal. A rib that resists is described as “hypomobile” or positively springing.
The test is used across physical therapy, osteopathy, and manual therapy. It belongs to the wider family of passive accessory movement tests, which also includes central and unilateral PA pressures on the thoracic vertebrae.
What sets the rib spring test apart is its target. It loads the rib-vertebra articulations rather than the facet joints. That makes it useful when a patient’s symptoms suggest costovertebral involvement rather than disc or facet pain.
Clinicians in physical therapy and osteopathy practices usually include it in a thoracic spine battery. It sits alongside thoracic PA pressures, active range-of-motion testing, and neural tension tests. It also shows what active movement can’t: A patient may have full thoracic rotation but clearly restricted rib excursion at one segment.
Understanding the rib spring test takes a working knowledge of two articulations: The costovertebral joint and the costotransverse joint. Both connect the rib to the thoracic vertebra, and both contribute to the spring you feel during assessment.
When both joints are mobile, a PA force over the rib angle produces a compliant, springy response as the two joints move together. Restriction at either joint reduces that compliance. Joint inflammation, capsular tightening, or periarticular fibrosis can all cause it, and the clinician feels a “blocked” or “leathery” response.
Use the rib spring test when a patient’s symptoms suggest costovertebral or rib involvement rather than purely spinal pathology. It is not a screen for serious pathology. Red flags such as fracture risk, osteoporosis, malignancy, or recent trauma must be ruled out before you apply any spring test.
Presentations that warrant adding the rib spring test to an assessment include:
Practices working to physiotherapy compliance requirements need a consistent record of when and why this test was chosen. The reasoning behind test selection matters as much as the findings themselves.
The standard rib spring test for ribs 2-10 is performed with the patient prone and the clinician standing beside the table. It targets the rib angle, about 5-7 cm lateral to the spinous process. That is the bony prominence where the rib bends as it curves forward.
Position the patient prone, with the head resting in a face hole or turned to one side. The arms can rest alongside the body or hang off the edge of the table. Keep the thoracic spine neutral, neither flexed nor extended. A small pillow under the upper abdomen reduces lumbar hyperextension and improves comfort without changing thoracic position.
Sitting is the alternative when prone positioning is contraindicated or uncomfortable. The clinician stands behind the patient and applies PA pressure over the rib angle, on one side or both. Seated testing for ribs 2-10 takes more skill to stabilize the patient and judge spring quality, so prone is preferred for consistency.
Palpate the spinous process of the target segment, then move about 5-7 cm laterally to find the rib angle. Place the heel of one hand (pisiform contact) over the rib angle, with the other hand reinforcing on top. Keep both elbows extended and your shoulders directly above the contact point. That way your body weight generates the force, not your arms.
Apply a gentle, oscillating PA pressure perpendicular to the rib surface. At the rib angle, that means slightly medial and inferior rather than straight down. The rhythm should feel like a gentle spring, typically 2-3 cycles per second. Start with low amplitude (grade I-II in Maitland terms) to assess end-feel and pain response.
Increase to larger amplitudes only if the tissue allows it. Test each rib level separately, and compare the left and right sides.
Practices training new graduates should standardize the technique early. The angle of force, contact point, and oscillation rate all change what the clinician feels. Agreeing on these variables reduces inter-rater variability within the team.
Use the prone technique as your default for ribs 2-10. Place your reinforcing hand on top and lock your elbows. The force should come from a controlled lean of body weight, not from your arms. Arm-generated force reduces sensitivity and tires the clinician. Practice the oscillation rate on a firm surface before applying it to patients.
The first rib spring test uses a different technique because rib 1 sits beneath the clavicle and trapezius. That makes posterior access in prone difficult and often uncomfortable, so the seated position is standard for the first rib.
With the patient sitting upright, stand behind them or slightly to one side. Find the first rib by palpating posteriorly in the angle between the neck and the upper trapezius, just lateral to the C7/T1 junction. Its superior surface feels like a firm, rounded structure.
Apply gentle pressure over the superior surface of the first rib with the thumb or the radial border of the index finger. Direct it inferolaterally, down and away from the neck, rather than straight PA, to match the rib’s oblique orientation.
Judge spring quality the same way as for ribs 2-10: Note whether the rib yields with elastic compliance or resists. Pain referring into the arm or neck may point to a neurovascular component in the thoracic outlet region. That warrants a more cautious approach. Once that diagnosis is confirmed, thoracic outlet syndrome exercises often form part of the rehab plan.
First rib hypomobility is associated with restricted cervical lateral flexion, same-side neck pain, and, in some cases, thoracic outlet syndrome. Cross-check first rib findings against a cervical range of motion assessment before concluding that the rib is the main driver.
Interpreting the rib spring test means weighing two variables together: The quality of movement (spring quality) and the pain response. Neither gives the full clinical picture on its own.
A positive rib spring test indicates costovertebral or costotransverse joint hypomobility, or both, at the tested rib level. It shows up in two patterns. Either the rib resists without yielding (reduced or absent spring), or springing reproduces the patient’s familiar pain even when some movement is present. Either pattern, or both together, counts as positive.
A positive finding doesn’t confirm a specific diagnosis. It tells you the joint complex at that level is restricted or pain-sensitive, which supports directing manual therapy to that segment. Interpret it alongside the patient’s history, active movement findings, and any relevant imaging. Recording it in SOAP format keeps the history, tests, assessment, and plan in a logical order.
Most clinical references treat the rib spring test as pass/fail (normal vs. positive). A graded approach records more and makes reassessment comparisons meaningful. Adapting the Maitland grading convention to rib spring findings gives a practical 0-4 framework:
Laid out side by side, the scale shows how each grade steps toward a full elastic spring.
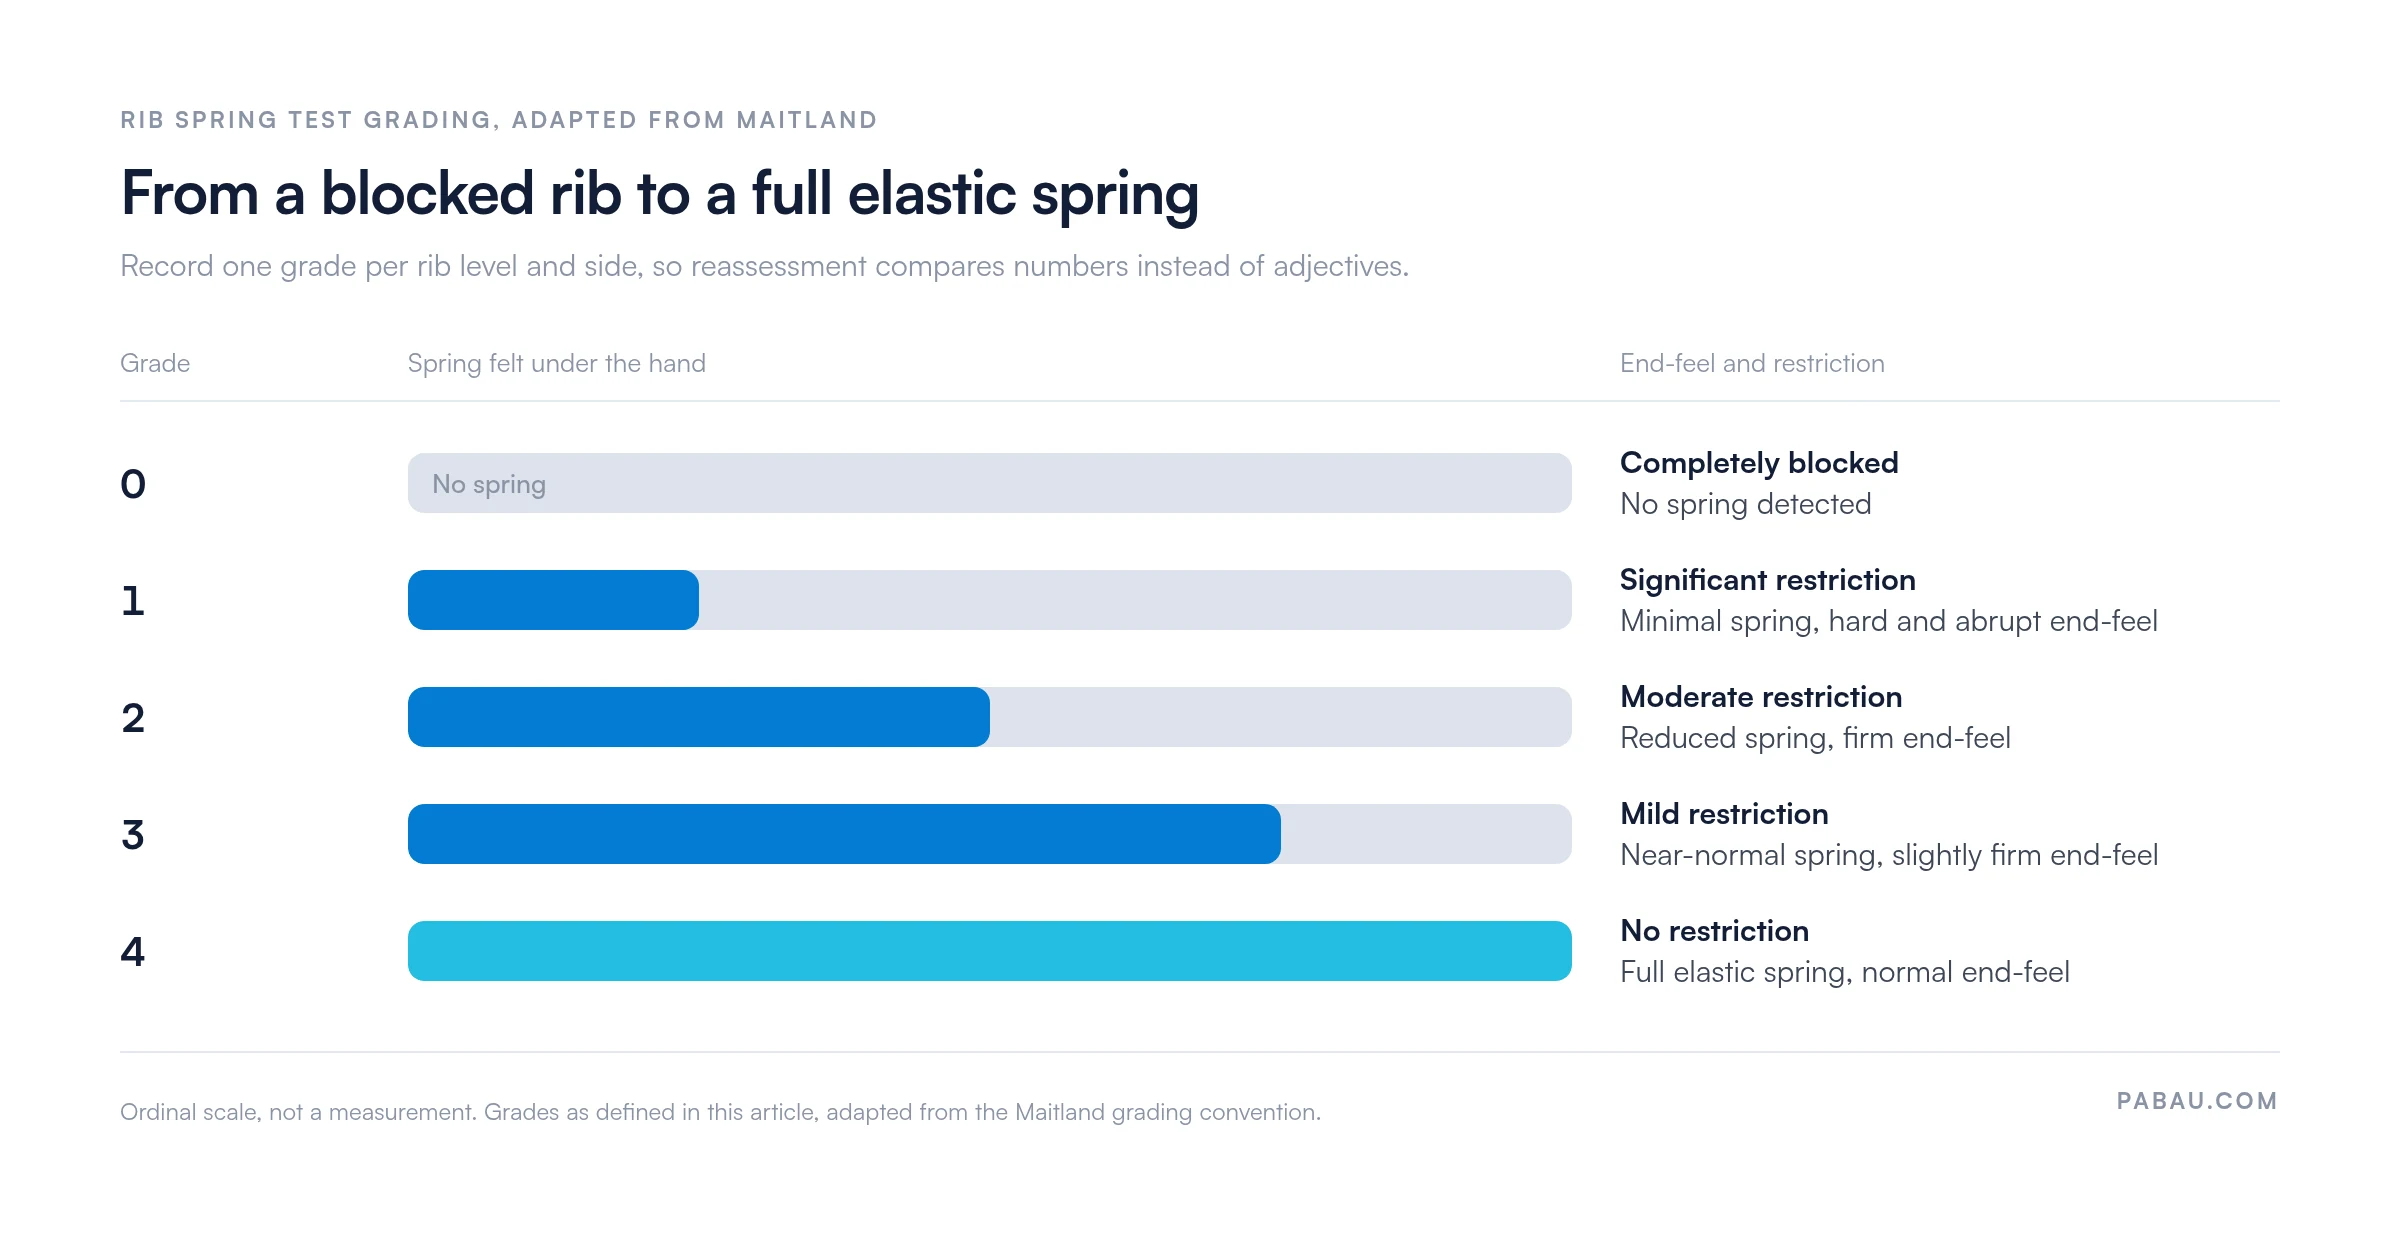
Record the rib level and side (for example, right rib 4, or “R4”), the grade, and whether pain was provoked and where. Note whether the finding changed with breathing, because some restrictions show more clearly on full expiration. Also note the patient position and any technique changes, so results can be repeated at reassessment.
Using digital assessment forms removes the transcription step between paper and the patient record. It also makes rib-level grids easy to standardize across a practice team.

The rib spring test is useful, but evidence-based manual therapy means knowing its limits. Published data on spring testing of thoracic joints suggest moderate inter-rater reliability at best. Rib-specific reliability studies are also sparse compared with research on lumbar or sacroiliac spring tests.
A systematic review of spinal palpation reliability (Seffinger et al., 2004) found that spinal motion palpation generally shows poor-to-moderate inter-rater reliability. Pain provocation tests performed better.
Rib-specific spring tests were not isolated in that review, and later work hasn’t produced large-sample reliability data for costovertebral assessment. So treat the rib spring test as a useful clinical indicator rather than a definitive diagnostic finding.
Key limitations to explain to patients and record in clinical notes:
Tracking adherence to home exercise programs for thoracic mobility is easier when baseline grades are recorded clearly. Reassessments can then compare numbers instead of subjective descriptions.
The rib spring test adds the most when it sits inside a structured thoracic assessment rather than standing alone. A logical sequence for a physical therapy or osteopathic assessment looks like this:
A standardized rib assessment template saves documentation time at step six. It also stops findings from earlier steps slipping out of the note.
Run through the spring test battery in a consistent anatomical direction: Start at T1/rib 1 and work down to T10/rib 10. This prevents the common error of skipping levels after finding a positive result early. Look at the wider picture of rib mobility, too. A cluster of restricted ribs from T4 to T7 often points to postural or thoracic cage loading patterns. Those patterns inform treatment beyond single-segment mobilization.
Many practices still record spring test findings as free text or on a paper body chart, then type them up later. A note like “R4 a bit stiff” is hard to compare at reassessment. A second clinician grading the same rib has no baseline to work from.
Pabau, the practice management platform we build, lets you create a rib spring test grading grid once and reuse it at every relevant visit. Patient record management in Pabau stores each grade against the patient, next to the treatment note and plan. If you’re weighing up systems, our guide to physiotherapy practice management software compares the options.
The result is a reassessment that compares like with like. You can see that right rib 4 moved from grade 2 to grade 3 between visits, and you can show the patient that progress.


Pabau lets physical therapists and osteopaths record spring test grades, compare them between visits, and link results to treatment plans in the same patient record.

Rib hypomobility is easy to overlook in thoracic pain because only hands-on testing finds it. The rib spring test is a low-tech screen that adds little time to a standard thoracic assessment sequence.
Its value rests on consistent technique, a graded record, and honesty about its reliability. Treat a positive finding as a reason to look closer at that segment. Then let the reassessment grades tell you whether treatment is working.
Book a demo to see how Pabau turns rib spring test grades into records you can compare at every reassessment.

Need to measure what the rib spring test can’t? Range of motion assessment explains how to measure and record active and passive movement in practice.
Recording pain provocation alongside spring quality? Pain assessment scales shows how to choose a scale and document it consistently.
First rib findings pointing to the thoracic outlet? Thoracic outlet syndrome exercises sets out a phased rehab plan.
Looking for another graded manual test? Manual muscle testing covers grades, technique, and clinical use.
Managing a physical therapy practice and want to standardize assessment records? Physical therapy compliance covers the documentation and governance standards that apply to manual therapy records.
The rib spring test evaluates mobility at the costovertebral and costotransverse joints to find rib hypomobility. Clinicians use it for posterior thoracic pain, breathing-related chest tightness, or thoracic wall restriction. It shows whether manual therapy aimed at a specific rib level is indicated.
A positive rib spring test means the rib resists springing, the patient’s familiar pain is reproduced, or both. It suggests hypomobility or irritability at that rib level and supports a decision to mobilize or manipulate it. It doesn’t identify the underlying cause of the restriction.
Ribs 2-10 are tested prone, with posterior-to-anterior pressure over the rib angle about 5-7 cm lateral to the spinous process. The first rib is tested seated because it sits beneath the clavicle and upper trapezius. Force goes inferolaterally over its superior surface, using the thumb or the radial border of the index finger.
Its reliability is limited, and rib-specific data are sparse. Systematic reviews show that spinal motion palpation generally has poor-to-moderate inter-rater reliability, with pain provocation tests performing better. Practices can improve consistency by standardizing hand placement, force direction, and oscillation rate, and by agreeing on reference end-feels.
Yes. Sitting is the standard position for the first rib, and it’s an option for ribs 2-10 when lying prone is contraindicated or uncomfortable. The seated technique takes more skill to stabilize the patient and isolate rib movement, so prone stays the default for ribs 2-10.
Record the rib level and side (for example, right rib 4, or “R4”) and a 0-4 mobility grade adapted from Maitland conventions. Note whether familiar pain was reproduced and where. Add the patient position and any technique changes. A shared digital assessment template keeps grades comparable across clinicians and between visits.