Treatment summary
A treatment summary is a written record of what care was delivered during an epi...

1
Last Updated: Oct 16, 2026
A nursing process worksheet is a structured form that walks you through the five ADPIE steps: Assessment, Diagnosis, Planning, Implementation, and Evaluation. You record patient data, write a nursing diagnosis, set measurable goals, log each intervention, and check the results against those goals.
Nursing students use it to show their clinical reasoning on rotations, and practicing nurses use it to build individualized care plans. Below, you’ll find a free downloadable worksheet, a section-by-section guide, and a filled-out example for a post-op knee replacement patient.
A one-page form with fields for patient identification, allergies, isolation status, admitting diagnosis, and surgery. It also has space for the situation you’re reporting on and the patient’s background, plus pre-shift directions for reviewing notes, medications, and lab results.
Download template
A nursing process worksheet documents the five ADPIE steps: Assessment, Diagnosis, Planning, Implementation, and Evaluation.
Record assessment data in S/O format and write each nursing diagnosis as a NANDA-I statement in PES or PE format.
Set SMART goals in Planning, because the Evaluation step checks the patient’s result against each goal.
When a goal is only partially met, record the barrier and revise the plan instead of starting a new one.
Practice management software like Pabau keeps assessments, care plans, and evaluations together with its clinical record features. Every nurse on shift sees the latest plan.
A nursing process worksheet is a form built around the five-step nursing process. That clinical decision-making framework is taught in accredited nursing programs and tested on the NCLEX. Each section matches one ADPIE phase, so you move from assessment to evaluation in order.
For nursing students, it turns theory into documentation and removes the “what comes next?” guesswork during a busy clinical shift. For practicing nurses, it’s a quick check that the care plan is complete. It also serves as evidence of clinical reasoning during audits or peer reviews.
Nursing schools often require completed worksheets as proof of clinical competency. In practice settings, they help most where staff turnover is high or a complex patient needs a clear handoff.
ADPIE stands for Assessment, Diagnosis, Planning, Implementation, and Evaluation. The steps form a cycle. You assess the patient, name the problem, plan interventions, carry them out, and check whether the patient improved. If not, you loop back and adjust the plan.
Assessment is the foundation of the nursing process, and it covers two types of data. Subjective data is what the patient tells you about symptoms, feelings, and concerns. Objective data is what you observe or measure: vital signs, lab results, physical findings, imaging, and medication history.
Label subjective findings “S” and objective findings “O” so other nurses can read your worksheet at a glance. Example: S: “Patient reports sharp pain in right knee when standing.” O: Right knee swelling present, range of motion limited to 90 degrees.
Once you’ve gathered assessment data, identify actual or potential patient problems using NANDA International (NANDA-I) approved nursing diagnoses. NANDA-I publishes a taxonomy of over 200 diagnoses, which keeps your documentation consistent and auditable. Our nursing diagnosis handbook is a handy reference while you choose a label.
Write the statement in PES format, which stands for Problem, Etiology, and Signs/Symptoms. The pattern is “[NANDA-I diagnosis] related to [cause] as evidenced by [supporting data].”
For example, you might write “Acute pain related to post-operative tissue trauma as evidenced by patient report of 7/10 pain and facial grimacing.”
For risk diagnoses, use PE format and leave out the signs and symptoms: “Risk for falls related to impaired balance.”
For each nursing diagnosis, set short-term and long-term goals using the SMART framework: Specific, Measurable, Achievable, Relevant, and Time-bound. Goals describe what the patient will do or what will improve, not what the nurse will do.
Example: Short-term goal (24 hours): Patient will report pain ≤4/10 after analgesic administration. Long-term goal (by discharge): Patient will walk 150 feet without an assistive device and report pain ≤3/10 at rest.
Interventions are the specific nursing actions that help the patient reach each goal. List every intervention with its rationale, meaning the evidence or clinical reasoning behind it. If you’re choosing actions for a new diagnosis, a list of nursing interventions gives you a starting point.
Ice reduces inflammation and edema after surgery. The intervention might read “Ice pack to right knee, 15 minutes every 2 hours, first 48 post-op hours.”
Digital records can also show whether each intervention was completed and by whom. That’s much harder to prove on paper.
At each evaluation point, such as every shift, daily, or at discharge, reassess the patient against the goals. Document whether each goal was met, partially met, or not met. If a goal wasn’t met, note the barrier and revise the care plan so it keeps pace with the patient’s condition.
A complete worksheet covers all five ADPIE phases, plus patient identification at the top. The downloadable form handles identification, the situation you’re reporting on, and the patient’s background. Use the table below as your checklist for the ADPIE sections that follow.
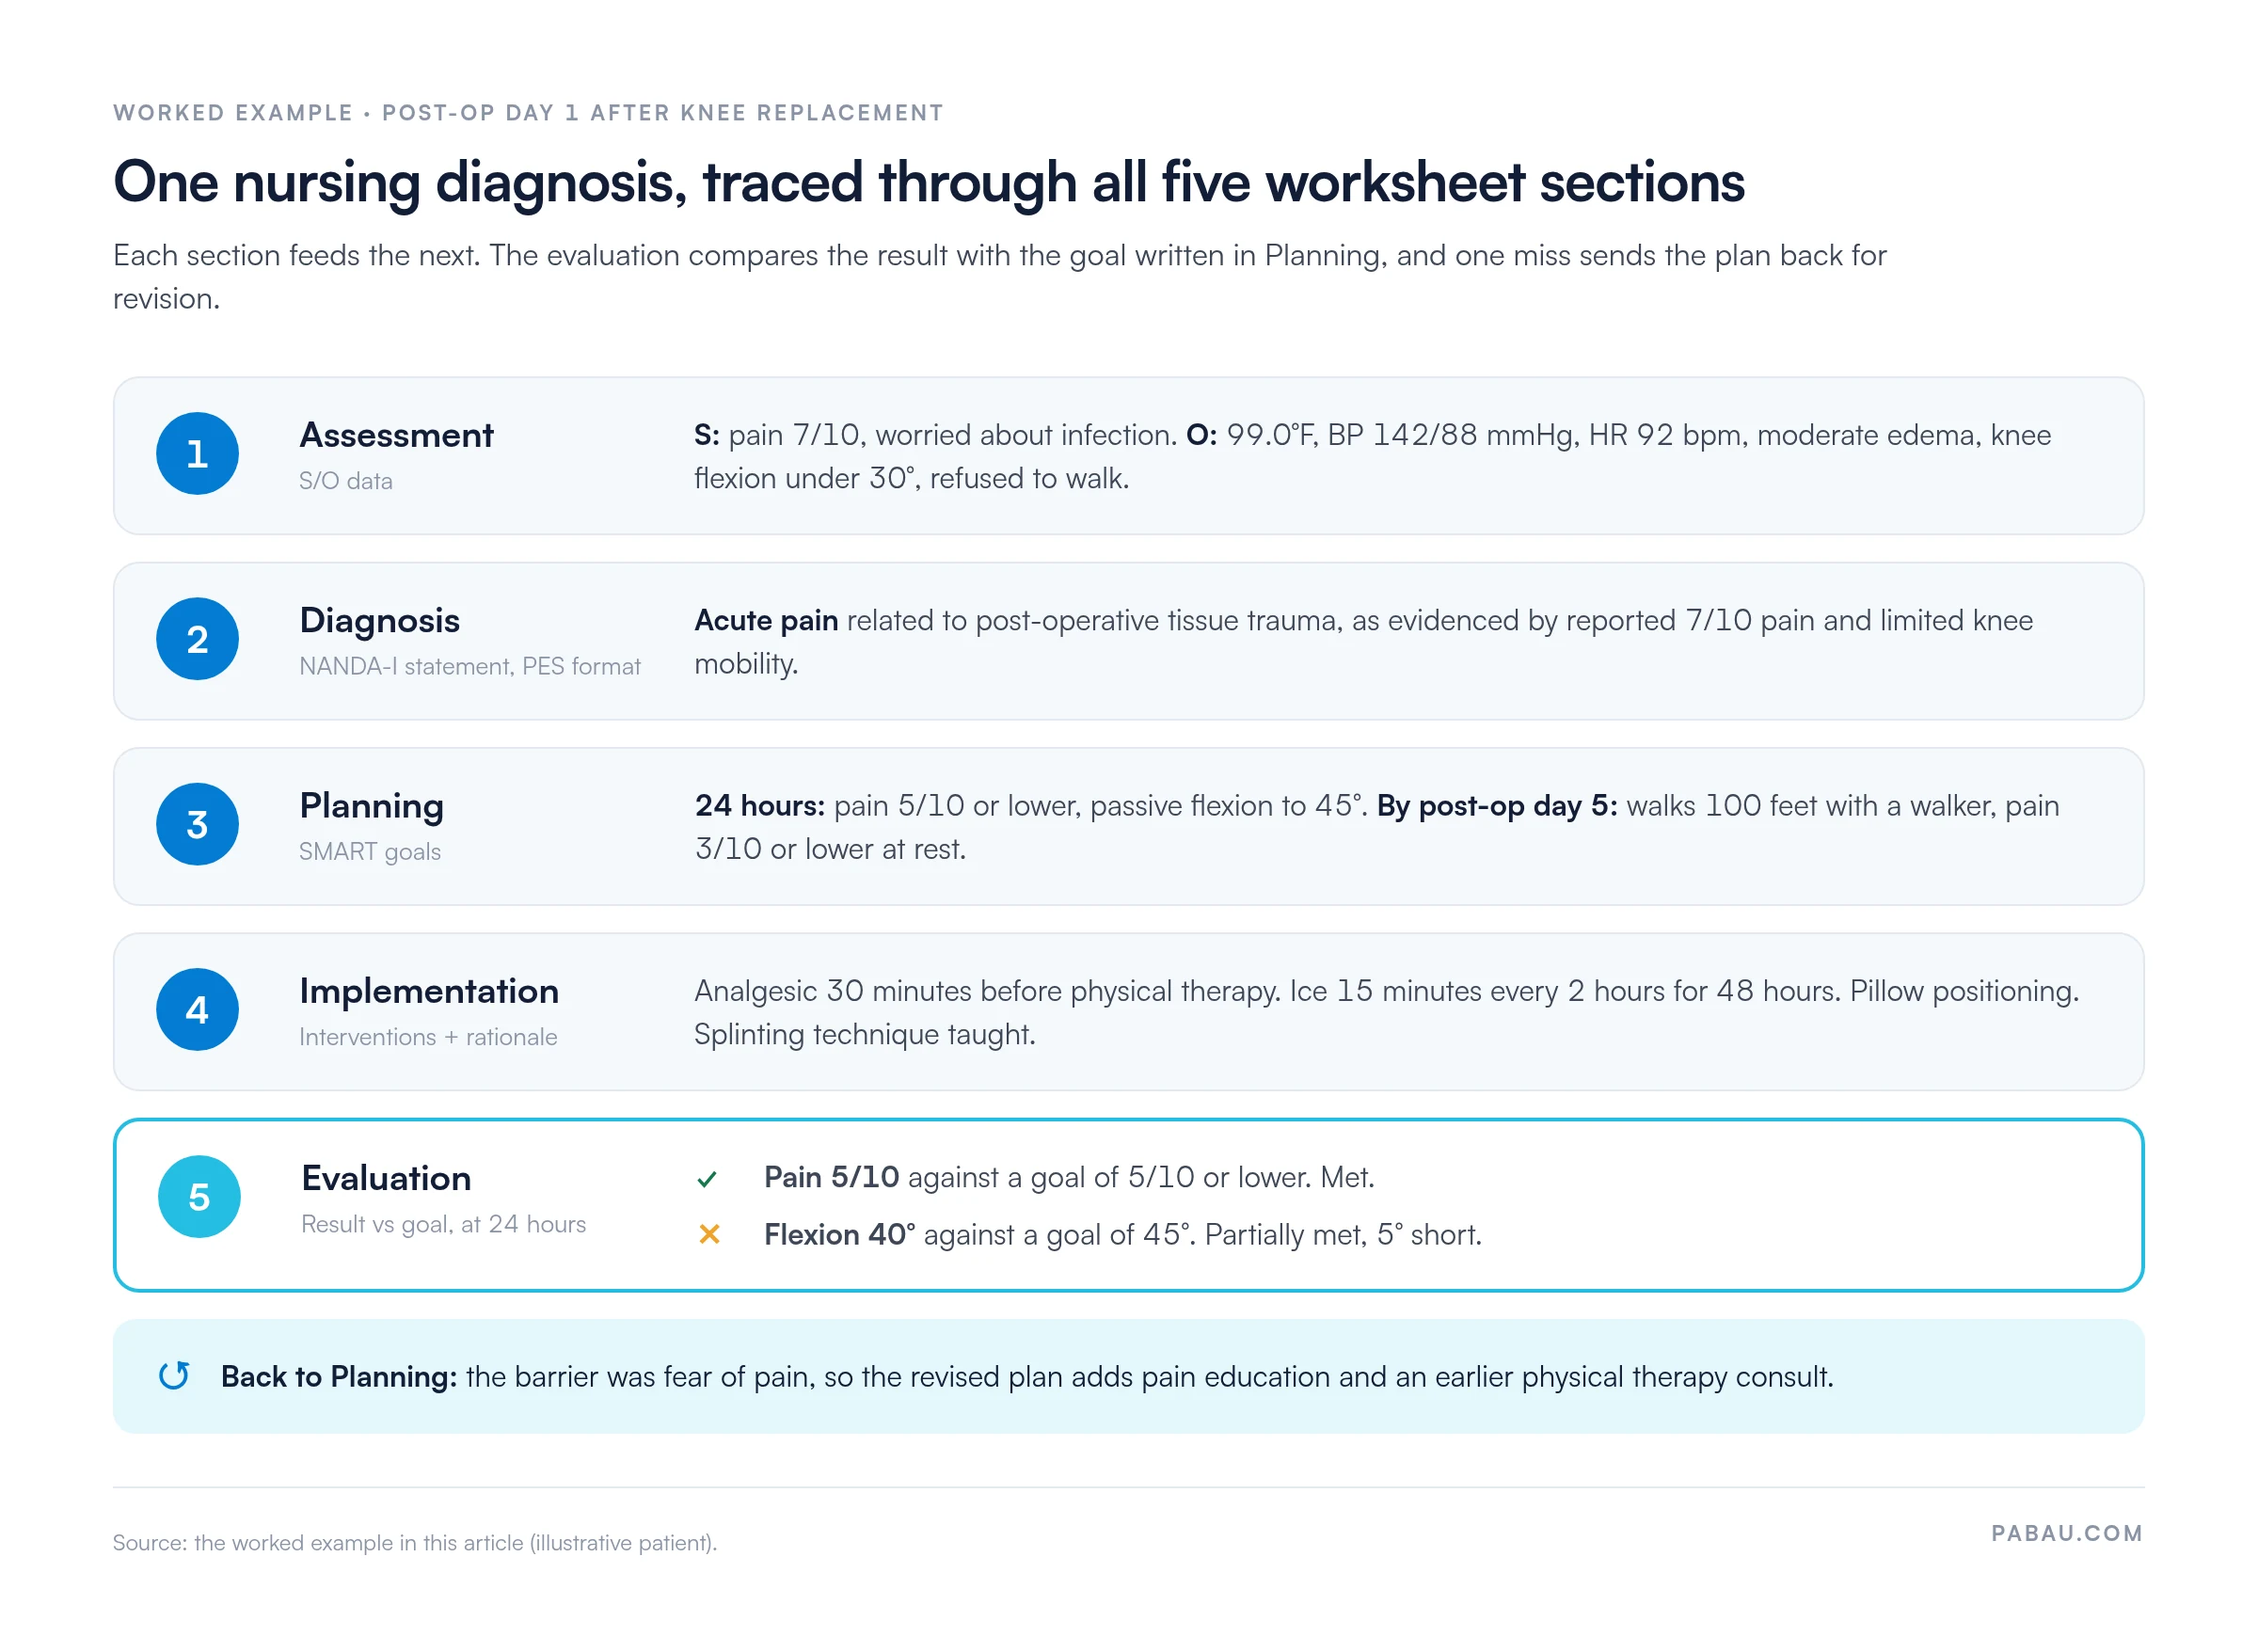
Here’s a completed worksheet for a patient with acute post-operative pain, worked through ADPIE in order.
Patient: Maria Garcia, 68, post-op day 1 after knee replacement surgery.
Assessment: S: “My knee is killing me. I rate it 7 out of 10. I’m worried about infection.” O: Temperature 99.0°F (37.2°C), BP 142/88 mmHg, HR 92 bpm, right knee dressing clean and dry, wound margins approximated. Moderate edema noted, passive knee flexion under 30 degrees, and ambulation refused due to pain.
Nursing diagnosis: Acute pain related to post-operative tissue trauma as evidenced by patient report of 7/10 pain and limited knee mobility.
Patient goals: Short-term (24 hours): Patient will report pain ≤5/10 and perform passive knee flexion to 45 degrees. Long-term (by post-op day 5): Patient will walk 100 feet with a walker and report pain ≤3/10 at rest.
Nursing interventions:
Evaluation (at 24 hours): Patient reported pain 5/10 after the analgesic and reached passive knee flexion of 40 degrees, 5 degrees short of the goal. Barrier: the patient was reluctant to move because of fear of pain. Revision: more pain management education and reassurance, plus an earlier physical therapy consult for mobility help.
Laid out stage by stage, the example shows how the evaluation checks each result against the goal set in Planning.
The worksheet works best when you fill it in during the shift rather than after it ends. That’s the same rule behind all good nursing documentation. Here’s how to fit it into your workflow.
On paper, the nursing process lives on a clipboard. The worksheet gets filled out mid-shift, copied into the chart later, and handed over verbally at shift change. Each copy is another chance for a vital sign or a revised goal to go missing.
Practice management software like Pabau moves the same five sections into the patient’s file. You can build the worksheet as a digital form, and intake forms for nurses collect the patient’s history before the visit. Assessment data then sits beside treatment notes and appointment history in structured clinical records.
When an evaluation shows a goal wasn’t met, you update the plan in the same record. The next nurse on shift sees the revision instead of an old printout. Pabau Scribe, our AI scribe, can also draft notes from your consultations, so you spend less time typing between interventions.

Pabau turns your nursing process worksheet into a digital form that saves to the patient record. Assessments, goals, and evaluations stay together, so every handoff starts from the latest plan.

The worksheet proves its value at the evaluation step. A SMART goal can be checked against a number at 24 hours, and a miss tells you which part of the plan to change. A vague goal like “improve mobility” gives you nothing to compare.
Start with one patient on your next shift. Fill in the assessment as you go, write one PES statement, and set goals you can measure before the shift ends. It costs a few extra minutes up front, and you get them back at handoff and at every evaluation.
Paper works for a student placement. A practice where several nurses share patients needs the plan in one place that updates for everyone. Book a demo to see how Pabau keeps assessments, care plans, and evaluations in each patient’s record.

Turning the worksheet into a full care plan? Plan of care: definition and components explains what a formal plan of care contains and how to write one.
Need a deeper assessment form? Nursing assessments template gives you a structured head-to-toe assessment to feed the first ADPIE step.
Setting goals your evaluation can measure? SMART treatment plan template includes goal and objective examples you can adapt for the Planning section.
Looking for standard outcome language? Nursing outcomes classification list helps you word measurable outcomes for the Evaluation step.
Handing the patient over at shift change? Nursing handoff report structures the handover so the next nurse picks up the current plan.
A nursing process worksheet is a structured form that guides nurses through the five ADPIE steps: Assessment, Diagnosis, Planning, Implementation, and Evaluation. It organizes patient data, problems, goals, interventions, and outcomes on one page.
The five steps are Assessment, Diagnosis, Planning, Implementation, and Evaluation. You gather subjective and objective data, then name the problem with a NANDA-I diagnosis. Next, you set SMART goals, carry out and document interventions, and check whether each goal was met.
Work through the sections in order. Record patient identification, then subjective and objective assessment data. Write a NANDA-I diagnosis in PES or PE format, set short- and long-term SMART goals, and list interventions with rationales. Finally, evaluate each goal at shift change or a set interval, and revise the plan if needed.
ADPIE is an acronym for the five-step nursing process: Assess, Diagnose, Plan, Implement, and Evaluate. It’s the core clinical reasoning model taught in accredited nursing programs and tested on the NCLEX.
A nursing care plan is the formal document built with the nursing process. It often runs to several pages and is stored in the patient’s chart as a legal record. A nursing process worksheet is a shorter form that guides you through the five-step thinking. The completed worksheet often feeds the formal care plan or a student assignment.
Yes. The nursing process worksheet on this page is a free PDF download. Print it and complete it by hand during your clinical rotation, then keep the finished copies in your clinical portfolio.
The assessment section holds subjective data, meaning what the patient reports about symptoms, feelings, and concerns. It also holds objective data: vital signs, lab results, exam findings, imaging, and medication history. Label each finding S or O so other clinicians can see its source at a glance.
Use a NANDA-I approved diagnosis and write a full PES statement (Problem + Etiology + Signs/Symptoms). For example: “Acute pain related to post-operative tissue trauma as evidenced by patient report of 7/10 pain.” For risk diagnoses, use PE format without signs or symptoms: “Risk for falls related to impaired balance.” Always take the label from the NANDA-I list rather than inventing one.