Fun journal prompts for adults
Fun journal prompts for adults are short, open-ended questions that make sitting...

Last Updated: Oct 6, 2026
A bullet exit wound chart sets out the features that separate an exit wound from an entrance wound at the bedside. Entrance wounds carry an abrasion collar and inverted margins. Exit wounds have neither, and they are usually larger, everted, and stellate or slit-like.
Soot, searing, and stippling show up at the entrance only, which is what narrows the firing distance. This page covers those features, a caliber-by-caliber size reference, and the ballistics behind large rifle exits. It also sets out a five-step documentation sequence and the ICD-10-CM codes by wound site.

Entrance wounds carry an abrasion collar and inverted margins, and exit wounds carry neither.
Exit wounds are usually larger, everted, and stellate or irregular, especially with high-velocity rifle rounds.
Soot, searing, and stippling appear only at the entrance, so they place the muzzle rather than describe the exit.
Record wound dimensions in millimeters at first assessment, before swelling or manipulation changes the margins.
Practice management software like Pabau stores structured wound assessments in the patient record, so the findings stay retrievable for later review.
A printable recording form for logging wound assessment values at the bedside. It carries a reference-values table with source and date-checked fields, an approval line, a timed recording log, and a notes page.
Download templateThe most common documentation error in penetrating trauma is calling the exit the entry. Peer-reviewed forensic pathology research published in PubMed Central reports that entrance holes in skin vary in size with caliber, range, and tissue. Several morphological features still separate them from exits reliably.
Entrance wounds form as the bullet first penetrates skin. The projectile pushes tissue inward, which produces a predictable set of features reflecting both the bullet’s diameter and the firing distance.
Exit wounds reflect how much kinetic energy the bullet transferred on the way through. The projectile leaves with deformed or fragmented geometry and pushes tissue outward. Pathology Outlines notes that exits are typically larger, stellate or irregular, and free of the abrasion collar seen at entry sites.
The table below consolidates these features for bedside or autopsy reference. Recording them the same way at every encounter takes structured fields rather than free text, which is what patient intake software provides.

Firing distance is the second axis of the reference. The same caliber produces very different entrance features depending on how far the muzzle sat from skin at discharge. The University of Utah WebPath forensic tutorial describes three main range categories: contact, intermediate, and distant.
Forensic pathology texts commonly split contact further into contact and near-contact, and the table below follows that four-tier version. Range-of-fire features appear at the entrance wound only, because firing distance does not change exit morphology.
Range-of-fire classification feeds both the forensic investigation and the clinical trajectory assessment. Record what you see at each entrance wound and leave the distance conclusion to forensic pathology.
Caliber affects exit wound size, but not in a straight line. Bullet construction, velocity, intermediate barriers, and anatomical location all shape the final morphology. The figures below are approximate ranges from ballistics literature, and they work as a clinical reference rather than a formula.
Plotted on one scale, the rifle rounds separate from the handgun rounds by a wide margin, and entrance size runs in the opposite direction.
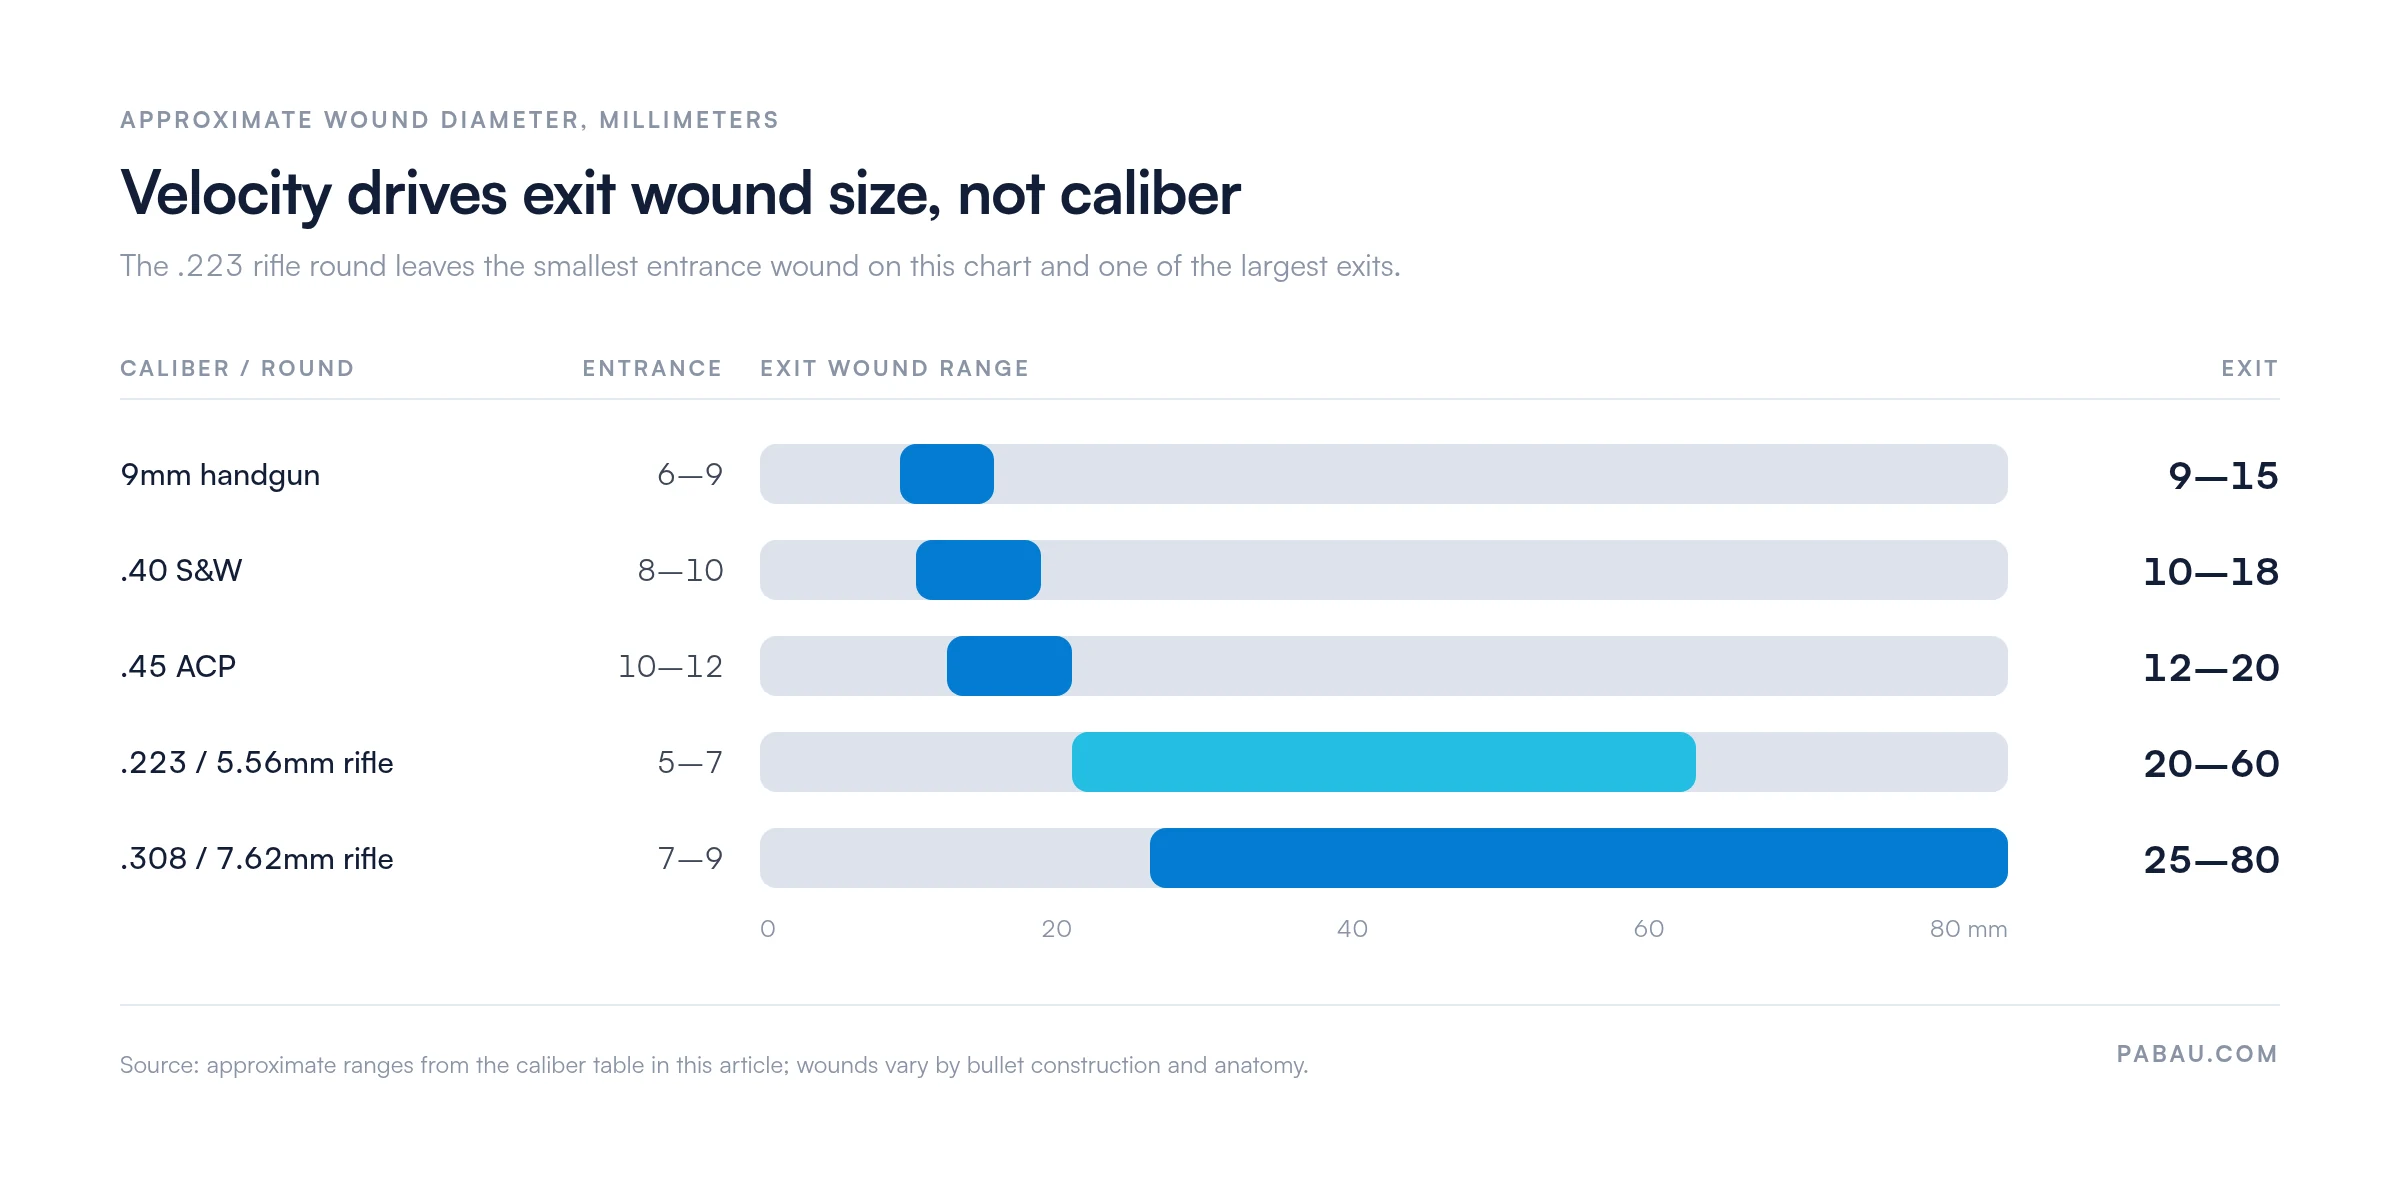
Important caveat: These figures are approximate and drawn from ballistics research literature. Actual wound dimensions depend on bullet construction (hollow point vs full metal jacket), intermediate barriers (clothing, bone), and anatomical site. No caliber-to-wound-size correlation should be used as a standalone forensic determination.
Cavitation explains exit wound size, particularly for high-velocity rifle rounds. The University of Utah WebPath tutorial on gunshot wound tissue injury distinguishes two cavitation mechanisms behind the damage pattern.
Tissue elasticity decides how well a structure tolerates temporary cavitation. Elastic tissues such as lung and skeletal muscle handle it better than the liver, spleen, and brain. That is why a rifle round through the abdomen can cause catastrophic organ damage while the permanent crush track looks small.
Document wound dimensions in millimeters at the time of initial assessment, before wound margins change with swelling or manipulation. Note the clock-face position of the abrasion collar relative to the wound center, as this can help forensic pathologists determine bullet trajectory angle.
Documenting a gunshot wound asks for clinical precision and legal awareness at once. Most US states have mandatory reporting requirements for penetrating trauma, so follow the obligations that apply in your jurisdiction. Record the wounds systematically at first evaluation, before manipulation changes how they look.
Use the following five-step sequence when completing a gunshot wound assessment record. Each step can sit as a required field in your medical records management system, which lowers the odds of an omission on a busy shift.

ICD-10-CM coding for gunshot wounds turns on wound type, anatomical location, and episode of care. The table below covers common reference codes and is not exhaustive. Confirm current codes against the CDC National Center for Health Statistics ICD-10-CM resources for each fiscal year, since codes are revised annually.
Accurate, ICD-10-aligned records are easier to keep when the documentation system is built for structured data capture. Consistent templates cut coding errors at source, which matters most for teams handling high volumes of trauma paperwork.

This reference suits practitioners who meet penetrating trauma in clinical, educational, or forensic settings. The structured format carries across several specialties.
The wound description is one part of a wider workup. Our emergency nursing assessment template covers the rest of the initial evaluation, and our guide to nursing documentation sets out how those entries should read.
Free-text wound descriptions drift between clinicians, shifts, and documentation reviews. A standardized entry and exit record answers three clinical risks.
Standardized wording also makes a form easier to digitize later. Our overview of medical forms covers which paper records are worth converting first.
A paper chart works at the bedside and then stops working. The sheet gets scanned, filed, or mislaid, and the next clinician reads a narrative that may never mention the abrasion collar.
Practice management software like Pabau replaces that step with structured fields inside the patient record. Wound count, dimensions, margin character, abrasion collar status, and range indicators each get their own field, so a required entry cannot be skipped. Pabau Scribe, our AI scribe, drafts the surrounding narrative while the clinician stays with the patient.
The record stays searchable rather than archived. When a case returns for forensic or legal review months later, the assessment is retrievable by patient and by date. An audit trail shows who recorded what.

Pabau helps emergency and forensic nursing teams capture structured wound assessments and store them securely. Records stay retrievable for clinical review or reporting in one HIPAA-aligned platform.

Entrance and exit wounds are told apart by the abrasion collar first and by size last. Size is the feature clinicians reach for and the one that misleads most often. A .223 round leaves the smallest entrance on this chart and one of the largest exits.
Where the classification is uncertain, write down the features and leave the conclusion to forensic pathology. A note describing an everted, stellate defect with no abrasion collar still holds up a year later. A bare “exit wound” entry gives a reviewer no way to check the reasoning.
Print the chart for the trauma bay, then decide where those findings live afterward. Book a demo to see how Pabau turns a wound assessment into a structured record your team can retrieve on request.

Need the wider initial workup? Emergency nursing assessment walks through the full ED assessment sequence that surrounds a wound examination.
Documenting burns as well as penetrating trauma? Body burn percentage chart gives you the body-surface mapping reference for burn extent.
Writing up a prehospital handover? EMS chart narrative shows how to structure the narrative section of a run report.
Training new field responders? EMT patient assessment sets out the assessment order EMTs follow on scene.
Comparing documentation systems? Clinical documentation software reviews what to look for before moving records off paper.
An exit wound is typically larger, more irregular, and lacks the abrasion collar that characterizes entrance wounds. Exit wounds often have everted margins and a stellate or slit-like shape. Entrance wounds tend to be round or oval with inverted margins. They also carry an abrasion ring left by the bullet scraping the skin edge on entry.
Forensic pathologists combine several wound morphology criteria. They check the abrasion collar, wound size relative to caliber, margin direction, and wound shape. They also look for soot or stippling at the entrance site. The abrasion collar is the single most reliable distinguishing feature. Cases involving atypical presentation, such as a supported exit wound against a firm surface, require additional contextual analysis.
Yes, but caliber is not the only factor. High-velocity rifle rounds such as .223/5.56mm produce much larger exit wounds than handgun rounds of similar diameter. Higher velocity drives greater temporary cavitation and tissue disruption. Bullet construction also matters: hollow-point rounds expand on entry and transfer more energy to tissue than full metal jacket rounds of the same caliber.
An abrasion collar is a ring of abraded skin around the entrance wound margin. The bullet drags against the skin surface as it enters, which leaves the ring. It is present at virtually all entrance wounds and absent at exit wounds. That makes it the primary criterion for telling entry from exit.