GLP-1 diet plan
A GLP-1 diet plan is a structured eating framework for patients taking semagluti...

2
Last Updated: Oct 13, 2026

A knee examination runs in four stages: inspection, palpation, range of motion, and special tests.
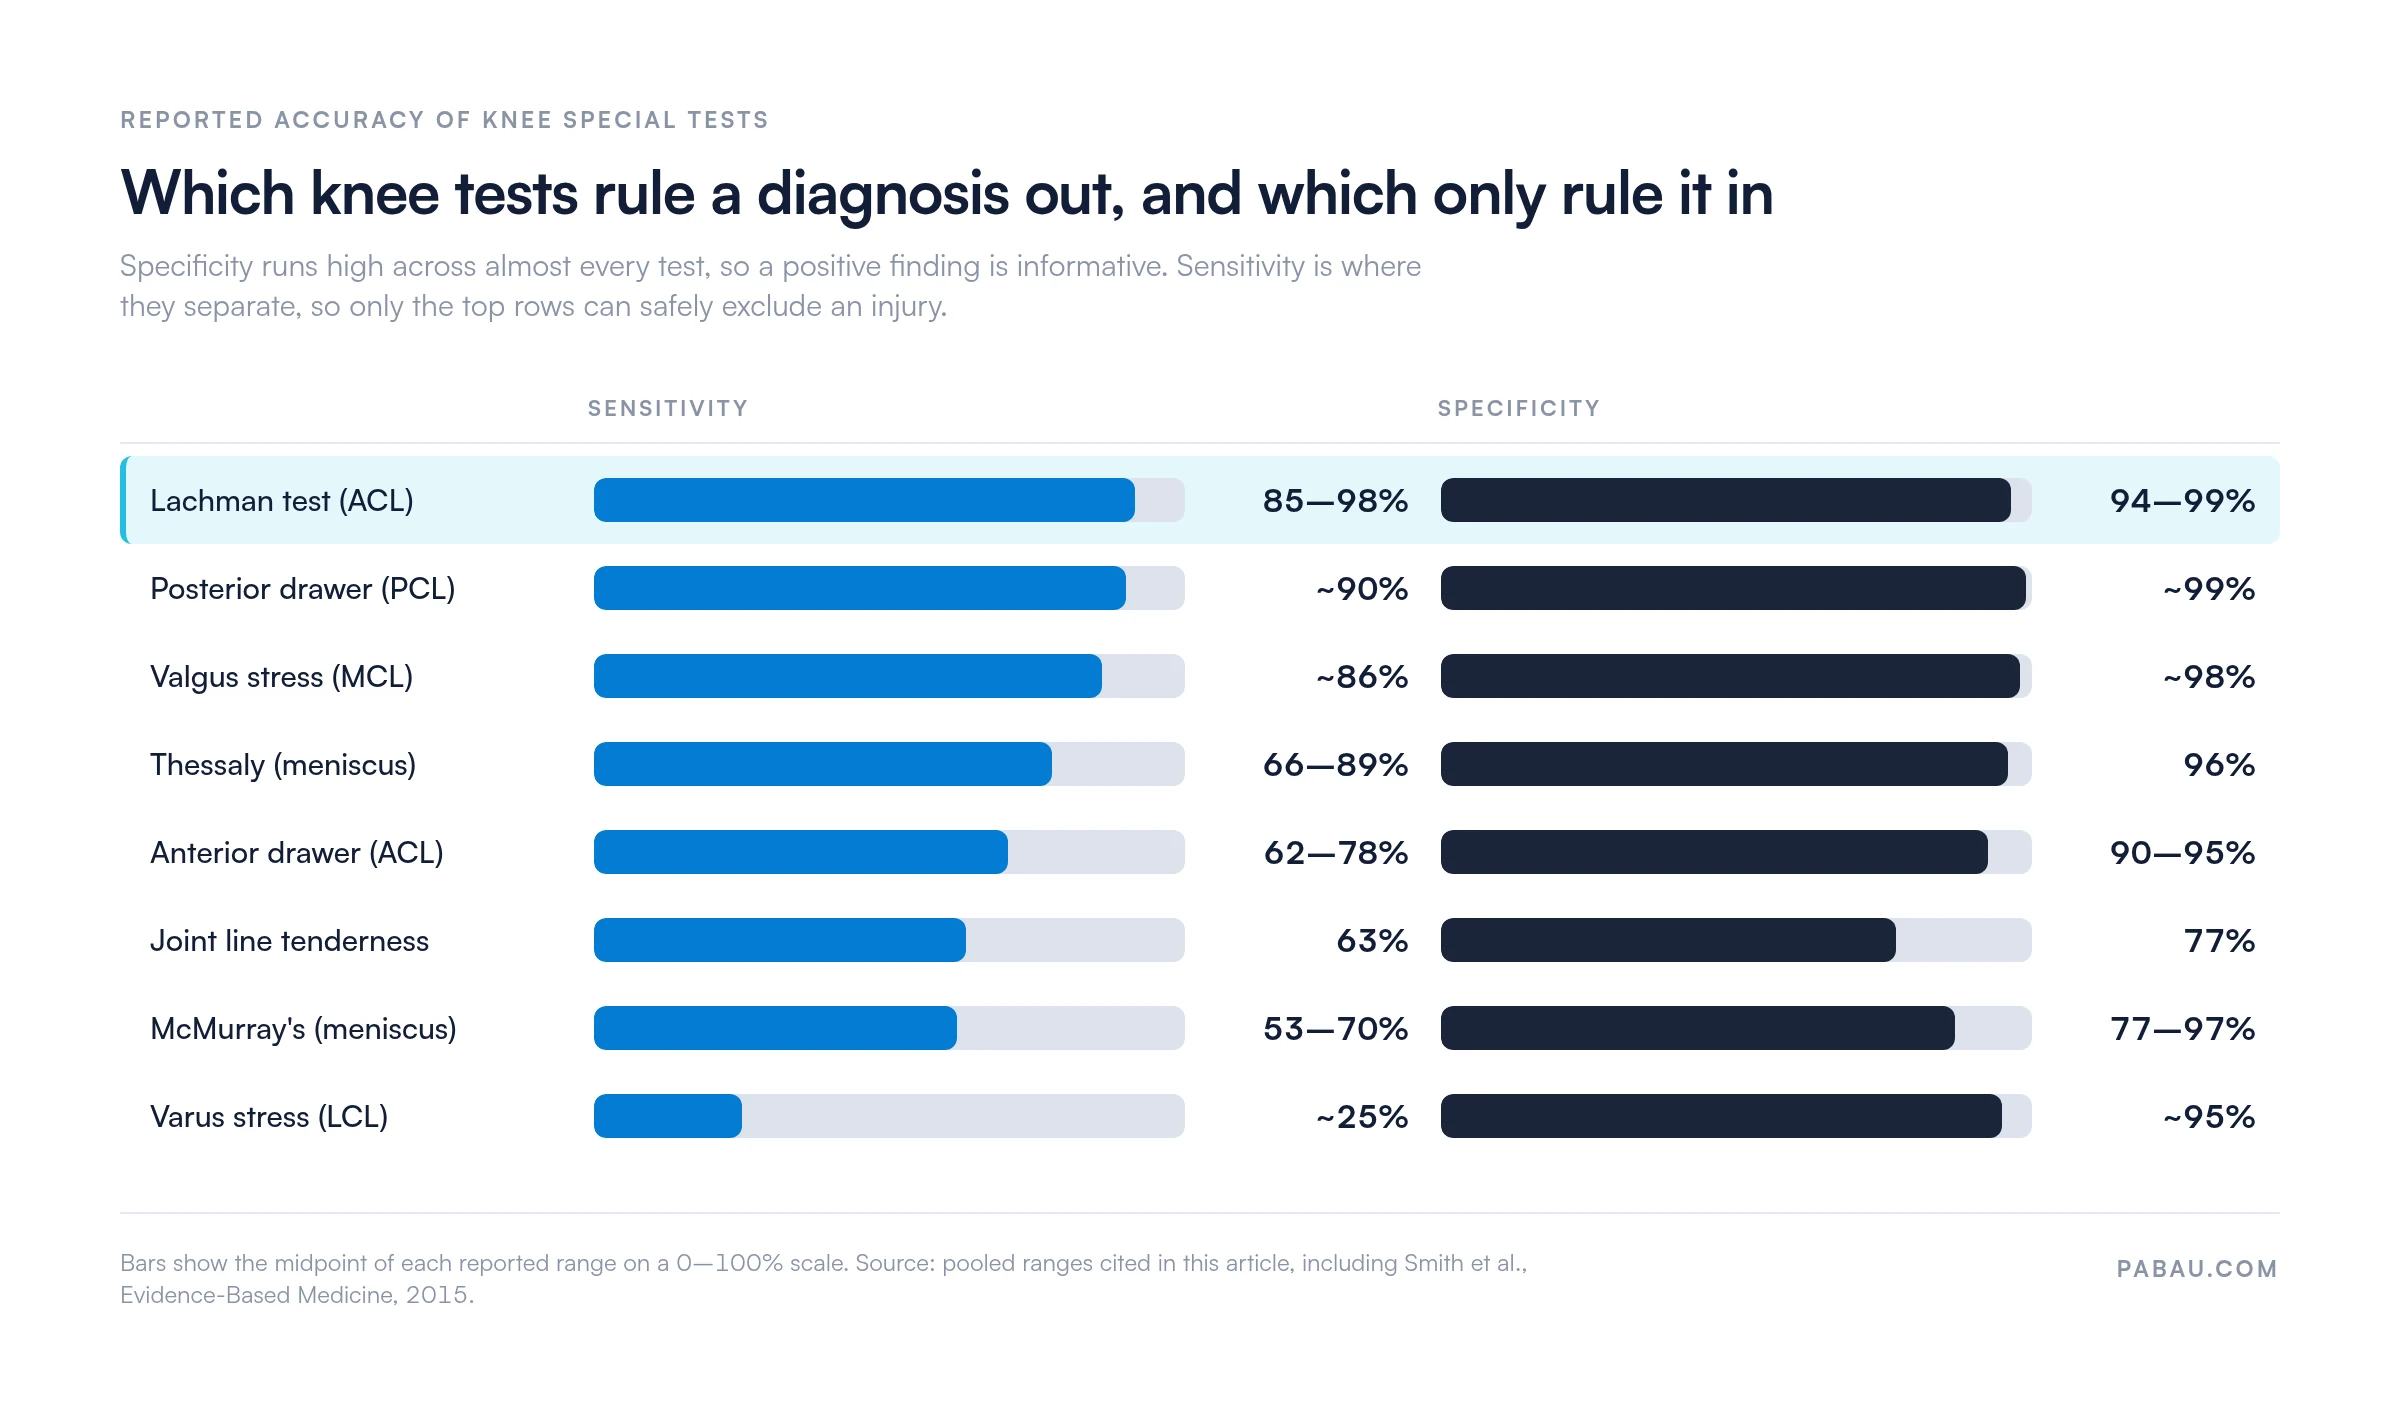
The Lachman test detects 85 to 98% of ACL tears, against 62 to 78% for the anterior drawer test.
Specificity is high across almost every knee special test, so a positive finding is worth acting on.
The Ottawa Knee Rules decide when an acute knee injury needs an X-ray, and MRI follows a clear film.
Structured templates in Pabau keep each stage’s findings retrievable at the follow-up visit.
Knee injuries make up a large share of musculoskeletal presentations in primary care, physical therapy, and orthopedic settings. A systematic knee examination narrows the differential, guides the imaging decision, and shapes management before a single scan is ordered.
This guide walks through the sequence in clinical order, from history-taking to special tests. It also sets out the accuracy data behind each test, so you know which findings can exclude an injury and which can only confirm one.
Whether you work in a physical therapy practice, a sports medicine setting, or general practice, a reliable framework reduces missed diagnoses. The sections below cover each stage of the knee examination in clinical detail, with technique notes and diagnostic accuracy where the evidence supports it.
A knee examination is a structured clinical assessment of the knee joint’s integrity, function, and pathology. It follows a four-stage sequence: inspection, palpation, range of motion testing, and special tests. Each stage narrows the differential before special tests confirm a working diagnosis.
A neck examination runs through the same four stages, with a red-flag screen placed ahead of inspection. Its final stage pairs neurological testing with provocative tests such as the Spurling test.
The examination applies across clinical contexts, from acute sports injury to long-term osteoarthritis monitoring. Recording findings the same way at every visit is what makes them comparable, which an EMR built for rehab handles with fixed templates. A standardized approach also cuts inter-examiner variability, which matters when several practitioners assess the same patient over time.
History guides the physical examination. Without it, you end up examining every structure instead of prioritizing the likely pathology. Five questions carry most of the diagnostic yield.
Instability during pivoting or deceleration points toward ACL pathology. Locking that resolves with a twisting movement suggests a bucket-handle meniscal tear. Diffuse morning stiffness lasting more than 30 minutes raises concern for inflammatory arthropathy.
These flags decide which special tests to prioritize. The same reasoning runs through a hip examination, and referred hip pain is a common reason a knee complaint produces no knee findings at all.
Begin inspection with the patient standing, then supine. Standing reveals alignment, deformity, and gait. Supine gives a clear view of swelling and muscle bulk.
Quadriceps wasting out of proportion to the history suggests a more chronic process, or reflex inhibition from a long-standing effusion. Note it before palpation, because it shapes what you tell the patient about the recovery timeline.
Palpate systematically, moving from bony landmarks to soft tissue structures. Warn the patient about possible tenderness before you begin.
Joint line tenderness is one of the most useful palpation findings. Pooled data put its sensitivity at 63% and its specificity at 77% for meniscal tears, per a systematic review in Evidence-Based Medicine. Medial tenderness points toward the medial meniscus, and lateral tenderness toward the lateral meniscus or lateral compartment disease.
Palpate the MCL along its course, from the medial femoral epicondyle to the proximal tibia. The LCL is easiest to feel with the knee in a figure-of-four position. Check the popliteal fossa for a Baker’s cyst in any patient with a chronic effusion.
Three tests detect effusion, each suited to a different fluid volume.
Normal knee range of motion runs from 0 degrees extension to 135-140 degrees flexion. Assess active movement first. Passive movement follows, to determine whether the restriction is contractile or structural.
A fixed flexion deformity means the knee cannot reach 0 degrees extension even passively. It is a key indicator of significant intra-articular pathology or posterior capsule contracture. Record the exact degrees of limitation at each visit, so you can track progression or response to treatment.
Special tests isolate individual structures. No test is diagnostic on its own, so read each one against the history and the palpation findings. The table below summarizes the key tests with technique and diagnostic accuracy.
Figures are drawn from published systematic reviews. Values shift with the population and the examiner’s experience, so cite the individual study in clinical reporting.
Read down the specificity column and the tests look interchangeable. Read down the sensitivity column and they separate sharply, which is what decides whether a negative result tells you anything.
The Lachman test is performed with the knee at 20-30 degrees of flexion. Stabilize the distal femur with one hand while applying an anterior force to the proximal tibia with the other. A positive test shows anterior translation greater than 3 mm with a soft or absent end-feel.
The Lachman outperforms the anterior drawer test in acute settings for a mechanical reason. The drawer test needs 90 degrees of flexion, which hurts in a fresh injury. The resulting hamstring guarding masks the translation you are trying to feel.
Perform collateral tests at both 0 degrees and 30 degrees of knee flexion. At full extension the posterior capsule and cruciate ligaments contribute to stability, so isolated collateral laxity only shows at 30 degrees. Medial joint-line opening at 30 degrees indicates MCL injury.
Grade the laxity as you go. Grade I is 0-5 mm of opening and grade II is 5-10 mm. Grade III is more than 10 mm, or no firm end-feel at all.
For McMurray’s test, flex the knee fully, then extend it while applying internal rotation for the lateral meniscus or external rotation for the medial meniscus. Combine that with valgus or varus stress. A palpable or audible click at the joint line is positive.
The Thessaly test is performed at 20 degrees of flexion during single-leg stance, with internal and external rotation. It loads the meniscus through body weight, which is why it often reads more sensitively than McMurray’s in weight-bearing populations.
The Apley grind test is performed prone at 90 degrees of flexion, with downward compression and rotation. Pain on compression indicates meniscal pathology. Pain that eases on distraction points to ligamentous rather than meniscal involvement.
Clarke’s test, or the patellar grind, is performed with the knee extended. Apply pressure to the superior pole of the patella and ask the patient to contract the quadriceps. Anterior knee pain with this movement is a positive finding.
The patellar apprehension test is more specific for lateral patellar instability. Displace the patella laterally with the knee at 20-30 degrees. Apprehension, or a quadriceps contraction to protect the joint, counts as positive.
Run all special tests after palpation, not before. Palpating a tender joint line before McMurray’s test tells you where to focus rotation stress. Starting with provocative tests on an unprepared patient increases guarding and reduces test accuracy.
Once the special tests are done, assess neurovascular status. Check the popliteal, posterior tibial, and dorsalis pedis pulses. Test sensation across the L3-S1 dermatomes. Motor testing of ankle dorsiflexion (L4), great toe extension (L5), and plantar flexion (S1) completes the lower limb screen.
After a knee dislocation, treat this step as urgent. Popliteal artery injury is time-sensitive, and absent distal pulses call for an immediate vascular surgery consultation.
Not every knee presentation needs imaging. The Ottawa Knee Rules, derived by Stiell and colleagues in Annals of Emergency Medicine, guide the X-ray decision after acute injury. Their sensitivity for clinically significant fractures approaches 100%.
X-ray is indicated if any one of the following is present:
The Pittsburgh knee rules are the main alternative, and they cut more unnecessary films at a slightly narrower age range. Pick one rule as your practice default rather than switching between them case by case, because mixed criteria are where fractures get missed.
When the findings suggest soft-tissue pathology and no fracture, MRI is the investigation of choice. The American Academy of Orthopaedic Surgeons recommends MRI for suspected ACL or meniscal tears where the clinical picture stays inconclusive.
MRI adds the most value when the Lachman or McMurray’s test is equivocal. It also earns its place when pain or swelling blocks an adequate examination, or when surgery is planned. The same decision-rule logic drives the Ottawa ankle rules calculator for foot and ankle injury.
Documentation matters as much as the examination. An undocumented finding cannot inform a colleague at the next visit, support a medico-legal case, or track rehabilitation progress over time.
A structured note captures alignment and gait from inspection, then the exact tenderness locations from palpation. Use anatomical landmarks rather than “tender knee”. Record range of motion in degrees for both active and passive movement, and log each special test with its grade.
Free text makes that hard to sustain under time pressure. Practice management software like Pabau lets you build a knee examination form that prompts every stage in order. No section gets skipped on a busy list.
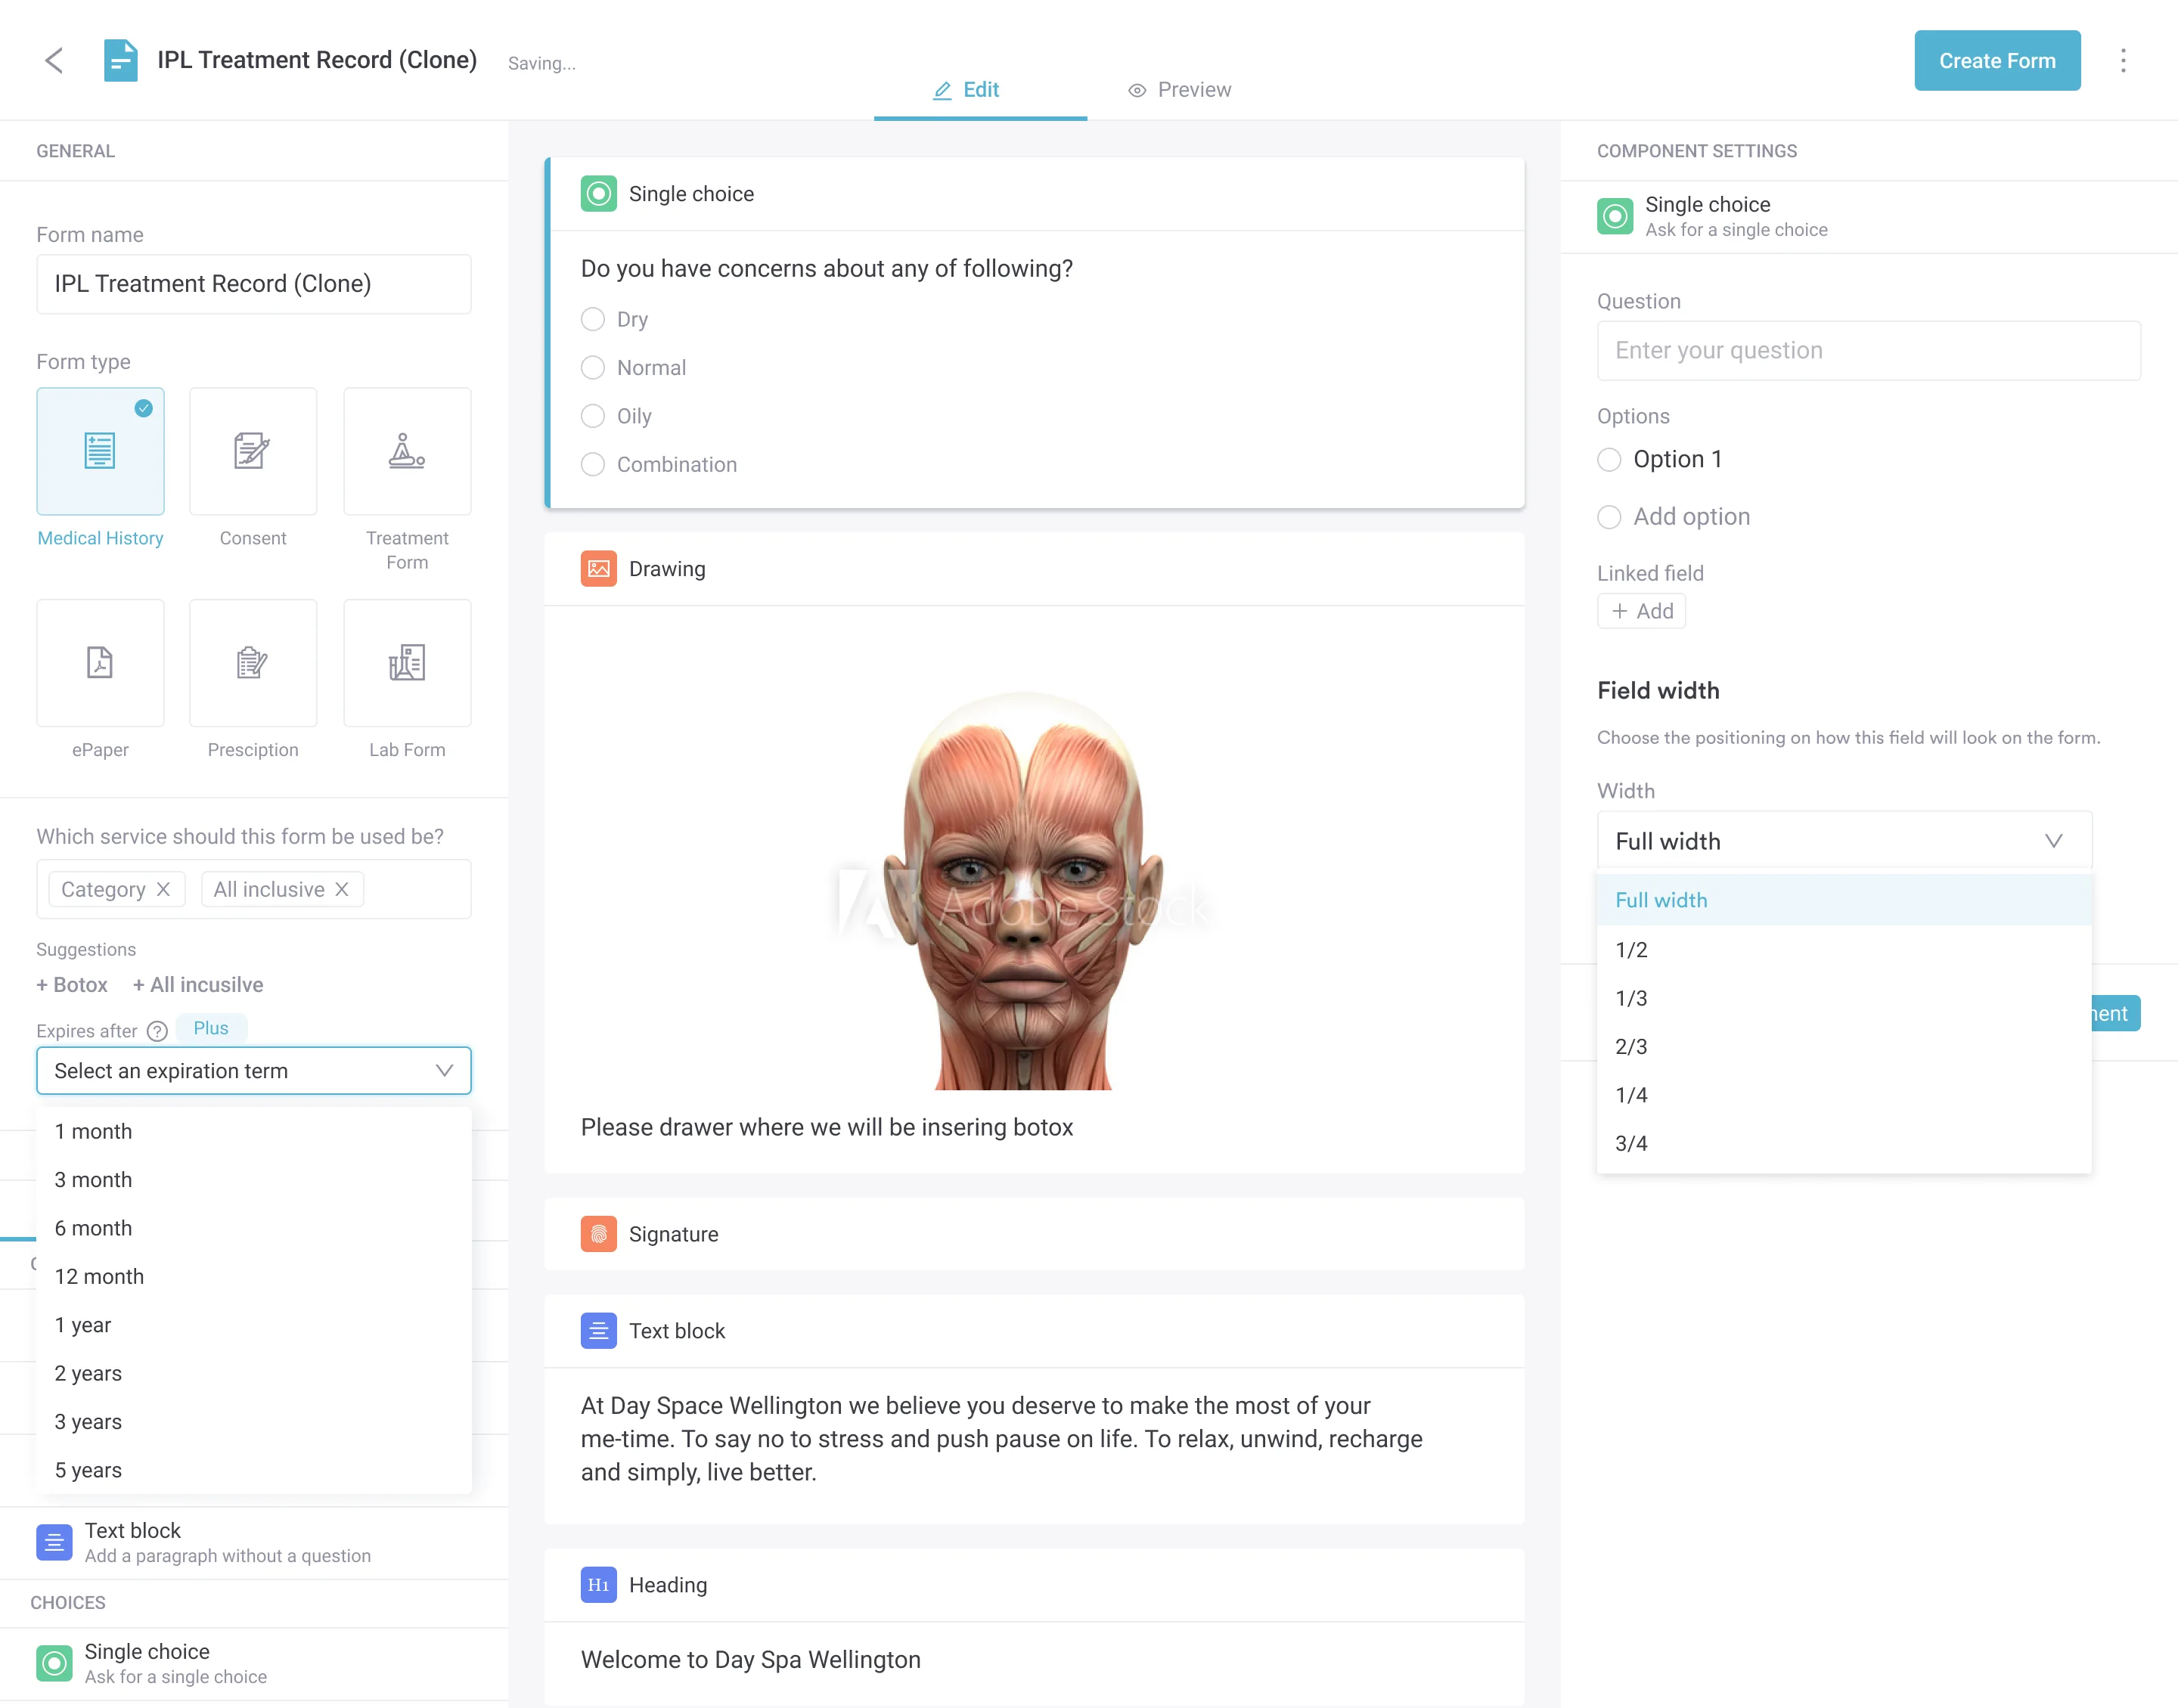
Consistent records also support audit and quality improvement. If a practice’s notes show a pattern of missed effusion documentation, the training fix can be aimed at that stage precisely.
Most practices still record knee findings as free text. The wording changes with the practitioner, and the range of motion figures sit buried inside a paragraph. Charting progress means rereading six notes end to end.
Pabau replaces that with a form you design once. Drawing fields mark the tender joint line, numeric fields hold flexion and extension in degrees, and single-choice fields carry each special test result. Pabau Scribe, our AI scribe, can transcribe spoken findings straight into those fields during the consultation.
The payoff shows up at the follow-up. Last visit’s numbers are already on screen, so you measure change instead of estimating it, and a covering colleague reads the same structure you wrote.

Pabau gives physical therapy and sports medicine practices custom examination forms, so knee findings stay consistent between practitioners and stay retrievable at every follow-up.

The sequence carries the diagnosis, not any single test. Inspection and palpation build the shortlist, range of motion measures the functional cost, and special tests confirm the structure at fault.
The accuracy data is the part worth holding on to. Almost every knee test is specific, so a positive finding usually means something. Only the Lachman, posterior drawer, and valgus tests are sensitive enough that a negative result genuinely lowers your suspicion.
Write the findings down in a form the next clinician can read at a glance. Book a demo to see how Pabau structures knee examination notes, so progress stays measurable across visits.

Rehabilitating a knee after injury? Return-to-running protocol for physical therapy sets out the staged criteria for getting a patient back to load safely.
Tracking knee outcomes over a course of care? Knee outcome survey is a ready-to-use patient-reported measure you can score at each review.
Handing out meniscal rehab exercises? Meniscus rehab exercises handout gives patients a printable progression they can follow between visits.
Choosing software for a physical therapy practice? Physiotherapy clinic management software compares what the main platforms handle for scheduling, notes, and billing.
A knee examination is a structured clinical assessment of the knee joint’s integrity, function, and pathology. It follows four stages: inspection, palpation, range of motion testing, and special tests. Those tests target individual structures such as the ACL, the menisci, and the patellofemoral joint.
Start with a history covering mechanism, onset, and mechanical symptoms. Inspect the knee standing and supine for alignment, swelling, and muscle wasting. Palpate the bony landmarks, joint lines, and soft tissue. Assess active and passive range of motion. Finish with special tests for the ligaments, menisci, and patellofemoral joint.
The Lachman and anterior drawer tests assess the ACL, and the posterior drawer test assesses the PCL. Valgus and varus stress tests assess the collateral ligaments. McMurray’s and Thessaly tests assess the menisci. Clarke’s test and the patellar apprehension test assess the patellofemoral joint.
Use the bulge sign for small effusions, the patellar tap for moderate effusions, and cross-fluctuation for large ones. The bulge sign is the most sensitive at low volumes. Sweep the medial compartment fluid up toward the suprapatellar pouch, tap the lateral side, and watch for a medial fluid wave.
Order an MRI when the examination suggests soft-tissue pathology without a fracture, such as an ACL tear, a meniscal tear, or a multi-ligament injury. It also helps when pain or swelling blocks an adequate examination, or when surgery is being planned. In acute injury, X-ray comes first, following the Ottawa Knee Rules.
The valgus stress test assesses MCL integrity. With the patient supine, stabilize the distal femur. Apply an outward force to the lower leg at both 0 and 30 degrees of knee flexion. Medial joint-line opening at 30 degrees indicates MCL injury. Laxity at 0 degrees suggests posterior capsule or cruciate involvement as well.