GLP-1 diet plan
A GLP-1 diet plan is a structured eating framework for patients taking semagluti...

2
Last Updated: Oct 13, 2026

A respiratory assessment works through the IPPA sequence (inspection, palpation, percussion, auscultation), then adds an oxygen saturation reading.
Subjective history and objective examination findings are read together, because that is what makes escalation risk visible.
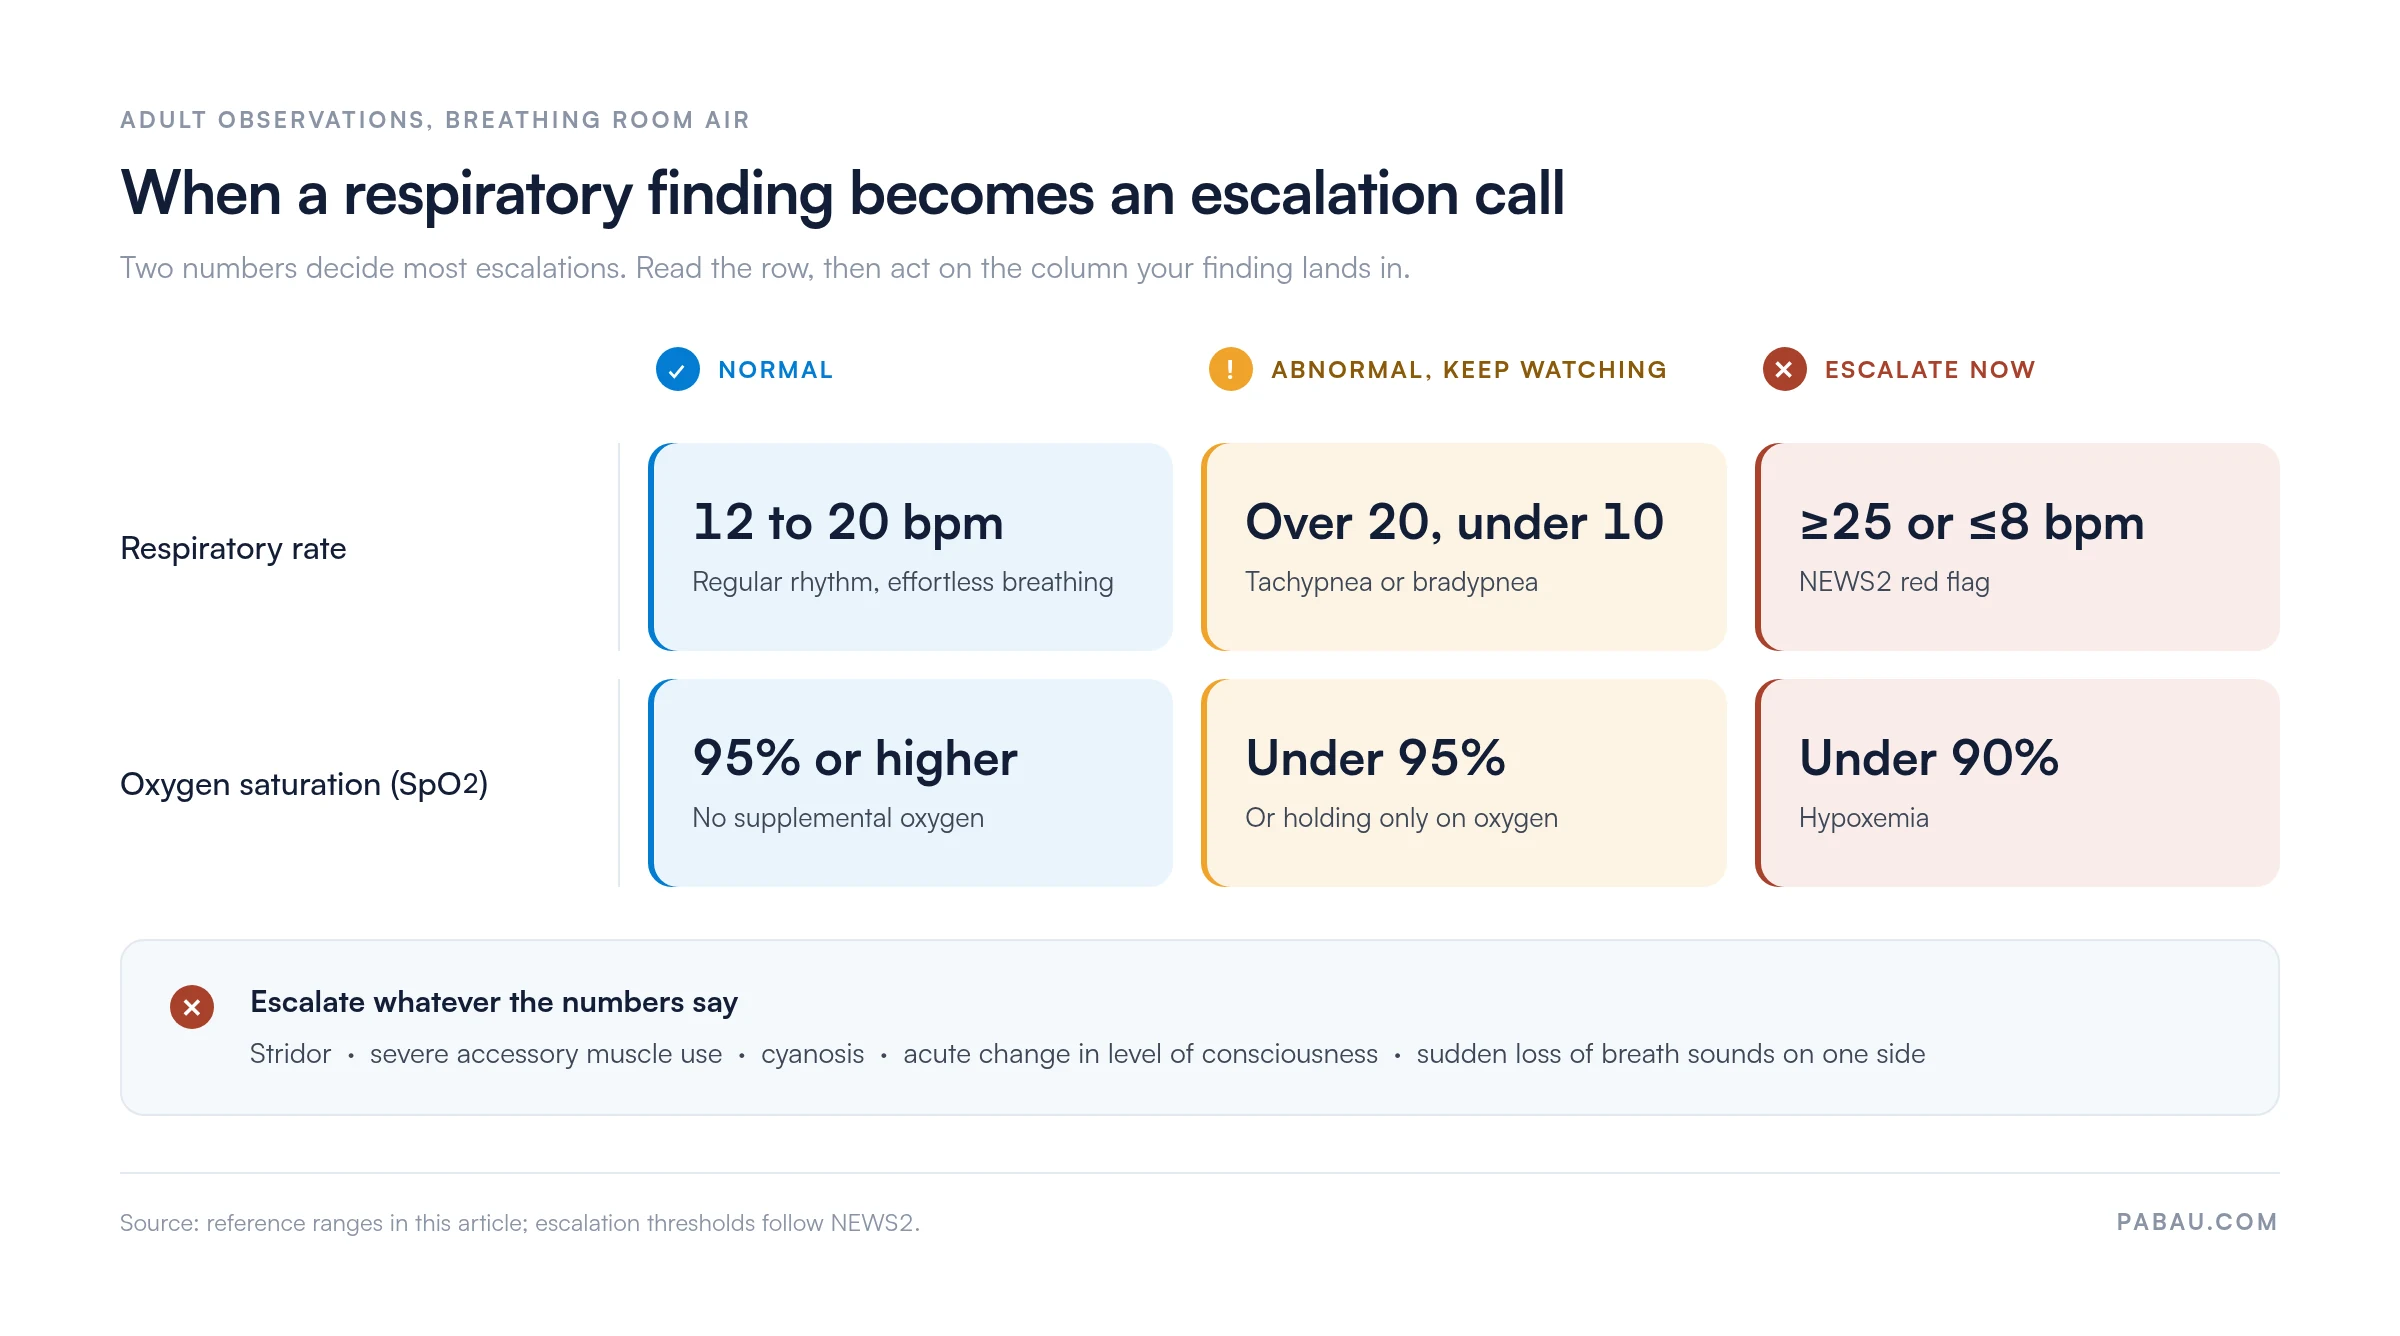
Normal adult respiratory rate is 12 to 20 breaths per minute, and SpO2 sits at 95% or higher on room air.
Escalate immediately when SpO2 falls below 90%, or when respiratory rate reaches 25 or drops to 8 breaths per minute.
Building the form inside practice management software like Pabau keeps findings, timestamps, and follow-up tasks in the patient record.
A structured respiratory assessment template covering patient history, inspection, palpation, percussion, auscultation, oxygen saturation monitoring, and clinical documentation in a single downloadable form.
Download templateA respiratory assessment is a systematic evaluation of a patient’s breathing function and respiratory status. Nurses and clinicians perform it to identify respiratory conditions, monitor disease progression, and catch deterioration early. It pairs subjective data, such as the patient’s history and symptom description, with objective findings from examination, vital signs, and tests.
The IPPA framework covers inspection, palpation, percussion, and auscultation. It is the sequence taught in nursing schools and used at the bedside worldwide. Add patient history and an oxygen saturation reading, and the sequence becomes reproducible. That is what escalation frameworks like the National Early Warning Score (NEWS2) rely on. This guide also sets out where each finding stops being merely abnormal and becomes an escalation call.
Respiratory assessment is a cornerstone of patient safety. Undetected deterioration can escalate within minutes, and a systematic examination catches the warning signs early. Those signs are falling oxygen saturation, increased work of breathing, changing lung sounds, and a rising respiratory rate.
The framework standardizes how clinicians evaluate the respiratory system. That reduces variation between assessors and improves the odds of timely intervention. It matters most on hospital wards, in intensive care, in community nursing, and in primary care, where patients often carry several conditions that affect breathing.
Clinicians also use the assessment to set a baseline for chronic conditions such as asthma, COPD, and cystic fibrosis. It frames acute presentations too, including pneumonia, pulmonary embolism, and acute heart failure, and it tracks recovery after surgery. A structured patient record that holds each set of findings is what carries continuity across shifts and care settings.
The template above is built for clinicians to download and use at the bedside. It walks you through the four IPPA steps plus oxygen saturation, with fields for recording each finding. It also gives you room to interpret those findings against normal ranges and flag anything that needs escalation.
Treat the form as a working clinical tool rather than a learning checklist. Fill it in as you go, so findings are captured at the bedside and nothing has to be reconstructed from memory later.
Start with a focused history. Ask about the chief complaint, such as shortness of breath, cough, or chest pain, then onset and duration. Cover associated symptoms (fever, night sweats, sputum), relevant history (asthma, COPD, previous pneumonia, cardiac disease, smoking), current medications, allergies, and recent travel or exposures.
Practices that run intake forms for nurses digitally collect much of this before the patient sits down. Either way, the subjective picture shapes how you read every objective finding that follows.
Observe the breathing pattern, the effort behind it, and the appearance of the chest. Count the respiratory rate, which is normally 12 to 20 breaths per minute, and note rhythm and depth. Look for accessory muscle use in the neck, intercostal, and abdominal muscles, which signals increased work of breathing. Check for chest deformities, cyanosis, pursed-lip breathing, and nasal flaring, then document symmetry and any visible scars.
Place your hands on the posterior chest wall with your thumbs at the midline, then ask the patient to breathe deeply. Both sides should move equally. Now palpate for tactile fremitus, the vibration you feel when the patient says “99”, which should be equal across both lung fields. Decreased fremitus suggests consolidation or pleural effusion, while increased fremitus points to pneumonia or another cause of denser lung tissue.
Use the middle finger of one hand as a plexor, striking the middle finger of the other hand where it rests against the chest. Work across the chest systematically and compare symmetrical areas. Normal lung tissue gives a resonant, drum-like note. Hyperresonance suggests pneumothorax or emphysema, and dullness indicates consolidation, atelectasis, or pleural effusion. Document the location and quality of each note.
Listen systematically across the posterior, lateral, and anterior chest, covering at least six points on the back and comparing symmetrical areas. First place the normal sound you are hearing.
Then identify any adventitious sounds, which are the abnormal ones.
Knowing what is normal is what lets you recognize what is not. Compare your findings against the reference ranges below, then document every deviation you find.
Accurate documentation carries continuity of care, escalation safety, and compliance. Record every objective finding, including respiratory rate, SpO2, lung sounds, and percussion notes, and mark abnormal results clearly. Follow the order of your IPPA sequence, so the next clinician reading the note can see what you found and why it mattered.
Example documentation: “RR 22, shallow, regular. Accessory muscles in use. SpO2 92% on room air. Bilateral chest expansion symmetric. Breath sounds diminished in right lower lobe with scattered crackles. HR 98. Assessment: Possible pneumonia right lower lobe, mild hypoxia. Escalated to physician for evaluation.”
AI-assisted clinical documentation shortens note-writing without costing you accuracy. Practice management software like Pabau takes on part of this work. Pabau Scribe, our AI scribe feature, drafts a structured note from the consultation, so your findings reach the record while they are fresh.
Some findings demand immediate escalation, so know them before you need them. A patient needs urgent physician review with SpO2 below 90%, or a respiratory rate of ≥25 or ≤8 breaths per minute. The same applies to stridor, severe accessory muscle use, cyanosis, or an acute change in level of consciousness. Those respiratory rate thresholds follow NEWS2, which is the escalation trigger most wards already run on.
Other findings also warrant escalation. New crackles can mean pneumonia or pulmonary edema, and high-pitched wheezes can mean acute asthma or anaphylaxis. Sudden loss of lung sounds on one side can mean pneumothorax. So does any finding that represents a change from the patient’s baseline.
Document the finding, the time, your interpretation, and the escalation action taken, including who you notified and what came back. That record is the audit trail regulatory compliance depends on, and it protects the patient too. Where the assessment points to failing gas exchange, our respiratory failure care plan sets out the interventions and monitoring that follow.
Beyond the physical examination, validated measures and diagnostic tests quantify respiratory function and guide treatment.
These tests complement the examination rather than replace it. An abnormal IPPA finding is the prompt to consider one of them, to confirm your clinical suspicion and settle the next step.
On paper, the assessment gets written on a form, carried around, and typed up later. Findings sit in a folder rather than in the record, escalation signals wait for someone to notice them, and the same numbers get transcribed twice.
Practice management software like Pabau turns the same form into a digital medical form your team completes during the encounter. Fields enforce structured entry, so a respiratory rate or an SpO2 reading lands as data rather than as handwriting. Once submitted, the assessment is timestamped in the patient’s clinical record and searchable next time anyone needs the trend.
From there, automations do the chasing. An abnormal result can raise a task for the duty clinician. The record also keeps who saw what and when, so your documentation is audit-ready without a second write-up. If you would like to see how that runs in your practice, book a demo and we will walk through it with your own forms.

Pabau turns your respiratory assessment into a digital medical form your team completes at the bedside. Findings, timestamps, and follow-up tasks stay in the patient record, so escalation is documented and nothing waits for a typing-up session.

The value of IPPA is not the sequence itself. It is that four findings and one number, taken the same way every time, tell you whether this patient is stable or sliding. Download the template, run it in that order, and the judgment gets easier to make under pressure.
The part worth deciding in advance is your escalation line. Agree that SpO2 below 90%, or a respiratory rate of ≥25 or ≤8, means a call rather than a recheck. Then the finding does not have to be re-argued at the bedside.
Paper works for the assessment and struggles with what comes after it: the trend, the handover, and the proof that someone acted. Book a demo to see how Pabau keeps respiratory findings, escalation notes, and follow-up tasks in one patient record.

Working in acute or urgent care? Emergency nursing assessment template covers the wider primary and secondary survey that a respiratory finding usually sits inside.
Need to grade level of consciousness? AVPU scale template gives you a fast, repeatable way to record the red flag that most often accompanies hypoxemia.
Documenting a full systems review? 12-point review of systems template sets out what to ask in each system, so the respiratory section fits the wider history.
Handing over at the end of a shift? Bedside shift report template structures the handover so trends and escalation actions travel with the patient.
Comparing documentation tools? Best clinical documentation software weighs the platforms that hold structured assessments and notes in one record.
A respiratory assessment evaluates a patient’s breathing function, detects respiratory conditions, monitors disease progression, and identifies escalation risk. It combines patient history with physical examination (IPPA) and vital signs to guide clinical decisions and support early intervention.
Follow this sequence. (1) Inspection: Observe the breathing pattern, count the respiratory rate, and look for accessory muscle use and chest symmetry. (2) Palpation: Assess chest expansion and tactile fremitus. (3) Percussion: Elicit resonance notes across the lung fields. (4) Auscultation: Listen for normal and adventitious lung sounds with a stethoscope. Then measure oxygen saturation.
SpO2 below 90% means blood oxygen saturation has fallen under the safe threshold, which indicates hypoxemia. Escalate to a physician immediately. Other red flags include a respiratory rate of 25 or above, or 8 or below, plus stridor, severe accessory muscle use, and cyanosis.
Vesicular sounds are soft, rustling, normal lung sounds heard throughout the lung fields. Adventitious sounds are the abnormal ones. Crackles are fine and crackling, and suggest fluid or pneumonia. Wheezes are musical and high-pitched, and indicate airway narrowing. Stridor is a high-pitched inspiratory sound from upper airway obstruction. Pleural rub is a scratchy sound from inflamed pleura.
Yes. Download the PDF and load it into your EHR, or use it as a paper form during the encounter and transcribe the findings afterwards. For automated escalation tasks and an audit trail, rebuild it as a structured digital form inside practice management software instead.