GLP-1 diet plan
A GLP-1 diet plan is a structured eating framework for patients taking semagluti...

2
Last Updated: Oct 13, 2026
The shrug test shows whether a patient lifts the shoulder girdle to compensate for restricted glenohumeral movement. You ask the patient to raise the arm out to the side toward 90 degrees of abduction, then repeat it in forward flexion. A positive shrug sign means the girdle rises early, before the glenohumeral joint has used the range it has.
The sign turns up most often in frozen shoulder, glenohumeral osteoarthritis and rotator cuff weakness. It does not tell the three apart on its own. The angle at which the girdle starts to rise does much of that work. This guide covers the anatomy, the procedure, how to read the onset angle, the evidence, and how to document it.

The shrug test is positive when the shoulder girdle lifts early to compensate for restricted glenohumeral elevation, rather than as a pain response.
Test in active abduction toward 90 degrees first, then repeat in forward flexion, since one plane can restrict before the other.
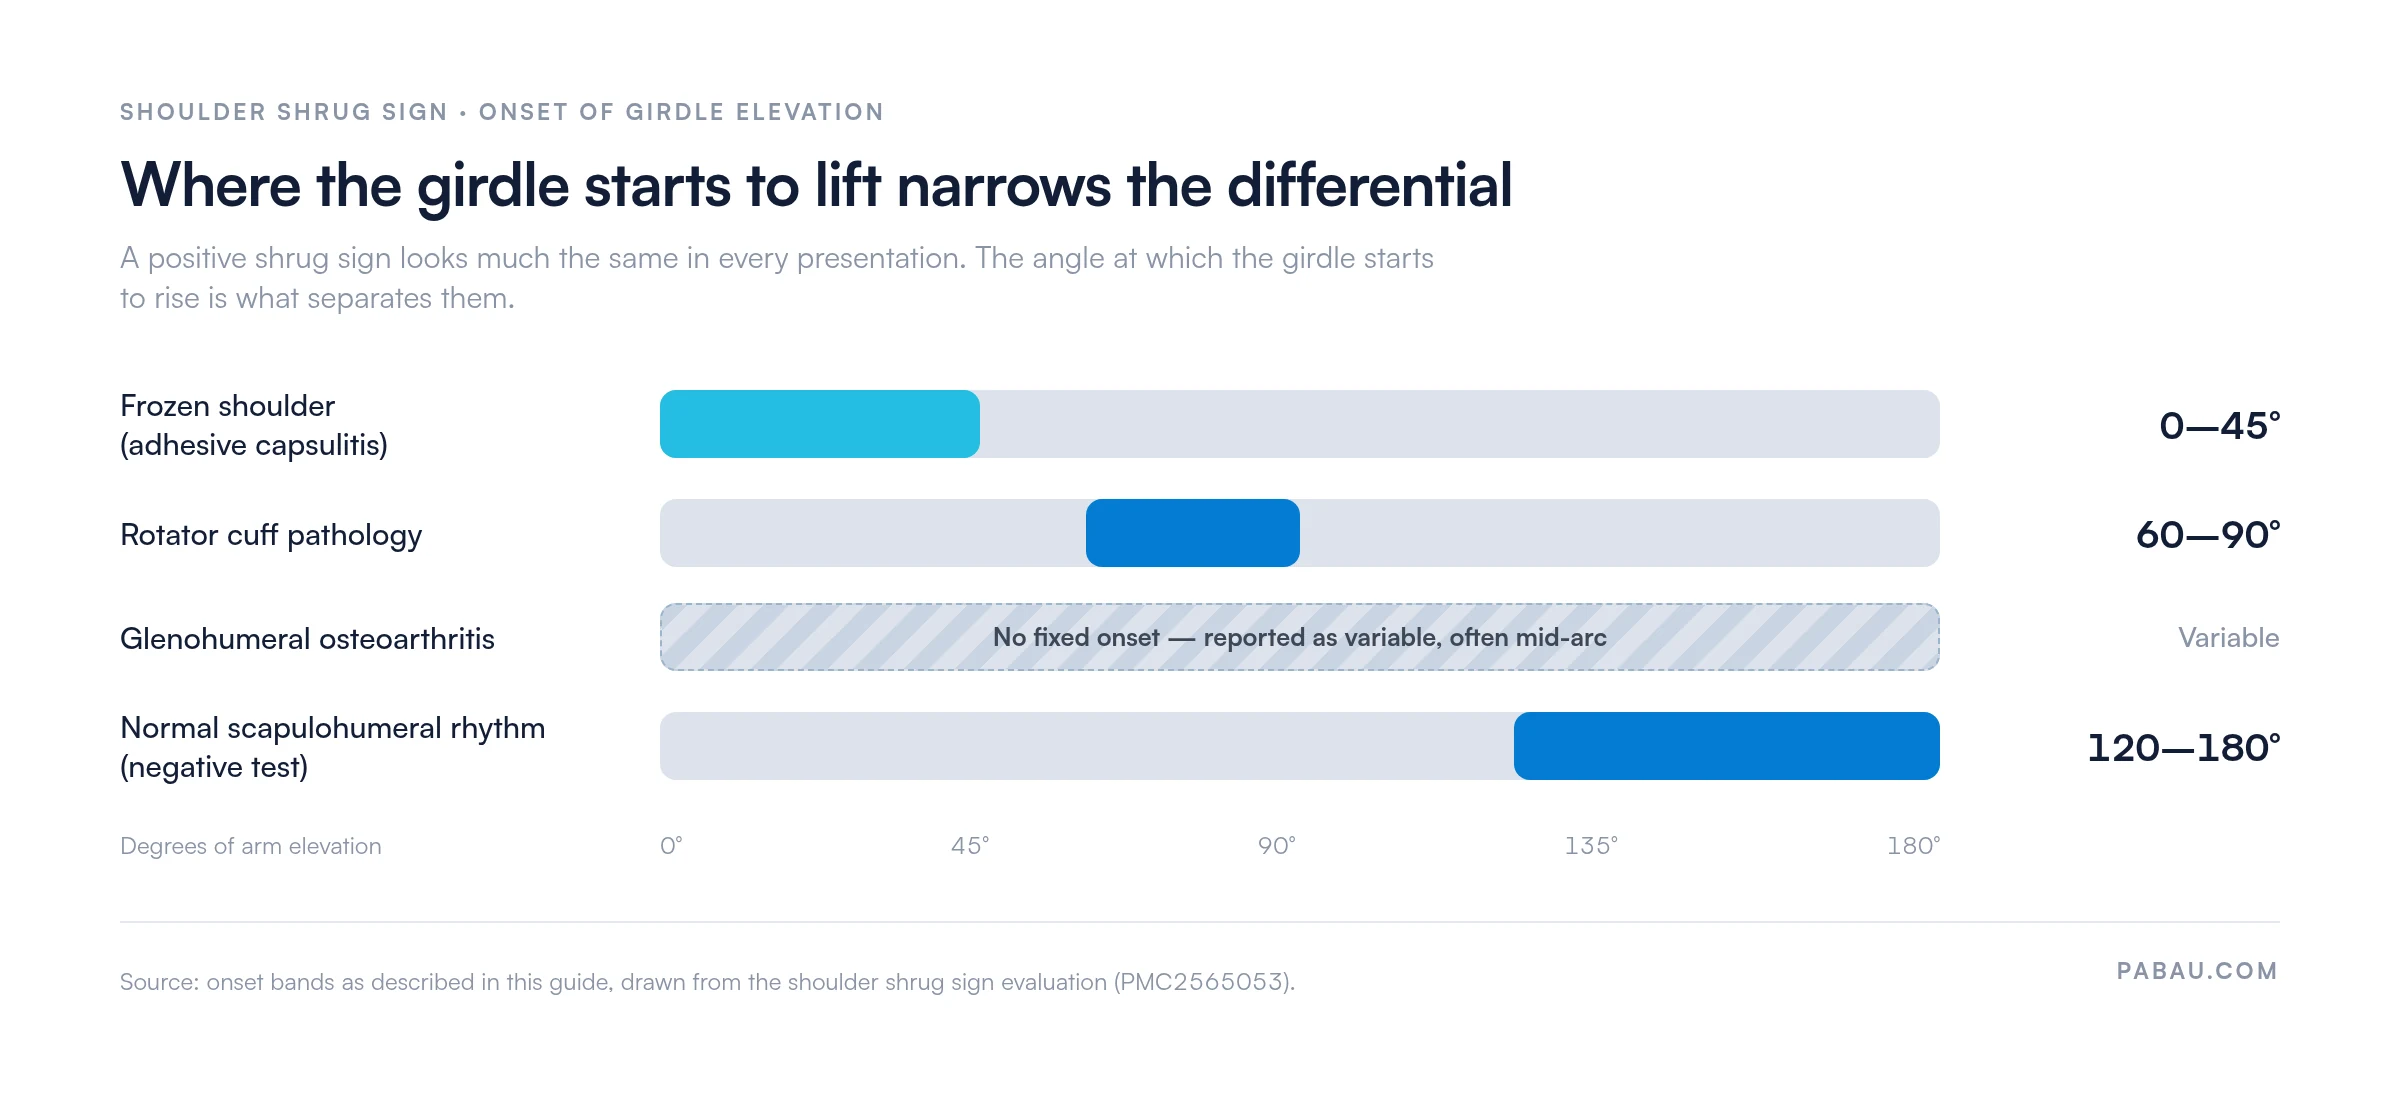
Record the angle at which girdle elevation begins: early onset points to frozen shoulder, mid-arc onset to rotator cuff pathology.
Sensitivity and specificity are modest, so pair the shrug test with passive range, end-feel, and condition-specific tests.
Practice management software like Pabau captures shrug test findings in a structured shoulder examination template.
The shrug test, also called the shoulder shrug sign, is an observation test used in musculoskeletal practice. A positive result tells you the glenohumeral joint cannot produce the full arc on its own. The patient recruits the trapezius and the surrounding girdle muscles to lift the arm higher than the joint allows.
The examiner gives no manual resistance and applies no overpressure, so it is not a provocative maneuver. The whole test rests on watching, which makes it fast to run and easy to repeat at every follow-up.
The shrug test sits early in a shoulder examination. It reveals movement quality before goniometry or pain provocation, so a positive finding steers the rest of the assessment toward glenohumeral restriction.
The glenohumeral joint contributes roughly 120 degrees of the full 180-degree elevation arc. The rest comes from scapulothoracic rhythm, thoracic extension, and trunk lateral flexion. When glenohumeral motion is restricted, the nervous system compensates by bringing scapulothoracic upward rotation and trapezius elevation in earlier than normal.
Three mechanisms commonly produce that pattern, and each one calls for a different treatment response:
The deltoid needs a stable, depressed humeral head to elevate the arm efficiently. When the cuff cannot supply that base, the deltoid fires inefficiently and the girdle lifts to help. That is why the sign shows up in both capsular and neuromuscular presentations, and why the differential matters.
Patient adherence to rehabilitation also affects how quickly the compensatory pattern settles once the primary driver is treated. Explaining the mechanism at the first appointment gives patients a reason to stick with it.
Include the shrug test whenever a patient presents with reduced active elevation. It earns its place when the loss of range looks out of proportion to the reported pain. Four presentations make it most useful:
The shrug test tells you less in acute shoulder trauma, where pain limits voluntary movement. It also tells you little in acromioclavicular joint pathology, where the complaint is localized AC tenderness rather than global restriction.
The shrug test needs no equipment beyond a clear view of the patient’s shoulder girdle from the front or the side. Standardize the position and the instruction every time, so findings compare across appointments.
Seat the patient on a backless stool or examination table with both arms relaxed at their sides. Expose the shoulder and upper trapezius so the whole girdle is visible. Ask the patient to look straight ahead and let both shoulders drop before the movement starts. Stand directly in front of the patient, or slightly to one side.
Ask the patient to raise the symptomatic arm out to the side, in the plane of the body, toward 90 degrees of abduction. Codman described the sign in that movement, and the clinical evaluation of the shoulder shrug sign tested it the same way.
Then repeat the instruction in forward flexion, because a restriction can show in one plane before the other. Ask for a natural pace, give no further coaching, and watch the ipsilateral girdle from the moment the arm starts to move.
Positive finding: the ipsilateral girdle lifts visibly early in the arc, before the glenohumeral joint has used its available range. That points to compensatory recruitment of the trapezius and the surrounding musculature.
Negative finding: the girdle stays level, or rises only in the final degrees of elevation, which matches normal scapulohumeral rhythm.
Compare both shoulders on every shrug test. Subtle unilateral elevation is easy to miss when only the symptomatic side is watched. Asking the patient to raise both arms together shows the asymmetry straight away and cuts inter-examiner variability.
A positive shrug sign tells you glenohumeral contribution is reduced. It does not tell you why. The sign narrows the differential toward conditions that restrict the joint, and the onset angle narrows it further.
Read the angle at which the girdle begins to rise against the four patterns below, then confirm with range-of-motion measurement, end-feel, and condition-specific tests.
Both frozen shoulder and glenohumeral osteoarthritis produce a positive shrug sign. The picture around the sign differs enough to guide the differential:
Cuff weakness and partial or full-thickness tears produce a positive shrug sign through a different mechanism. The cuff cannot generate enough force to depress the humeral head during elevation, so the deltoid vector shifts superiorly and the girdle lifts.
The shrug test alone does not confirm a tear. A positive sign alongside normal passive range and weakness on resisted external rotation warrants further investigation, imaging included. The infraspinatus test is a useful next step when external rotation weakness is the finding you are chasing.
Cuff-related shrugging often appears mid-arc, between 60 and 90 degrees, rather than at the very start of movement. That separates it from the early onset of frozen shoulder. Rehabilitation protocols address it by strengthening the scapular stabilizers alongside cuff-specific loading.
The most-cited work on the shrug sign’s diagnostic accuracy is the peer-reviewed evaluation published in PMC. Read the original paper for the figures, because sensitivity and specificity shift with the reference standard, the population, and the condition being tested against.
Four considerations shape how much weight the sign should carry:
The American Physical Therapy Association and the Chartered Society of Physiotherapy both stress that no single shoulder special test should be used in isolation. Clusters of three or more tests outperform individual tests in clinical prediction rules for shoulder pathology.
No shoulder examination rests on one test. The shrug sign works best as a screen that flags global glenohumeral restriction, after which condition-specific tests confirm the suspected pathology. Here is where it fits in a standard assessment battery:
For frozen shoulder, pairing the shrug sign with lost passive external rotation and a capsular end-feel in all planes gives strong certainty without imaging. For cuff pathology, pair it with empty-can, external rotation lag, and resisted internal rotation.
Capturing the shrug test finding clearly matters for three reasons: medico-legal protection, outcome tracking, and handover between clinicians. A vague note such as “shoulder elevation observed” leaves the next clinician without the onset angle or the side tested.
A complete shrug test entry should record:
Practices running a physical therapy EMR can build the shrug test into a standardized shoulder examination template. Every clinician then records the finding in the same format. That matters when you track recovery across appointments, or when a patient moves between practitioners in a multi-clinician physiotherapy practice management setup.
Consistent records also carry weight beyond the treatment room. Practices working through physiotherapy compliance requirements find that structured, repeatable documentation lowers audit risk and supports medico-legal defensibility.
Most practices record special tests in free text. Each clinician writes the shrug test up differently, one records the onset angle and another does not, and comparing two appointments becomes guesswork.
Pabau replaces the free-text note with a form you build once. Our digital clinical forms let you set the shrug test as its own component, with fields for side, plane, result, onset angle and severity.

The same component repeats at every follow-up. An onset at 45 degrees in week one and at 90 degrees in week six then sit side by side in the patient record. Your outcome reporting stops depending on whoever happened to write the note.

Pabau lets physical therapy and musculoskeletal practices record shoulder examination findings, range-of-motion measurements and SOAP notes in one patient record. See how it fits your clinical workflow.

The shrug test earns its place because it needs no equipment and runs before the rest of the examination. Treat the shrug itself as a screening result, and the onset angle as the finding worth writing down.
Test in abduction and in flexion, compare sides, and record where the girdle starts to lift. Then confirm with passive range, end-feel, and the condition-specific tests the onset angle points you toward. The sign is not specific enough to stand alone, and it was never meant to be.
Consistent records of onset angle, severity, and bilateral comparison are what turn a quick observation into outcome data. Book a demo to see how Pabau fits a physical therapy or musculoskeletal practice’s documentation workflow.

Need another cuff test to pair with it? Belly press test for shoulder walks through the subscapularis examination and how to read a positive result.
Chasing external rotation weakness? Hornblower test covers the teres minor and infraspinatus examination step by step.
Planning or managing a practice? Opening a physiotherapy clinic walks through the operational and compliance steps for a new MSK practice.
The shoulder shrug sign is an observation test in which the patient lifts the ipsilateral shoulder girdle during active arm elevation. It compensates for restricted glenohumeral motion. Physical therapists and musculoskeletal clinicians use it to screen for conditions that limit glenohumeral range. Those include frozen shoulder, glenohumeral osteoarthritis and rotator cuff pathology.
Test it in active abduction toward 90 degrees first, which is the movement Codman described and the one the cited evaluation used. Repeat it in forward flexion, because a capsular restriction can show in one plane before the other. Record which plane produced the positive finding.
A positive shrug sign means the glenohumeral joint is not contributing its normal share of arm elevation. The patient recruits the trapezius and shoulder girdle to compensate. It raises clinical suspicion for frozen shoulder, glenohumeral OA, or rotator cuff weakness, without confirming a diagnosis. The angle at which the girdle starts to lift narrows it further.
No. The shrug sign is not specific to either condition. Both frozen shoulder and glenohumeral osteoarthritis produce a positive finding, as can rotator cuff weakness and post-surgical stiffness. Clinicians tell them apart using passive end-feel, symptom pattern, age of onset, and condition-specific provocative tests rather than the shrug sign alone.
Patients lift the shoulder girdle automatically when the glenohumeral joint cannot produce enough elevation on its own. The three main drivers are capsular restriction, pain inhibition and rotator cuff weakness. Cuff weakness removes the stable base the deltoid needs to elevate the arm efficiently.
Following a positive shrug sign, complete passive ROM with end-feel assessment to confirm the restriction type. Add condition-specific tests based on clinical suspicion. Neer and Hawkins-Kennedy screen for impingement, while empty can and the external rotation lag sign test cuff integrity. Add AC joint stress testing when localized AC tenderness is present.