Stroke impact scale: Free PDF, scoring and MCID by domain
The stroke impact scale (SIS) is a 59-item questionnaire in which stroke survivo...

2
Last Updated: Oct 13, 2026

The load and shift test measures anterior and posterior humeral head translation against the glenoid fossa.
A positive result needs Grade I or higher translation plus symptom reproduction, because laxity alone is not instability.
Grading follows the Hawkins 0 to III scale, from no translation to a head that stays displaced.
Specificity is close to 100%, but sensitivity is only around 50% anteriorly, so a negative test rules little out.
Practice management software like Pabau records the grade, side, and symptom type as structured fields in the patient record.
A ready-to-use assessment form with fields for patient positioning, anterior and posterior grading, bilateral comparison, symptom type, and clinical interpretation. Print it, or copy the fields straight into your own notes template.
Download templateThe load and shift test measures how far the humeral head travels on the glenoid, so you can separate benign laxity from clinical instability.
Physical therapists, sports medicine clinicians, and orthopedic practitioners reach for it whenever a patient describes a shoulder that slips, catches, or has already dislocated.
This guide covers positioning, the three-phase technique, the Hawkins grading scale, and how to write the result up. A grade only helps the next clinician if they can find it. That puts the finding in your physical therapy EMR, not on a loose sheet of paper.
The load and shift test is an orthopedic special test that assesses glenohumeral instability. It measures anterior and posterior humeral head translation relative to the glenoid fossa. You load the humeral head centrally into the socket to seat it, then push it forward or backward to gauge laxity and provoke symptoms.
The apprehension test measures fear of instability. This test measures how much the joint moves. That distinction decides what you do next. Translation without symptoms is laxity, a common anatomical variant. Translation with pain or apprehension points to instability that needs treating.
Use the test whenever the history suggests glenohumeral instability. Common presentations include a previous shoulder dislocation, or chronic anterior or posterior shoulder pain with catching. Overhead athletes also report the shoulder giving way during throwing or swimming.
Run it after the history, range-of-motion testing, and strength testing, not before. Always pair it with a contralateral comparison. Asymmetrical translation or symptom reproduction on one side carries far more weight than hyperlaxity you find on both.
Two positions are standard. Supine suits most patients, because the table does the scapular stabilization for you and the patient is fully supported. Seated works when space is tight or the patient cannot lie flat, but you carry the whole stabilizing load yourself.
The technique has three phases: loading the humeral head, shifting it, and grading what you felt. Work through the sequence twice, once anteriorly and once posteriorly.
The anterior component is the one most patients present for. Apply the force smoothly. A jerky push triggers protective muscle guarding, which makes the shoulder feel tighter than it is and hides the laxity you are trying to measure.
Posterior translation uses the same stabilization and the same axial load, with the force directed backward. Posterior instability is less common than anterior instability. It still changes the rehabilitation plan and the return-to-sport decision, so test it every time.
The Hawkins grading scale is the most widely accepted standardized system for this test. It ties translation magnitude to clinical significance, which cuts the variation between clinicians. Recording the same grade language at every visit lets a colleague compare today’s finding with the last one. That depends on your medical records management, not on the scale itself.
Grade 0 is normal. Grade I turns up often in overhead athletes and may need nothing if the shoulder is asymptomatic. Grade II and Grade III findings usually warrant targeted rehabilitation, imaging correlation, and a specialist referral.
A grade on its own does not make the test positive. The classic positive finding is Grade I or higher translation together with pain, apprehension, or the patient recognizing their presenting complaint. That recognition is the discriminator between instability worth treating and laxity worth leaving alone.
The grid below sets the two variables against each other, so you can see where each combination lands.
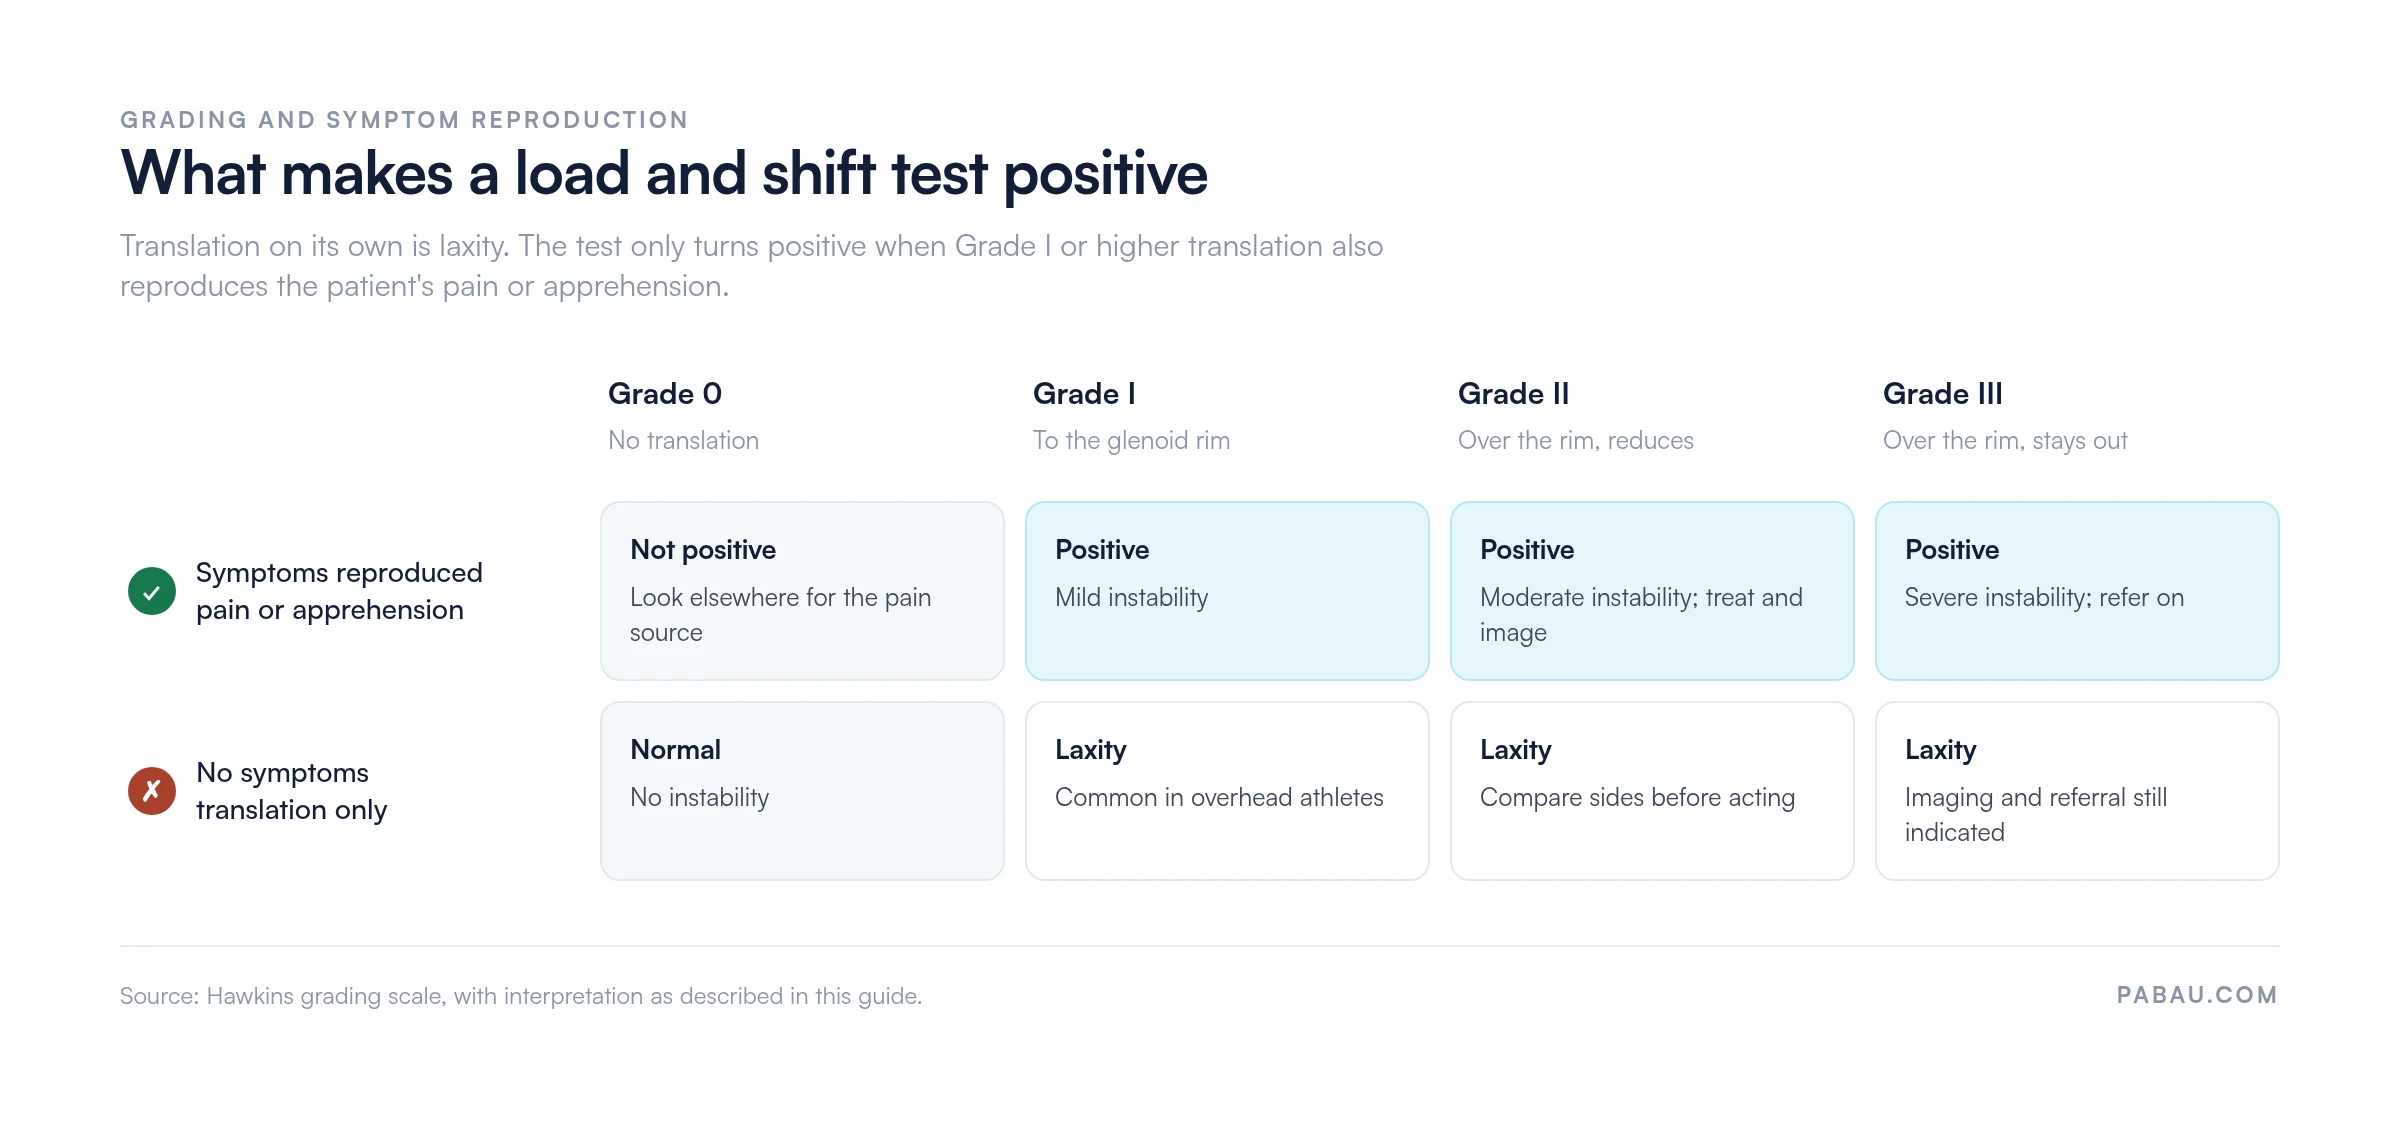
Always test both shoulders. Plenty of people have naturally lax shoulders, so an asymmetrical finding means more than bilateral hyperlaxity does. If both sides show Grade II translation but only the affected side reproduces symptoms, that still supports an instability diagnosis.
The published figures for this test are lower than the numbers usually quoted for shoulder instability testing in general. Tzannes and Murrell reviewed clinical examination of the unstable shoulder in Sports Medicine (2002). They report sensitivity of roughly 50% for anterior translation and about 14% posteriorly. Specificity sits close to 100%.
Figures around 72% sensitivity and 96% specificity belong to the apprehension test, not to this one. They are widely mis-attributed, so check which test a quoted number describes before you rely on it.
Figures reported by Tzannes and Murrell (Sports Medicine, 2002). That profile makes this a rule-in test rather than a screening test. Trust a positive finding, and never let a negative one close the examination.
No single test settles a shoulder instability question, so the load and shift test sits inside a small battery. Each of the tests below reads a different direction or a different structure.
The jerk test and the crank test are often treated as one test, but they read different things. Jerk targets posterior instability; crank targets the labrum at high elevation. If your suspicion is labral rather than capsular, the clunk test gives you a documentation template for that finding.
The load and shift test is worth more inside a structured protocol than on its own. Overhead athletes and patients with a dislocation history should get a battery rather than a single test. Sports medicine software keeps that battery on one form instead of four.
Farber and colleagues published figures for two of those tests in the Journal of Bone and Joint Surgery in 2006. They reported 72% sensitivity for the apprehension test and 81% for the relocation test. Both used apprehension rather than pain as the criterion. The load and shift test adds roughly 50% sensitivity anteriorly, with much higher specificity. A patient positive on all three has a high probability of glenohumeral instability, which justifies imaging and a specialist opinion.
Use SOAP format, and put the mechanics in the Objective section. Record the position you used, the scapular stabilization, the bilateral comparison, and then the anterior and posterior grades with their symptoms. State whether translation was painless, painful, or reproduced the presenting complaint.
Example: “Load and shift test, supine, 90 to 120 degrees abduction. Scapula stabilized. Anterior translation Grade II right with apprehension, Grade I left, asymptomatic. Posterior translation Grade I bilaterally, no symptoms. Reproduces the patient’s sense of instability on overhead throwing.”
One distinction is worth spelling out every time: whether the test produced pain at the joint or an apprehension or instability sensation. That difference sets the intensity of the rehabilitation plan and drives red-flag screening. Checkbox fields in patient intake software cut the transcription errors that free-text notes invite.

A load and shift result usually lands in free text or on a paper form. The grade goes in, the bilateral comparison sometimes does, and each clinician describes the symptom type in their own words. Six weeks later nobody can say whether the right shoulder actually improved.
Practice management software like Pabau replaces that with a structured form. You build the grading scale into checkbox fields once, and everyone then records the same four data points: side, direction, grade, and symptom type. The completed form attaches to the patient record beside the appointment that produced it.

Because the fields are structured, the next visit shows the last grading alongside today’s. Progress becomes something you read rather than something you reconstruct, and a referral letter pulls the objective findings straight out of the record.

Pabau’s digital forms capture load and shift grading, bilateral findings, and symptom type as structured fields. Each one files into the patient record in SOAP format. Your team then reads the same finding at every follow-up.

This test earns its place on specificity, not sensitivity. A positive finding with symptom reproduction is close to conclusive, so it deserves a careful technique. A negative finding tells you very little, so it should never end the examination.
Scapular stabilization and bilateral comparison are where the test is usually lost. Get both right and the grade means something. Skip them and you are recording scapulothoracic movement instead of glenohumeral translation.
The template at the top of this page gives you the fields to capture it the same way every time. Book a demo to see how Pabau turns those fields into a record your whole team can read at the next follow-up.

Suspect a labral tear rather than capsular laxity? Biceps load test: SLAP lesion assessment protocol walks through the positioning and the interpretation for SLAP screening.
Want a second labral test to confirm the finding? O’Brien’s test: how to perform and interpret the result covers the active compression technique and the errors that produce false positives.
Need the range-of-motion baseline that goes with it? Shoulder range of motion chart template gives you a printable chart for recording active and passive movement in every plane.
The load and shift test assesses glenohumeral instability by measuring how far the humeral head translates on the glenoid fossa. Clinicians use it to quantify laxity and to check whether that translation reproduces the patient’s symptoms. The result guides treatment for shoulder pain, apprehension, or a dislocation history.
Position the patient supine with the shoulder abducted 80 to 120 degrees. Stabilize the scapula posteriorly with one hand. Grasp the humeral head with the other hand and apply axial compression to seat it in the glenoid. Push the head forward and grade the translation. Return to center, push it backward, and grade again. Check for pain, apprehension, or an instability sensation each time.
A positive result needs Grade I or higher translation together with symptom reproduction, meaning pain, apprehension, or recognition of the patient’s own instability sensation. Translation without symptoms is laxity, which is often normal. Asymmetrical findings between the two shoulders carry more weight than hyperlaxity on both sides.
Grade 0 is no translation. Grade I is translation to the glenoid rim with spontaneous reduction. Grade II is translation over the rim that still reduces on its own. Grade III is translation over the rim that stays displaced and needs manual reduction. Grade II and Grade III usually warrant intervention, while Grade I is often asymptomatic.
The load and shift test assesses anterior and posterior laxity with the shoulder abducted. The sulcus sign assesses inferior laxity by applying downward traction with the arm at the side, and a visible indentation below the acromion is positive. Both belong in an instability examination, but they read different directions.
Tzannes and Murrell (Sports Medicine, 2002) report sensitivity of roughly 50% anteriorly and about 14% posteriorly, with specificity close to 100%. That makes it a rule-in test: trust a positive finding, but do not exclude instability on a negative one. Pair it with the apprehension test, the relocation test, and the sulcus sign.