GLP-1 diet plan
A GLP-1 diet plan is a structured eating framework for patients taking semagluti...

2
Last Updated: Oct 13, 2026
The varus stress test is a manual orthopedic examination of the lateral collateral ligament (LCL) and, at full extension, the posterolateral corner of the knee.
You apply an adduction force at 30° of flexion to load the LCL on its own, then repeat it at 0°. Laxity at 30° points to the LCL. Laxity at 0° means the injury reaches past it.
Lateral-sided ligament injuries make up roughly 16% of knee ligament injuries, and an isolated LCL tear accounts for only about 2%. That rarity is why the lateral compartment gets skipped on a busy examination list. This guide covers positioning, technique at both angles, laxity grading, interpretation, examiner errors, and referral thresholds.

The varus stress test loads the knee with an adduction force at 30° and 0° of flexion.
Testing at 30° isolates the LCL. Laxity at 0° means the posterolateral corner or a cruciate ligament is involved as well.
Laxity is graded I at 0 to 5 mm, II at 5 to 10 mm, and III above 10 mm.
Grade III laxity, any opening at 0°, or a peroneal nerve deficit all warrant orthopedic referral and MRI.
Practice management software like Pabau keeps the angle tested, the end-feel, and both sides’ measurements in one client record.
The varus stress test loads the lateral compartment of the knee with a medially directed adduction force. It challenges the lateral collateral ligament directly, since that ligament is the primary static restraint against varus angulation. Performed at 30° of knee flexion, the test relaxes the posterolateral corner so the LCL works largely on its own.
At full extension the picture changes. The cruciate ligaments and the posterolateral corner co-stabilize the joint at 0°, so opening at that angle always means more than an isolated LCL injury.
Running both angles asks two sequential questions. Does the LCL resist an isolated varus challenge at 30°, and does the whole posterolateral restraint system hold at full extension? Both answers together describe injury severity far better than either position alone.
The lateral collateral ligament runs from the lateral femoral epicondyle to the fibular head. Unlike the medial collateral ligament, it is a cord-like, extra-articular structure with no attachment to the lateral meniscus. That independence makes it palpable under direct pressure and distinctly vulnerable to contact varus mechanisms.
The posterolateral corner (PLC) is a multi-structure complex built from the popliteus tendon, the popliteofibular ligament, and the arcuate ligament. PLC injuries turn up regularly in sports medicine, and they are missed on initial assessment just as regularly. Work by LaPrade and colleagues put the LCL’s share of varus resistance at roughly 55% at 25° of flexion. The corner supplies the rest.
Perform the varus stress test whenever a patient presents with lateral knee pain, or with a mechanism of injury consistent with a varus force. Common scenarios include a direct blow to the medial side of the knee in contact sport, hyperextension events, and review after LCL or PLC reconstruction. Most physical therapy practices build a standardized lateral stress test into every new knee assessment.
Technique is the single biggest variable in getting a reliable result. Muscle guarding, poor patient relaxation, and examiner hand placement errors cause most false negatives. Standardizing the procedure from patient positioning onward reduces all three. A digital intake form that collects the mechanism of injury and prior imaging also helps. The examiner then has that context before a hand goes near the knee.

Testing at 30° is the primary diagnostic position for isolating the LCL. The slight flexion unlocks the joint, removes the bony congruence of full extension, and reduces the stabilizing contribution of the posterolateral corner.
Testing at 0° adds information about the posterolateral corner and the cruciate contribution. Both stabilize the knee at full extension, so opening here implies a more complex injury than LCL disruption alone. According to Dr. Robert LaPrade’s published examination technique, isolated LCL tears rarely produce laxity at 0°.
The table below summarizes how the two positions differ in what they detect.
A positive varus stress test means the test reproduced lateral knee pain, revealed increased joint-space opening compared with the other side, or both. Pain alone with no measurable laxity suggests a Grade I sprain where the structure is mostly intact. Increased laxity with a soft or absent end-feel points to a partial or complete LCL tear. Always compare both sides, because natural varus laxity varies between individuals. A side-to-side difference of more than 3 mm is treated as clinically significant.
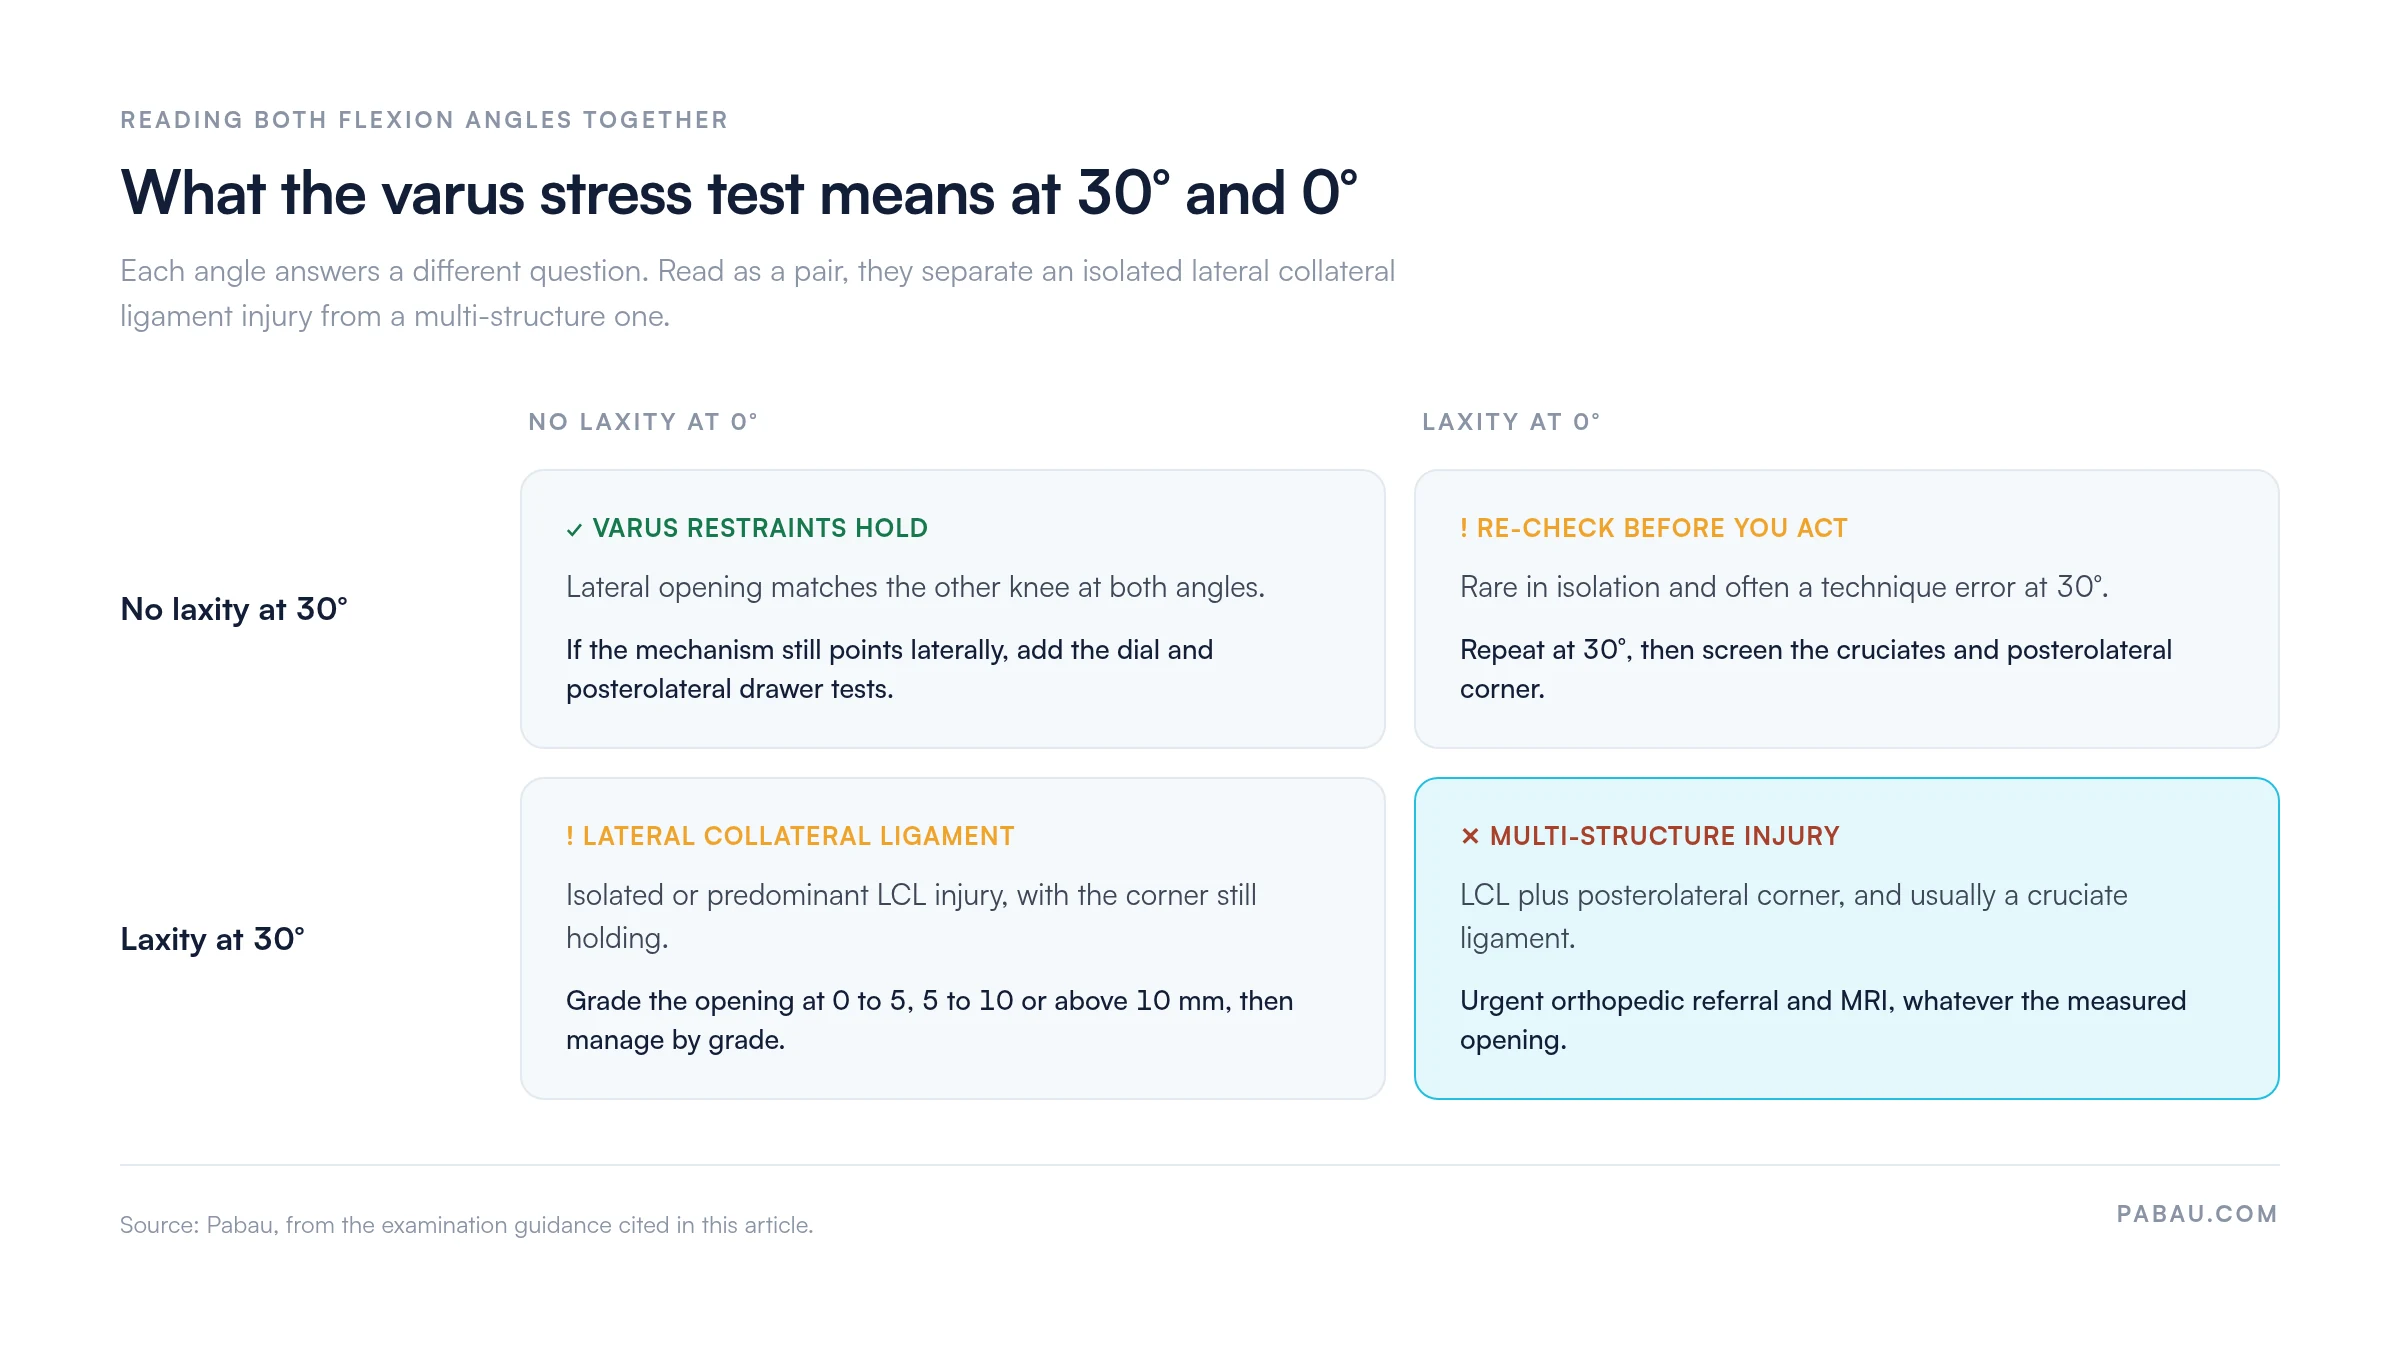
The two angles are most useful read as a pair rather than one after the other. The matrix below sets each 30° finding against its 0° counterpart and names the action each combination calls for.
Recording the finding properly matters for continuity of care and for medicolegal records. A structured clinical note gives every practitioner the same fields. They record the degree of opening, the angle tested, and the end-feel quality in one format.
Knee ligament laxity grading is standardized across most orthopedic and physical therapy guidance, though thresholds vary slightly between classification systems. The International Knee Documentation Committee (IKDC) grading is the most widely cited reference for clinical reporting.
Always compare the varus stress test on both sides before you grade it. Natural physiological varus laxity is common, particularly in hypermobile patients. A reading of 4 mm of opening only means something if the other knee measures 1 mm. Document both sides in the patient record.
The varus and valgus stress tests are companion procedures. They assess the two sides of the same joint with the same biomechanical logic. The direction of the applied force separates them. A varus (adduction) force loads the lateral compartment to assess the LCL. A valgus (abduction) force loads the medial compartment to assess the medial collateral ligament (MCL).
Clinical stress testing of the lateral compartment has limited sensitivity for isolated LCL tears, and considerably higher specificity. In practice that means a positive finding is far more informative than a negative one. Two well-recognized limitations account for the low sensitivity, and a third affects reproducibility between examiners.
The clinical implication is straightforward. A negative varus stress test does not rule out an LCL or PLC injury. When the mechanism still points laterally, combine it with the dial test, the posterolateral drawer test, and the external rotation recurvatum test.
Most published descriptions of the varus stress test stop at the technique and say nothing about how it goes wrong. The pitfalls below come from the orthopedic examination literature, and they are the usual sources of an unreliable result. Practices that standardize the assessment workflow see fewer inconsistencies between practitioners over time.
The same principle applies to the elbow, where the test assesses the lateral ulnar collateral ligament (LUCL). The elbow version matters most in overhead throwing athletes and in patients who have had a lateral epicondyle injection. Seat the patient with the elbow at 30° of flexion and the forearm supinated, stabilize the humerus, then apply a varus force to the forearm. Pain over the lateral elbow, or a sense of opening, indicates LUCL insufficiency.
Because the elbow shares the 30° isolation principle with the knee, clinicians already confident at the knee pick it up quickly. Practices assessing overhead athletes gain from keeping elbow, shoulder, and knee findings in one chart. That is what physical therapy record software is built to do.
A positive or equivocal varus stress test should trigger a structured cluster of further tests. Lateral knee pain has a wider differential than LCL injury alone. The posterolateral corner stays under-diagnosed because no single test is sensitive enough for it. Where the cruciates also need screening, the reverse Lachman test is a useful addition to the cluster below.
Referral thresholds depend on the grade of laxity and on whether a combined injury is suspected. Grade I findings are managed conservatively, and most of those patients can stay within a physical therapy or sports medicine practice. Grade III findings, any laxity at 0°, or a positive dial test should prompt orthopedic referral. Agree the referral pathway before these presentations arrive, not during one.
MRI is the primary imaging modality for soft tissue characterization after a positive test. According to StatPearls guidance on lateral collateral ligament knee injury, varus stress radiographs quantify joint-space opening objectively. That helps when comparing pre- and post-operative findings. Standardized grades and bilateral measurements in the referral give the receiving surgeon better information than a narrative letter. If you are choosing a system to hold those records, our round-up of sports medicine software reviews the main options.
Conservative management for Grade I and II injuries usually follows a four-phase rehabilitation protocol. The phases cover pain and swelling control, range of motion restoration, neuromuscular retraining, and sport-specific conditioning. The return-to-running protocol gives a framework for progression criteria that adapts well to lateral knee injury.
In most practices a varus stress test finding ends up as free text in a note. One clinician writes “lateral laxity, Grade II”, another writes “7 mm opening at 30°, soft end-feel, right knee”. Six weeks later nobody can say whether the knee improved, because the two entries do not compare.
Practice management software like Pabau replaces that with a structured examination template. You set the fields once — angle tested, opening in millimeters, end-feel, side — and every practitioner fills in the same ones. The values sit in the client record next to the intake form, the imaging request, and the rehabilitation plan. A colleague picking up the case reads the same numbers you wrote.
That consistency pays off twice. Progress across visits becomes comparable, so a knee that is not improving shows up early. And when the patient needs orthopedic referral, the letter carries graded, bilateral findings instead of a recollection.

Pabau gives sports medicine and physical therapy practices structured examination templates. Stress test grades, end-feel, and bilateral measurements land in the client record in one format. Progress stays comparable across visits and practitioners.

Test both angles, every time. Thirty degrees tells you about the LCL. Zero degrees tells you whether the injury runs beyond it. The pair of readings decides who gets referred. Skipping the extension test to save 20 seconds is how a posterolateral corner injury leaves the room undiagnosed.
The trade-off worth remembering is the test’s low sensitivity. A negative result buys you very little on its own, so when the mechanism points laterally, keep testing rather than reassuring. Write down the angle, the opening in millimeters, the end-feel, and the other side. A grade missing those four details cannot be compared with a later one.
If you would like to see how Pabau keeps examination findings consistent across a multi-practitioner practice, book a demo.

Need to confirm a posterolateral corner injury? Posterolateral drawer test walks through the technique that pairs most closely with a positive varus test.
Screening the cruciates in the same session? Reverse Lachman test covers positioning, end-feel, and how to read the result against a standard Lachman.
Looking for guidance on return-to-sport criteria? Return-to-running protocol for physical therapy sets out progression criteria that adapt to lateral knee rehabilitation.
Need software built for musculoskeletal assessment? Sports medicine software from Pabau covers scheduling, clinical notes, recall management, and multi-location reporting.
Running a physical therapy practice and need a compliance framework? Mandatory compliance for physiotherapy clinics covers the standards UK and international practices must meet.
A varus stress test is a manual orthopedic examination that applies a varus (adduction) force to the knee. It assesses the lateral collateral ligament and, at full extension, the posterolateral corner structures. It is performed at 30° of flexion to isolate the LCL and at 0° to screen for combined ligamentous injury.
A positive varus stress test indicates lateral collateral ligament injury. The finding is pain reproduction, increased joint-space opening compared with the other knee, or both. Laxity at 30° suggests an isolated or predominant LCL tear. Laxity at 0° indicates multi-structure involvement including the posterolateral corner and cruciate ligaments.
The varus stress test applies a medially directed adduction force to evaluate the lateral collateral ligament. The valgus stress test applies a laterally directed abduction force to evaluate the medial collateral ligament. The technique and the flexion angles are the same, so only the direction of force and the ligament assessed differ.
Testing at 30° of flexion unlocks the posterolateral corner, which reduces its contribution to lateral stability and lets the LCL work in relative isolation. At full extension the cruciate ligaments and posterolateral corner co-stabilize the joint, so laxity cannot be attributed to the LCL alone.
Laxity is graded on a three-tier scale. Grade I is 0 to 5 mm of joint-space opening with a firm end-feel, meaning micro-tears with the ligament intact. Grade II is 5 to 10 mm with a soft end-feel, meaning a partial tear. Grade III is more than 10 mm with an absent end-feel, meaning a complete tear. Always compare against the other side.
Yes. The elbow varus stress test applies the same adduction-force principle at 30° of elbow flexion to assess the lateral ulnar collateral ligament. It is commonly used in overhead throwing athletes and in patients with recurrent lateral elbow instability after a lateral epicondyle injection or previous elbow surgery.