Patient financing: How to offer it and stay compliant
Patient financing lets patients spread the cost of treatment over weeks or month...

Last Updated: Oct 7, 2026
Skin assessment tools are the scales, imaging systems, handheld instruments and AI apps practitioners use to judge skin type, condition, risk and progress. Which one you need depends on the question you are trying to answer.
This guide sorts them with the four-question skin assessment stack, which follows the order of a consultation. A Fitzpatrick type and a contraindication screen tell you whether it is safe to treat. Standardized photos and imaging set the baseline.
A dermatoscope, Wood’s lamp or hydration meter explains what is driving the concern. Repeating the baseline capture at review shows whether the plan is working.

Skin assessment tools fall into four families: Classification scales, imaging systems, handheld measurement instruments, and virtual or AI apps.
The four-question skin assessment stack orders them by consultation step: Safety first, then baseline, then the cause of the concern, then progress.
Fitzpatrick typing and standardized photos cost little beyond a camera and fixed lighting, and they cover the first two questions for most practices.
Virtual skin analysis apps suit pre-consult triage, but they are not validated for diagnosis or for choosing laser and peel settings.
An assessment only pays off when its results sit in the patient record, so every review compares like with like.
A skin assessment is a structured exam of skin type, condition, integrity and risk, recorded in a way that lets the next practitioner repeat it.
In an aesthetic practice, a facial skin assessment looks at skin texture, tone, hydration, oil, pigment, vascularity and elasticity. A full-body or nursing skin assessment shifts the focus to skin integrity: Intact skin, wounds, pressure areas and moisture damage.
Skin turgor assessment belongs to the second group. You pinch skin on the forearm or below the collarbone and watch how quickly it flattens. A slow return suggests dehydration, though the test is less reliable in older adults.
The word “structured” carries the weight here. A quick look under the treatment-room light tells you how skin appears today. A structured assessment fixes the light, the angle and the scale, so a reading in March means the same thing in June.
A skin assessment runs in six steps: History, visual exam, touch, classification, imaging, then documentation, in that order, so each finding informs the next.
Most skin consultation tools slot into one of these steps rather than replacing the exam. A facial consultation form handles step one before the appointment, which leaves more consultation time for the exam itself.
Repeat the full assessment whenever medication, pregnancy status or sun exposure changes, and before any new energy-based treatment.
The four-question skin assessment stack sorts every tool by the question it answers, in the order you ask those questions at consultation. Use it to check that your kit covers all four before you spend money on a fifth device.
The diagram below lays out the four questions, the tools for each, and what belongs in the patient file.
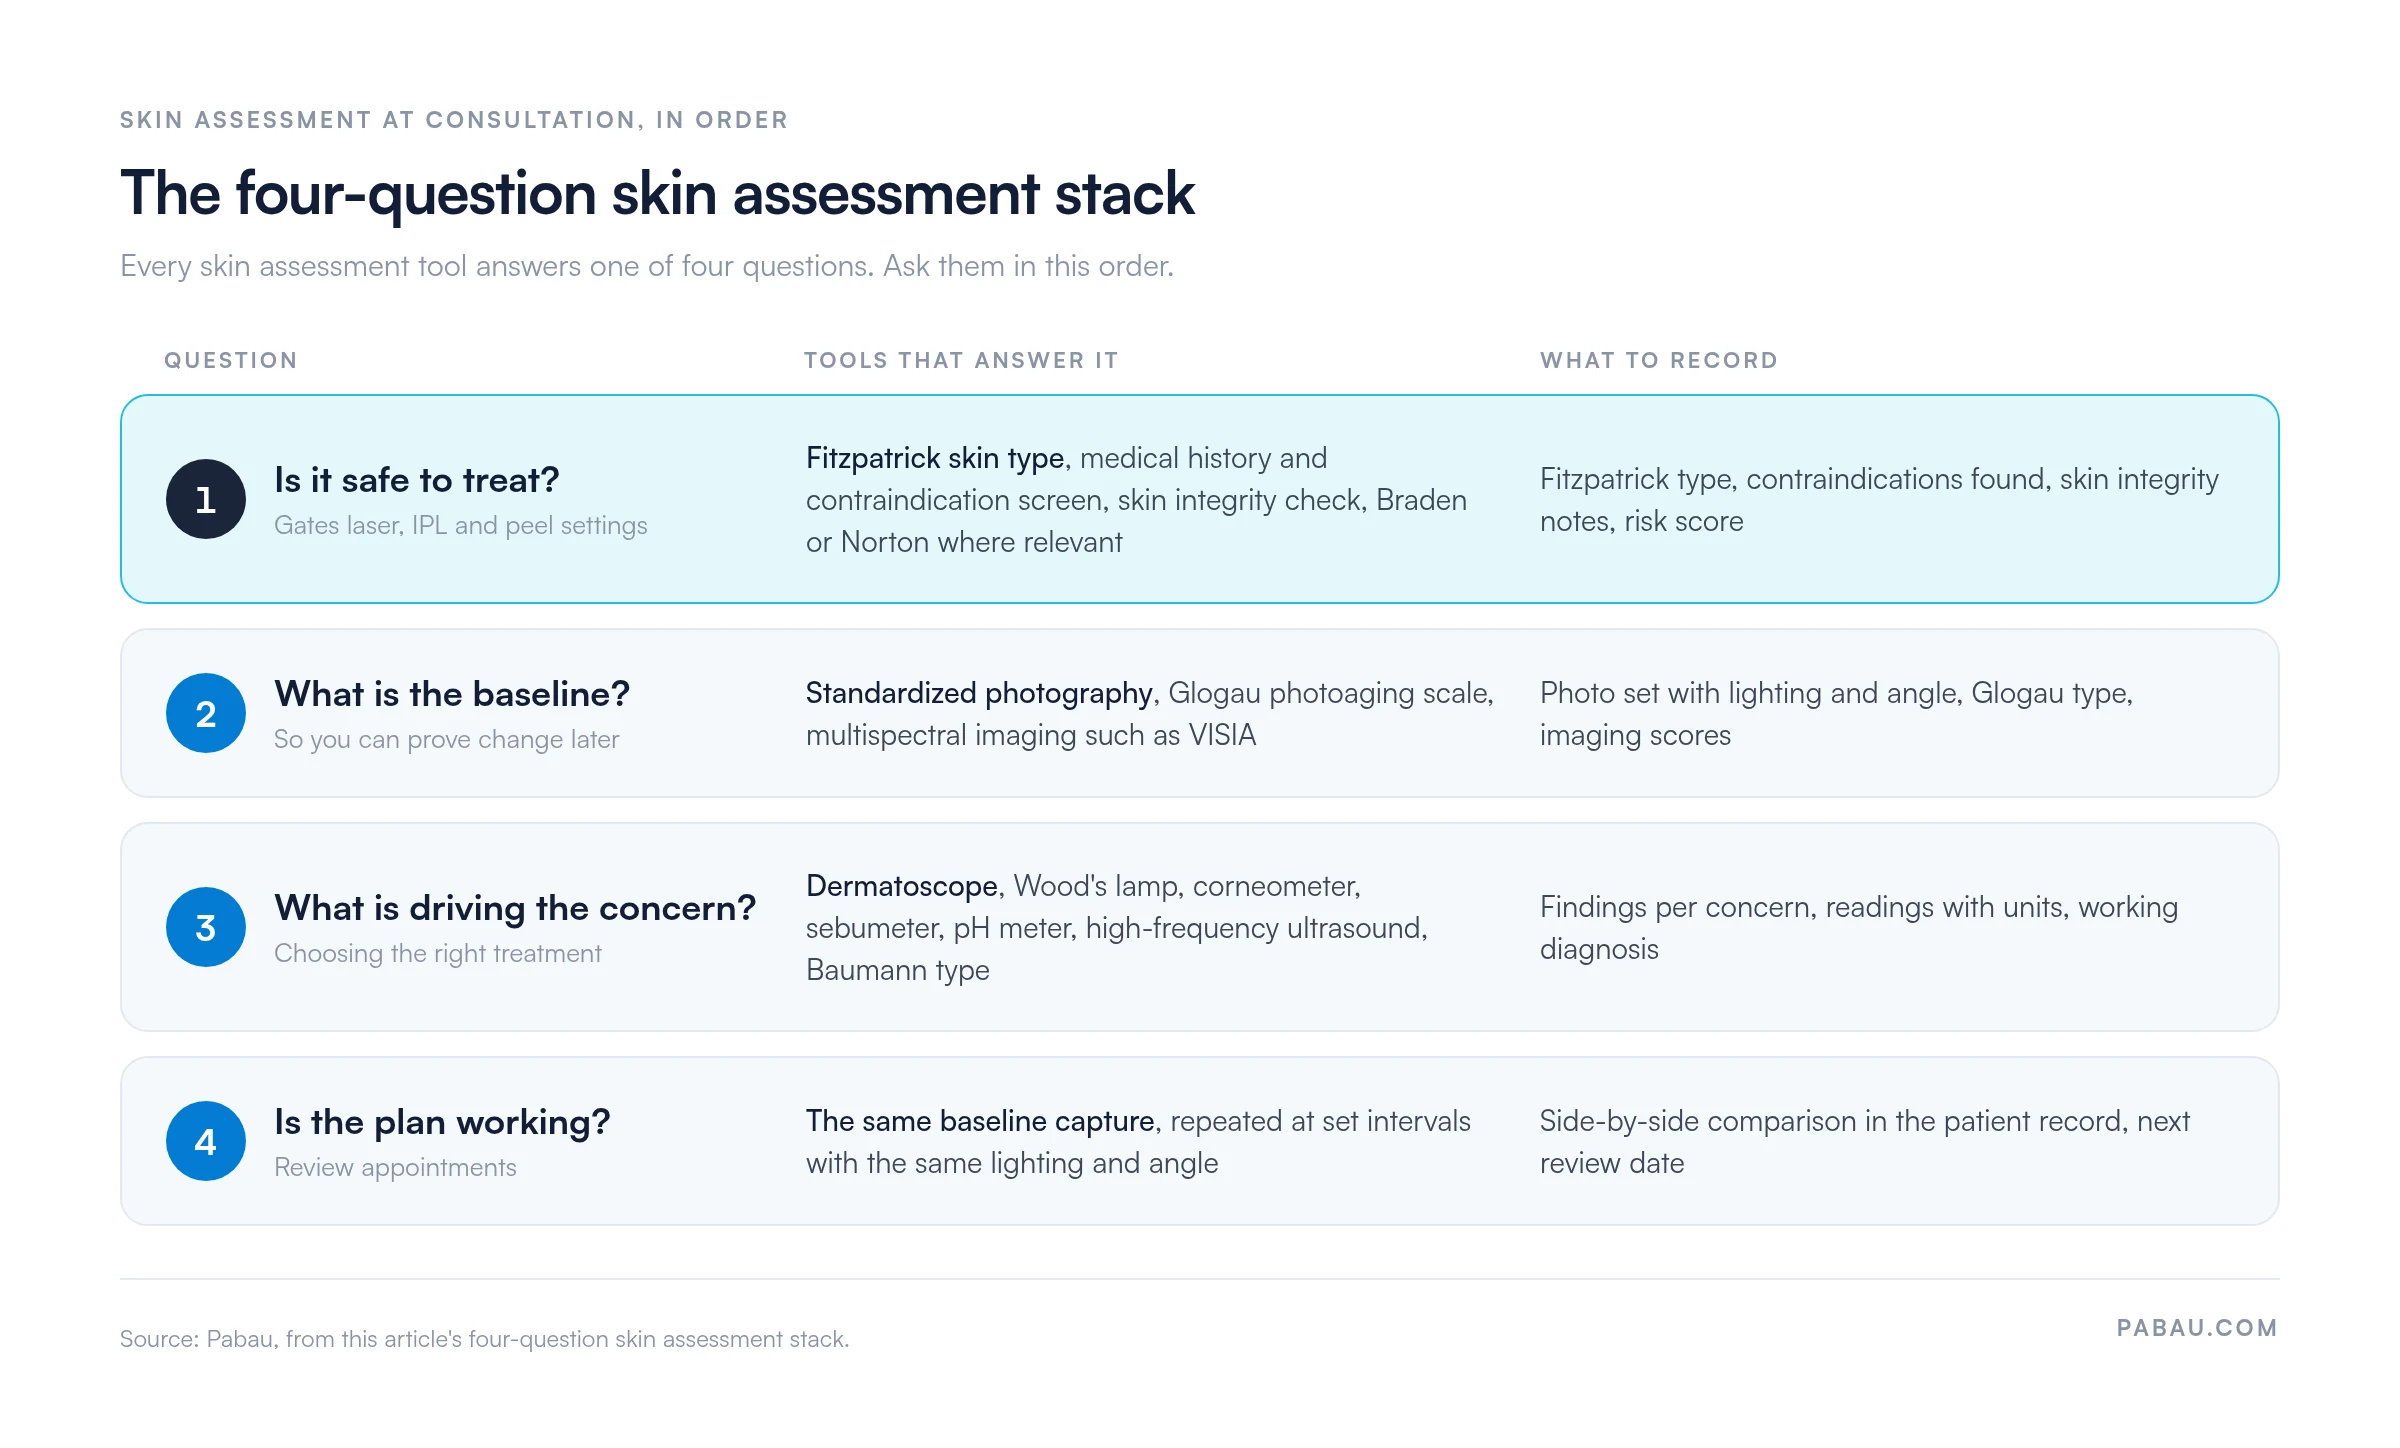
Safety is answered with a Fitzpatrick skin type, a medical history and contraindication screen, and a check of skin integrity at the treatment site.
Ask it first, before any photos. Record the Fitzpatrick type, every contraindication found or ruled out, and any broken, infected or recently treated skin. Older or less mobile patients may also need a Braden or Norton score before body treatments.
The failure it prevents is laser or IPL settings chosen for lighter skin on a Fitzpatrick IV–VI patient. That mistake raises the risk of burns and post-inflammatory hyperpigmentation.
The baseline comes from standardized photography, a Glogau photoaging type and, where you have it, multispectral imaging such as VISIA.
Capture it after the safety check and before treatment starts. Record the lighting setup, camera distance, angles and imaging scores alongside the photos. Without them, you have no proof of improvement at review and no answer when a patient says a treatment did nothing.
Diagnostic tools explain the concern: A dermatoscope for lesions and pigment, a Wood’s lamp for pigment depth, and meters for hydration, oil and pH.
Use them during the exam, aimed at the concern the patient came in with. Record each finding against the concern it explains, with units for any reading. Baumann skin typing adds a questionnaire-based profile that helps with home-care plans.
The failure this question prevents is treating melasma as simple sun damage, or dehydrated skin as oily skin.
Progress is measured by repeating the exact baseline capture at set intervals, under the same lighting and angle, and comparing the images side by side.
Schedule the repeat at each review appointment. Record the comparison and the decision it led to: Continue, adjust or stop. A different room, lamp or camera breaks the comparison, so lock the setup down.
We see this question go unanswered most often when review photos live on a practitioner’s personal phone instead of the patient record.
Skin assessment tools come in four families: Classification scales, imaging systems, handheld measurement instruments, and virtual or AI tools.
The table maps each skin assessment tool to the stack question it answers and the practice type that gets most from it. Read down the stack column to check that your tools for skin assessment cover all four questions.
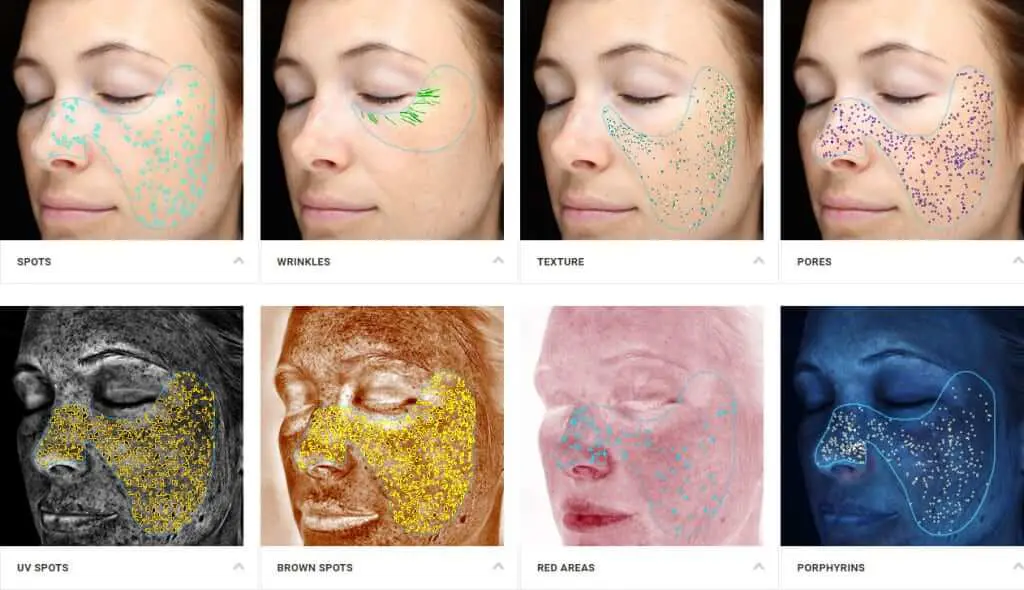
VISIA, made by Canfield Scientific, uses standard, cross-polarized and UV lighting to measure eight skin conditions. In the practices we onboard, VISIA is the imaging system we come across most often.
Dermascan, from Cortex Technology, images skin and soft tissue with 20 or 50 MHz ultrasound. Dermascan suits practices that need to measure change beneath the surface rather than surface appearance.
The best skin analysis tools for clinics answer all four stack questions for your treatment menu, starting with Fitzpatrick typing and standardized photos.
No single device covers all four questions. Cost-effective skin analysis tools come first. A Fitzpatrick questionnaire and a fixed photo setup cost little beyond a camera, lights and a marked spot for the patient. Add imaging when treatment volume justifies it.
A sensible default kit by practice type:
For practices adding medical skin work, a dermatoscope is the sensible first diagnostic purchase, because lesion and pigment questions come up daily. Dermatology practices treating eczema can pair imaging with an EASI score calculator.
Before you buy a skin analysis device, including one for a laser practice, run five checks:
Virtual skin assessment tools are apps that score skin from a selfie. They suit pre-consult triage and engagement, not diagnosis or treatment settings.
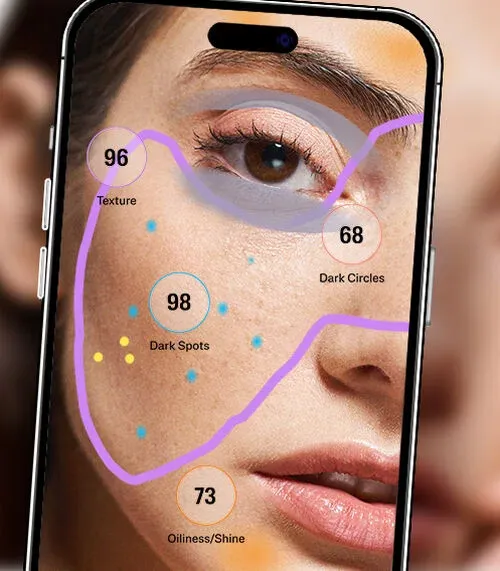
A virtual skin analysis usually returns scores for texture, spots, redness or oiliness, often with product suggestions. Use those results to open a conversation and book the right consultation. Do not use them to choose a peel strength or a laser setting.
General chatbots such as ChatGPT can describe a skin photo, but they are not validated diagnostic tools and should not guide treatment.
AI skin diagnosis does show promise when a clinician stays in charge. In a JAMA Network Open study, an AI tool helped primary care physicians and nurse practitioners agree more often with dermatologists.
Skin tone is the known weak point. A 2022 Science Advances study found three dermatology AI models performed worse on Fitzpatrick V–VI skin than on types I–II. Phone cameras and room lighting also vary between selfies, so app scores rarely compare cleanly over time.
Skin risk assessment tools are validated scales for breakdown risk and wound status: Braden and Norton for pressure injury, Bates-Jensen for wounds.
Braden, Norton and Bates-Jensen are the standard skin assessment tools for nurses. Risk scales matter in aesthetics wherever patients are sedated, immobile or healing, such as surgical suites, body-contouring recovery and older patients.
A nursing skin assessment uses these tools to assess skin integrity head to toe. Bony areas such as the sacrum, heels and hips get extra attention.
The blanch test is the quickest check. Press a reddened area for a few seconds, then release. Skin that stays red, called non-blanchable erythema, is a sign of a stage 1 pressure injury.
The National Pressure Injury Advisory Panel (NPIAP) stages pressure injuries from 1 to 4, plus unstageable and deep tissue pressure injury. Stage 1 is intact skin with non-blanchable redness, and stage 4 is full-thickness loss exposing deeper tissue.
The International Skin Tear Advisory Panel (ISTAP) grades skin tears into three types by flap loss. Type 1 has no skin loss, type 2 has partial flap loss, and type 3 has total flap loss.
Skin analysis devices turn a subjective look into measured baselines, so you can pick the right treatment, set safe parameters and show progress at review.
The device is the easy part. A treatment plan only improves when the reading sits in the same record as the treatment notes and the next appointment.
Here is a skin assessment documentation example for one facial consultation, laid out the way it should sit in the patient record. The patient is illustrative.
For a ready-made version, start from our full skin assessment template, or build the same fields into your own skin assessment form.
Common pitfalls that weaken the record:
We see the third pitfall often in practices we onboard. The device report sits on the laptop beside the machine, unlinked to the patient.
Pabau, the practice management platform we build, keeps the whole skin assessment in one patient record. Its digital forms carry the history and contraindication screen, so patients complete them before they arrive.
Pabau stores before-and-after photos against the patient record, next to the treatment notes. At review, you open the baseline and the new set side by side instead of scrolling a camera roll.
Care Pathways in Pabau GO, our iOS app for practitioners, prompts patients to complete forms, sign consents and add before photos ahead of the visit. The results flow into the patient record automatically.
The workflow is the same whether you run a med spa on our medical spa software or a skincare-led practice on our skin clinic software.

Pabau stores consultation forms, before-and-after photos and treatment notes on one patient timeline. Your team compares baseline and review images in seconds.

Start with the first two questions of the stack. A Fitzpatrick type, a contraindication screen and a locked-down photo setup protect patients and prove results for very little money.
Buy devices only when your menu asks a question those basics cannot answer, such as pigment depth for laser work. Then make sure every reading lands in the patient record, or the purchase stops paying off at the first review.
Book a demo to see how Pabau keeps skin assessments, photos and treatment notes together for your practice.

Need a form for the exam itself? Skin analysis form template for estheticians gives you fields for skin type, concerns and findings.
Running skincare consultations? Skin care consultation form covers history, routine and goals before the first treatment.
Seeing medical skin patients? Dermatology intake form template collects the history a dermatology assessment depends on.
Choosing a system for a dermatology practice? 7 best dermatology EHR software options compared weighs imaging, charting and billing side by side.
Growing a dermatology practice? How to manage my dermatology practice in 7 steps turns daily operations into a repeatable routine.
No single tool wins, because each answers a different question. For most practices, the best starting tools are Fitzpatrick typing and standardized photography. Multispectral imaging such as VISIA comes next, for baseline and progress tracking.
A practitioner takes a medical history, examines the skin under controlled light, palpates it, assigns a Fitzpatrick type, captures standardized images and records the findings. Digital intake forms cover the history step before the visit.
The Braden Scale and the Norton Scale are the standard skin assessment tools for nurses scoring pressure-injury risk. The Bates-Jensen Wound Assessment Tool tracks wound healing, and a four eyes skin assessment adds a second clinician at admission or transfer.
Estheticians get the most from low-cost tools: A magnifying lamp, a corneometer and sebumeter, and a fixed photo setup. Multispectral systems such as VISIA earn their cost once facial volume justifies daily use.