CRM for chiropractors: how to manage patients, bookings and marketing
A CRM for chiropractors is a patient relationship management system built around...

Last Updated: Oct 13, 2026

Ege’s test is a weight-bearing orthopedic assessment for medial and lateral meniscal tears, first described by Ridvan Ege, MD in 1968.
External tibial rotation during a squat tests the medial meniscus. Internal rotation tests the lateral meniscus.
A positive result means pain or an audible click at the relevant joint line. That is a screening finding, so MRI or arthroscopy still confirms the diagnosis.
Akseki et al. reported 67% sensitivity and 81% specificity medially, with 64% sensitivity and 90% specificity laterally.
Practice management software like Pabau captures structured assessment data, so physical therapy and sports medicine practices keep defensible records.
Ege’s test is one of the few orthopedic knee assessments that replicates the mechanism by which most meniscal injuries happen. Tears usually occur under load, yet the majority of clinical tests examine the knee supine and unloaded. Ridvan Ege, MD set out to close that mismatch when he described the test in 1968.
Physical therapists, sports medicine clinicians, and orthopedic practitioners need both the procedural detail and the evidence base to use the test defensibly. Recording those findings in a purpose-built physical therapy EMR keeps the clinical reasoning attached to the patient record.
This guide covers how to perform Ege’s test and how to read a positive result. It also covers what the accuracy data shows, and where the test belongs in a knee examination sequence.
Ege’s test, also called the weight-bearing McMurray’s test, is a clinical orthopedic assessment used to detect tears of the medial or lateral meniscus. McMurray’s test is performed supine. Ege’s test places the patient in full weight-bearing during a squat, which loads the menisci in a way that mirrors the injury mechanism.
The test was first described by Ridvan Ege, MD in 1968, making it the first clinical meniscal test built around weight-bearing. It was validated against arthroscopic findings in a 2004 study by Akseki et al., published in Arthroscopy: The Journal of Arthroscopic and Related Surgery. That paper remains the primary reference for its diagnostic accuracy data.
Key facts about Ege’s test at a glance:
The medial and lateral menisci are fibrocartilaginous structures that sit between the femoral condyles and the tibial plateau. They distribute compressive load, absorb shock, and contribute to joint stability. Both can tear, but they behave differently under tibial rotation, which is the core mechanical principle of Ege’s test.
Under external tibial rotation, the medial compartment closes and the medial meniscus is compressed between the femoral and tibial surfaces. That compression is what makes external rotation the provocative position for medial meniscal pathology. Internal tibial rotation does the same for the lateral compartment.
Compartment-specific loading is what lets Ege’s test separate medial from lateral tears inside one examination. Tests that load both compartments at once cannot make that distinction.
Two anatomical differences influence what you find:
Ege’s test runs in two stages, one for each meniscus. The clinician observes and palpates throughout. No equipment is required beyond a flat floor surface that lets the patient squat safely.
Both stages run in sequence, and they differ only in rotation direction. The summary below maps each stage to the compartment it loads and to the accuracy that compartment carries.
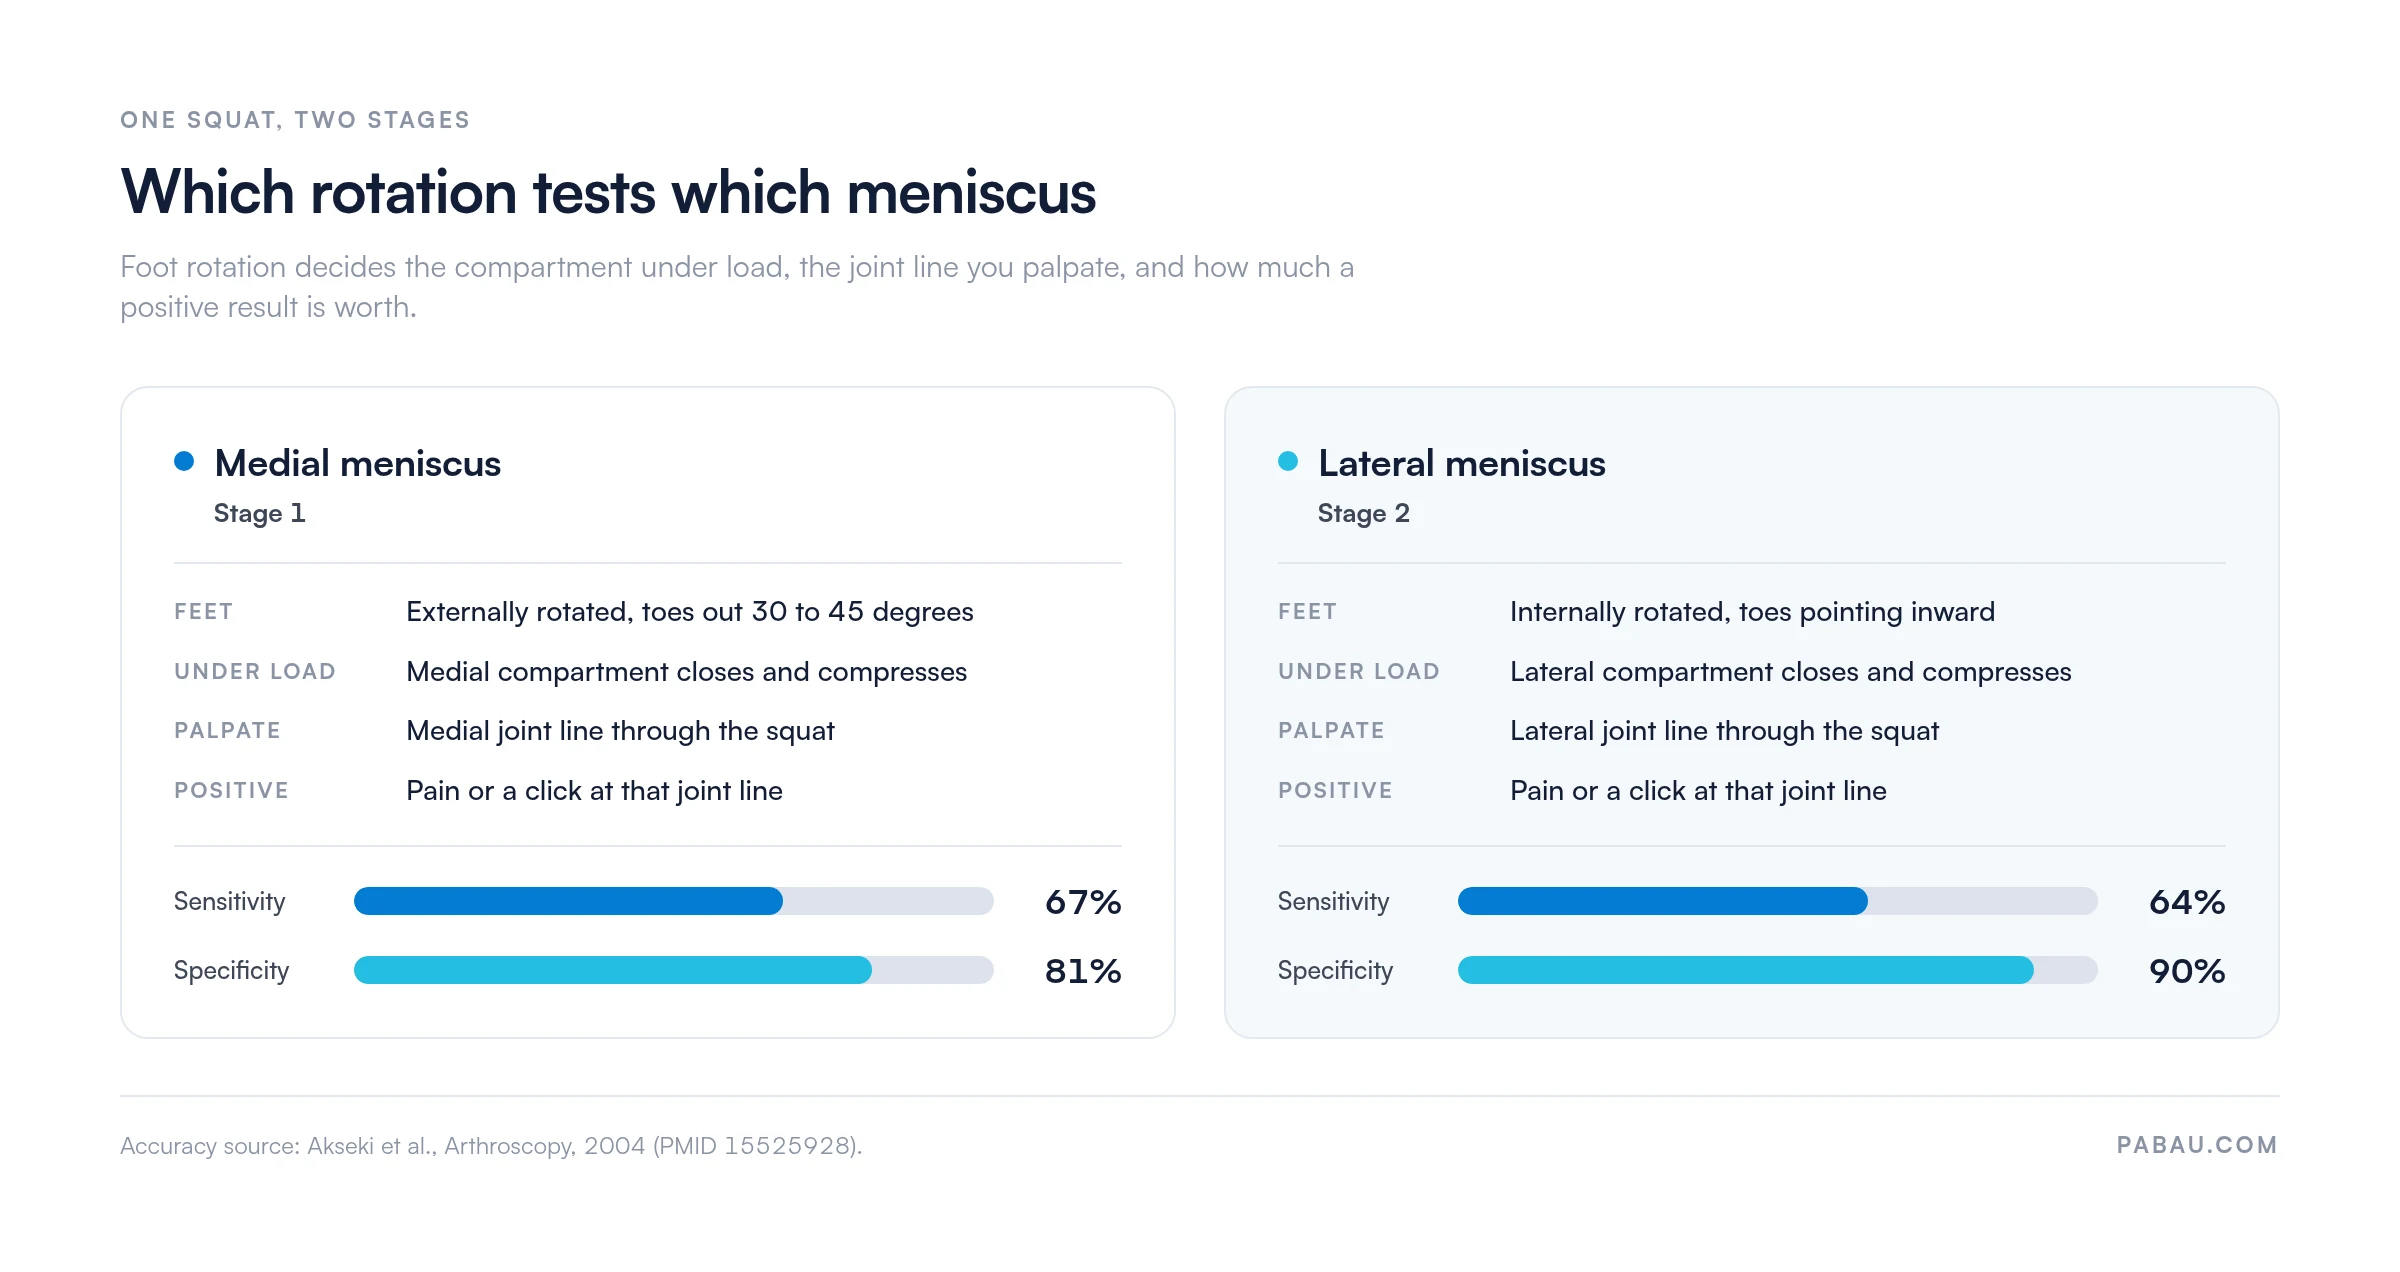
Documenting which rotational position provoked symptoms, and at which compartment, is what makes the finding usable later. Without that detail, the note records a painful squat and nothing more.
Ege’s test is positive when the squat provokes pain at the joint line of the compartment being stressed. An audible or palpable click at that joint line counts too.
A positive Ege’s test is a screening finding rather than a diagnosis. The sensitivity and specificity values below mean that false positives and false negatives both occur. Clinical reference guidance on knee meniscal tears from StatPearls treats a positive special test as a prompt for further investigation, usually MRI or arthroscopy.
A click without pain is not a positive result. The meaningful finding is pain localized to the compartment under stress, ideally reproducing the complaint the patient came in with.
The primary evidence base for Ege’s test comes from Akseki et al. (2004), published in Arthroscopy: The Journal of Arthroscopic and Related Surgery. The study compared Ege’s test, McMurray’s test, and joint line tenderness against arthroscopic findings as the reference standard.
Two practical implications follow from these numbers. Sensitivity between 64% and 67% means Ege’s test misses roughly one meniscal tear in three, so a negative result does not rule out pathology.
Specificity of 81% medially and 90% laterally means a positive result carries considerably more weight than a negative one. In the same study, specificity also ran higher than McMurray’s test and joint line tenderness. That profile makes Ege’s test a confirmatory step inside a battery, not a standalone screen.
Document whether the patient’s pain during Ege’s test reproduces their presenting complaint exactly. Provocation of a different or unfamiliar pain pattern is less clinically significant. It may point to a non-meniscal source such as patellofemoral irritation or MCL involvement.
Three tests dominate clinical meniscal assessment: Ege’s test, McMurray’s test, and the Thessaly test. Each targets the same pathology through a different mechanical approach, and each carries a distinct evidence profile. The Thessaly test is the newest of the three and the most dependent on single-leg balance.
The clinical consensus from the American Physical Therapy Association supports using a battery of meniscal tests rather than any single assessment. Combining Ege’s test, McMurray’s test, and joint line tenderness palpation improves diagnostic confidence beyond the accuracy of any one of them.
Ege’s test holds a specific advantage in subacute and chronic presentations where the patient tolerates full weight-bearing. McMurray’s test stays useful in acute situations where squatting is not possible. The Thessaly test’s early sensitivity figures have not replicated consistently since, which tempers its standalone weight.
Ege’s test does not suit every presentation. Because it requires full weight-bearing and a deep squat, several clinical scenarios limit or preclude its use. Published literature does not treat all of these as absolute contraindications, but each is a point where clinical judgment should guide the decision.
Clinicians in sports medicine practices meet the broadest range of these presentations. Documenting why a test was omitted or modified matters as much as documenting a positive result. A clear record of test selection supports continuity of care and stands up to later scrutiny.
Ege’s test does not stand alone. It belongs in a sequenced knee examination that runs from history-taking through observation, palpation, range of motion, and then special tests. Knowing where it sits in that sequence, and when to escalate to imaging, is what turns a set of tests into a defensible assessment.
A practical examination sequence for suspected meniscal pathology:
Deciding when to image is its own judgment call. After acute trauma, a validated decision rule such as the Pittsburgh knee rules tells you which patients need radiographs.
In subacute and chronic cases, Ege’s test often forms part of the functional loading screen. Clinicians working to a return-to-running protocol use it before clearing a patient for full activity. A negative test under load offers useful, though not conclusive, reassurance before you raise exercise intensity.
Once the diagnosis is settled, the plan moves to loading and strength work. A printable set of meniscus rehab exercises gives the patient something concrete to take home from the appointment.
Practices handling high volumes of musculoskeletal assessments benefit from structured digital intake forms. Capturing the knee history before the patient reaches the treatment room shortens the consultation and stops relevant history being missed.

Special tests are usually written as free text in the note. The rotation direction, the compartment, and the reason a test was skipped end up scattered across paragraphs. Six weeks later, nobody can line the findings up against the first visit.
Practice management software like Pabau replaces that with structured forms. You build the knee examination once as a template, with a field for each test, the side, and the finding. The clinician taps through it during the assessment rather than typing it up afterwards.
What you get back is a record you can compare visit by visit. Review appointments open on the previous findings, progress notes line up, and a colleague picking up the case can see what was tested and why.

Pabau helps physical therapy, sports medicine, and orthopedic practices capture structured assessment data, manage patient records, and automate appointment reminders. Clinicians spend less time on admin and more time in the treatment room.

Ege’s test earns its place because it loads the knee the way the injury did. Use it in subacute and chronic presentations where the patient can squat safely, and read it alongside joint line tenderness and McMurray’s test.
The trade-off is worth holding on to. Specificity of 81% medially and 90% laterally makes a positive result meaningful. Sensitivity near two-thirds means a negative test settles very little, so keep imaging on the table whenever the history points at a tear.
Write down what you tested, what you found, and why, and the next clinician can pick the case up without repeating the examination. Book a demo to see how Pabau structures musculoskeletal assessment records for physical therapy and sports medicine practices.

Comparing weight-bearing meniscal tests? Thessaly test covers the single-leg alternative and where its accuracy figures came from.
Need a rehab handout once the diagnosis is settled? Meniscus rehab exercises worksheet gives patients a printable loading program to take home.
Clearing an athlete for full activity? Return-to-running protocol sets out a staged framework for functional clearance decisions.
Deciding whether an acute knee needs an X-ray? Pittsburgh knee rules covers the criteria and how to document them.
Tracking knee outcomes across a course of care? Knee outcome survey provides a patient-reported measure you can repeat at each review.
Ege’s test is a weight-bearing orthopedic knee assessment used to detect tears of the medial or lateral meniscus. The patient squats with the tibia externally rotated for the medial meniscus, or internally rotated for the lateral meniscus. Pain or a click at the relevant joint line is a positive finding. It sits inside a meniscal assessment battery alongside McMurray’s test and joint line tenderness palpation.
The patient stands with feet shoulder-width apart. For the medial meniscus, they externally rotate both feet and perform a slow, controlled squat to depth. The clinician observes and palpates the medial joint line throughout. The test is then repeated with the feet internally rotated to assess the lateral meniscus. Pain or an audible click at that compartment, on descent or ascent, is a positive sign.
A positive Ege’s test means pain, or a palpable or audible click, at the medial or lateral joint line during the rotated squat. It suggests possible meniscal pathology in the compartment under stress. Treat it as a screening finding that should prompt further investigation, usually MRI. Specificity is higher than McMurray’s test, so a positive result carries reasonable predictive weight, but false positives still occur.
According to Akseki et al. (2004), Ege’s test has a sensitivity of approximately 67% and a specificity of 81% for medial meniscal tears. For lateral meniscal tears, sensitivity is 64% and specificity is 90%. These values were validated against arthroscopic findings, and specificity ran higher than McMurray’s test in the same study.
The key difference is position. McMurray’s test is performed with the patient supine, applying passive tibial rotation with valgus or varus stress. Ege’s test is performed weight-bearing during an active squat, which more closely replicates the mechanism of meniscal injury. Ege’s test has higher reported specificity, while McMurray’s test can still be used in acute presentations where a squat is not possible.
Ege’s test was first described by Ridvan Ege, MD in 1968. Akseki et al. later validated it in a 2004 comparative study. That paper appeared in Arthroscopy: The Journal of Arthroscopic and Related Surgery (PMID 15525928). That study confirmed its diagnostic accuracy against arthroscopy and compared it directly with McMurray’s test and joint line tenderness.