Bike riding exercise plan: Free 4-week template (PDF)
A bike riding exercise plan is a week-by-week schedule that moves you from your ...

1
Last Updated: Oct 2, 2026
A jumping rope exercise plan is only worth printing if it tells you what to do on every training day. Plenty of them stop at a vague 15 minutes a day, and leave technique, rest and progression to you. That is where beginners usually stall.
This free four-week template fills in the detail. You train five days a week, opening with five rounds of 30 seconds and finishing at eight rounds of 50. Build the weeks in that order and your calves adapt before the volume climbs.
Below you get the progression table, cues for three jumps, both routines, and a log for all 20 sessions.
Five printable pages covering the 4-week progression table, the warm-up and cool-down routines, and technique cues for all three jumps. The file also carries a form check and a dated training log for every session in weeks 1 through 4.
Download template
A jumping rope exercise plan fixes the technique, work time, recovery and round count for all 20 sessions.
Week 1 is the basic bounce, week 2 alternating feet, week 3 interval pacing, and week 4 mixes in double unders.
Sessions stay short. Week 1 is five rounds of 30 seconds, and week 4 is eight rounds of 50.
The PDF carries the progression table, warm-up and cool-down routines, technique cues, a form check, and a log sheet for every session.
Coaches can share the plan and chase check-ins with practice management software like Pabau, which sends automated reminders and stores each client’s history.
A jumping rope exercise plan is a time-boxed conditioning schedule for rope training. It sets the technique, the work window, the recovery, and the number of rounds for each session. That structure replaces open-ended jumping with a progression you can repeat and measure.
This template follows a progressive overload model. Week 1 builds the movement pattern at low intensity. Week 2 lengthens the work window and cuts the rest. Week 3 adds interval pacing, meaning short hard efforts with easy jumping between them. Week 4 mixes techniques at the highest volume of the cycle.
The PDF runs to five printable pages, and each one maps to a section of this article.
Print it single sided if you want room to write in the log. Otherwise keep it on your phone and note the rounds while you are still catching your breath.
Size the rope first, then block out five training days and two rest days. Stand on the middle of the cable with both feet, and the handles should reach about armpit height. Train Monday through Friday, and keep Saturday and Sunday for rest or easy movement.
Every session then runs the same way. Warm up for 3 to 5 minutes, work through the week’s prescription, then cool down for 4 to 6 minutes. Both routines are set out further down this page and on page 2 of the PDF.
Coaches usually take a baseline before day one. A fitness assessment form records resting heart rate, mobility and injury history, which gives week 4 something to be measured against.
The table below carries the prescription for every training day. Run the same one on all five days of the week, then step up on the following Monday. It is the same table you will find on page 2 of the template.
Session total counts work and recovery together, and it leaves out the warm-up and cool-down. Drop the work time or add to the recovery if your form breaks before the last round. The progression matters more than the exact seconds.
Line the four weeks up side by side and the shape of the plan shows. Jumping time more than doubles, while the session itself grows by less than four minutes.
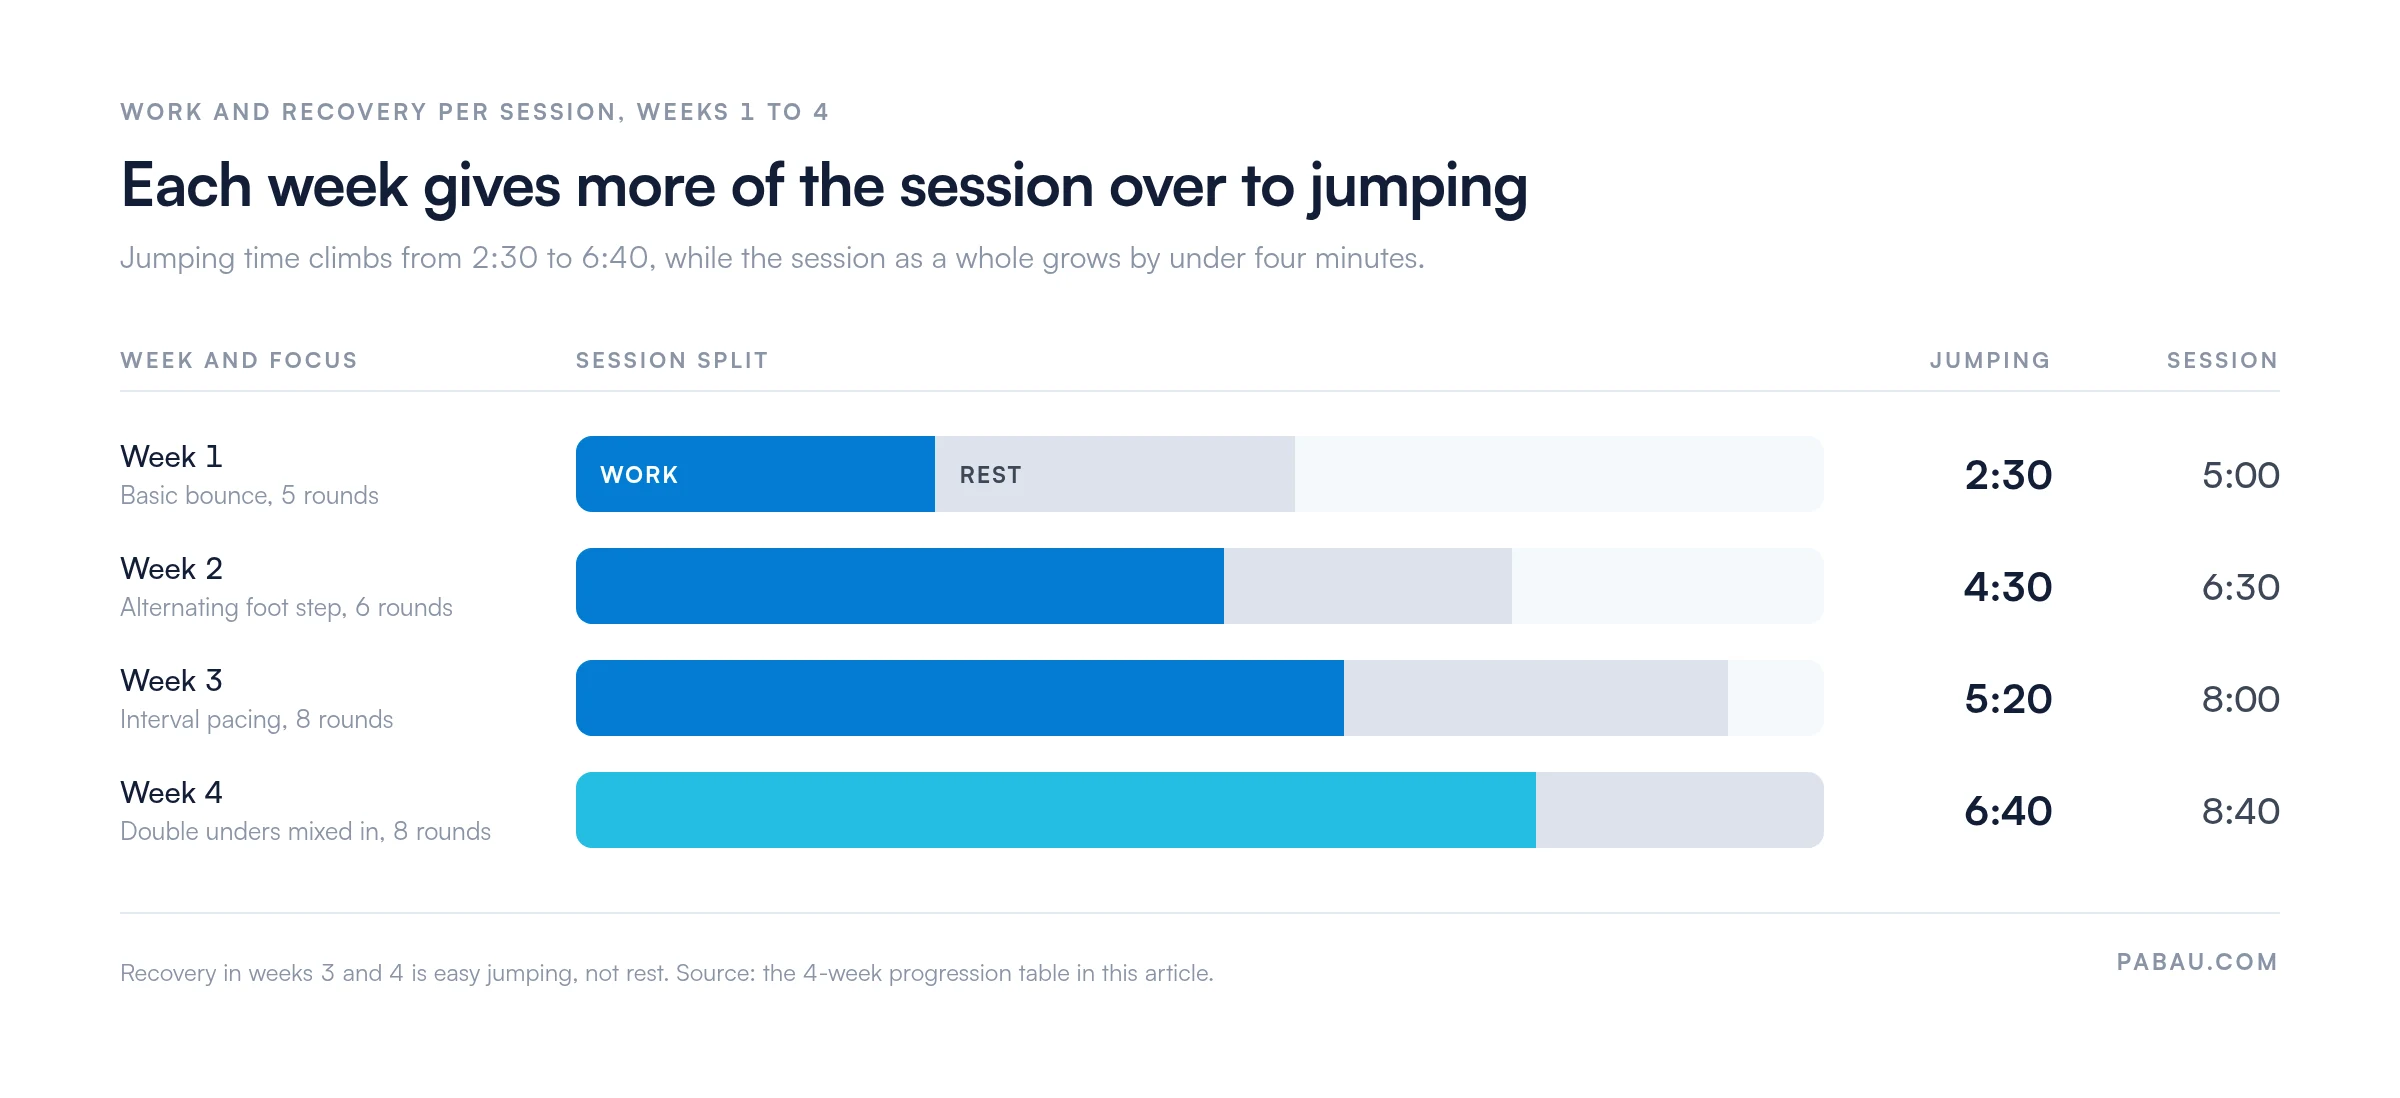
Week 1 is five rounds of 30 seconds with 30 seconds of rest, on the basic bounce only. Most people finish all five rounds on the first attempt, which is the point. You are building the movement pattern, not chasing a heart rate. If you trip, stop the clock, reset, and start the next round clean.
Week 2 runs 45 seconds of work with 20 seconds of rest, across six rounds. Those extra 15 seconds are where conditioning starts to show. Switch to the alternating foot step this week if the basic bounce feels automatic. If it does not, stay on the bounce and take the progression from the clock instead.
Week 3 moves to interval pacing, with 40 seconds hard and 20 seconds easy across eight rounds. Hard means faster foot speed, not a higher jump. Easy means steady jumping at about half pace, so the rope keeps turning. Expect Monday to feel harder than week 2 and Friday to feel easier.
Week 4 is 50 seconds hard and 15 seconds easy, across eight rounds. Mix the techniques inside each hard round, and fit in 5 to 10 double unders once the alternating step settles. By Friday you should be less winded between rounds than you were in week 1. Those numbers become the baseline for your next cycle.
Judge the recovery, not just the work. On easy intervals in weeks 3 and 4, keep the rope turning at about half pace instead of stopping. Steady active recovery holds your heart rate up and builds the aerobic base faster than standing still.
Learn the basic bounce first, then the alternating foot step, then double unders. Get each one slow and clean before you add speed. Page 3 of the template carries the same cues in printable form.
Stand with your feet together and hold the handles at hip height. Swing the rope overhead and jump as it passes under your feet. Land on the balls of both feet with a soft knee bend, never flat footed and never on your heels.
Keep your elbows close to your ribs and turn the rope from your wrists, rather than swinging your arms in wide circles. A steady 120 turns per minute is a good starting speed. Practice 30 seconds on and 30 seconds off until five rounds feel comfortable.
Once the basic bounce feels automatic, land on your right foot as the rope passes, then your left on the next turn. The motion looks like a jog, and many people find it easier than the two-foot bounce. It also costs less energy per minute, so longer work windows stay manageable. Keep the same wrist-driven turn and the same rhythm.
A double under is two rope turns per jump. The speed comes from your wrists rather than a higher jump, though you do need slightly more air. Start practicing in week 3, once your singles are reliable. Work sets of 3 to 5 in a row, reset, then go again, and link them into longer strings as your timing improves.
Every session starts with 3 to 5 minutes of warm-up. Jog lightly in place for 60 to 90 seconds, then work through 20 arm circles each way and 10 shoulder rolls. Finish with ankle circles, 15 calf raises, and 30 to 60 seconds of practice jumps at half speed.
Every session ends with 4 to 6 minutes of cool-down. Walk for 2 to 3 minutes until your breathing settles. Then hold a calf stretch and a kneeling hip flexor stretch for 20 to 30 seconds each side. Finish with a seated shin stretch. Those are the areas that fatigue first during rope work.
Rope work raises your heart rate to 75 to 85% of maximum within two or three minutes. That is why short sessions still build aerobic capacity. Regular endurance exercise lowers resting heart rate over weeks of consistent training. A target heart rate chart shows what that range looks like at your age.
It is also high impact. Your legs absorb around 1.5 to 2 times your body weight on every landing, and that load stimulates the cells that build bone. Mineral density in the legs and spine responds to repeated impact of this kind over months.
The third payoff is coordination. Turning the rope, placing your feet and holding your posture all happen at once, so your timing sharpens quickly. Many athletes use rope work as movement preparation before strength or sport-specific training. If that strength block needs its own structure, a kettlebell training plan sets the sessions, loads and rest.
Look for handles under 150 g each and a cable that is smooth and even in thickness. Thin PVC or beaded speed ropes turn fast and hold up well, which suits this plan. Leave weighted ropes until your technique is solid, because they punish sloppy timing.
Length still matters more than price. Re-run the armpit test from the setup section, since most ropes sold today adjust. Set the cable to that mark before your first session and leave it there for the cycle.
Jumping from the hips: beginners often fold at the hips and knees on every repetition. Drive from your ankles and calves with only a slight knee bend. That saves energy and makes faster rope speeds sustainable.
Swinging from the shoulders: let your wrists do the work. Keep your elbows at your ribs and flick the rope forward. Shoulder-driven swings tire your upper back and waste the round.
Skipping the warm-up: three minutes of preparation is not lost training time. It readies your calves and ankles for impact, and it lowers your injury risk on the days you feel rushed.
Fighting the wrong rope length: a cable that drags underfoot or catches your shoulders throws your timing off. Re-run the armpit test above before you blame your technique.
Logging the plan instead of the session: writing down what you intended hides the weeks where you cut rounds short. Record what you finished, even when the number is smaller than the prescription.
Pages 4 and 5 of the template carry the log. For each training day, note the date, the rounds you finished, and whether the session was completed or modified. Add one line on what made it hard. Rest days get a row too, so the week reads as a whole.
Jump count is the other number worth chasing. At 120 turns per minute, a 30-second round in week 1 comes to roughly 60 turns. A faster 40-second hard round in week 3 lands closer to 90. Counting turns gives you a figure that moves week to week.
From week 3, heart rate recovery is worth a look as well. Take your pulse at the end of a hard round, then again a minute later, and watch that drop widen as your conditioning improves.
A coach can hand that job to software instead of a group chat. Automated workflow tools prompt each client to log the session and flag the ones who have gone quiet for a week.

A coach who hands out a 4-week plan usually emails the PDF, then chases each client for an update. The file sits in an inbox, and the record of what was completed never makes it back to the coach.
Practice management software like Pabau keeps the plan and the record together. You can attach this template to a client’s file, share it through the client portal, and let automated reminders prompt each check-in. Session notes and measurements then sit alongside the plan they belong to.
Rehab and sports teams work the same way. Pabau doubles as a physical therapy EMR, so exercise prescriptions, progress notes and outcome measures stay on one client record.
For group programs, memberships turn a 4-week progression into a package clients buy and renew. Every subscription includes the full feature set, so scheduling, payments and client records come with the plan rather than as extras.

Coaches use Pabau to share plans like this one through the client portal and send automated check-in reminders. Session notes stay on the client’s record, so progress is easy to review.

Four weeks is long enough to change how the rope feels, and short enough to finish. The trade-off worth remembering is simple. Seconds on the table are negotiable, while the order of the weeks is not. Trim a work window if your form goes, but do not skip ahead to double unders.
Print the log before Monday. A written record is what turns 20 sessions into a habit you can see. It also tells you whether week 3 has earned you a week 4.
If you coach clients through plans like this one, book a demo with Pabau and see how shared plans, reminders and session notes fit together.

Not sure which heart rate range you are training in? Target heart rate chart sets out the training zones to aim for by age.
Want to see your conditioning improve week to week? Heart rate recovery chart by age shows how far your pulse should drop after hard work.
Need a baseline before week 1? Fitness assessment form gives you a starting point to measure week 4 against.
Looking for strength work to sit alongside the rope? Beginner workout plan for women follows the same week-by-week structure as this one.
Coaching other people through this plan? Personal training questionnaire collects the history you need before handing a client a program.
Wood, rubber matting or a gym mat are the kindest surfaces. Each one gives a little under the landing, so your calves and shins take less load. Concrete works, though long sessions on it feel harsh. Grass is soft, but it hides dips that catch the rope.
Cross-trainers with cushioning under the forefoot are the safest pick. You land on the balls of your feet, so that is where the padding needs to be. Thick-heeled running shoes tip you backward and blunt the rebound.
Rope work burns roughly 12 to 16 calories per minute for most adults, which makes it efficient cardio. Weight loss still comes down to total intake against total expenditure. Pair the plan with strength work and an eating pattern you can hold.
Yes, on a mat and after a check of your ceiling height. Neighbors below hear the landings rather than the rope, so a thick mat does most of the work. Keep the noise down in week 4, when the hard rounds run longest.
Run the cycle again with the same structure and slightly longer work windows. Add five seconds per round, or hold the times and add a ninth round. Your week 4 log is the baseline, so change one variable at a time.