Physician credentialing checklist
A physician credentialing checklist lists every license, certificate, verificati...

Last Updated: Oct 23, 2026

This free checklist for moving into assisted living splits the move into four phases, from first research through to long-term reviews.
The pre-move-in section covers choosing a facility, reviewing the contract, transferring medical records, downsizing, and setting up power of attorney.
Move-in day and the weeks after focus on settling the room, meeting staff, confirming the care plan, and monitoring adjustment.
Practice management software like Pabau captures the same resident details digitally, so admissions paperwork does not get re-keyed later.
A two-page task checklist with a resident details header, then sections for pre-move-in, during the move-in, after moving in, and other important considerations. A blank notes page follows for anything the family or facility needs to record.
Download templateMoving a parent or partner into assisted living spreads dozens of small tasks across several weeks. Some are practical, such as transferring medical records. Others are legal or emotional, and those are the ones that slip.
This page explains what the free checklist covers and how families and facility staff work through it together. It also sets out what each phase of the move asks of you.
A checklist for moving into assisted living is a task list that breaks the transition into phases. Families and facility staff use it to track what is finished and what is still outstanding.
The move is rarely a single event. Research and contract review happen weeks ahead. Records transfer, legal arrangements, and downsizing follow. Settling in and monitoring adjustment continue long after moving day.
Working the phases in order stops decisions from piling up on the day itself. It also gives the family, the resident, and the facility one shared reference point.
The template runs to two pages. Page one opens with a short resident details header, then lists four task sections. Page two is a blank notes page.
The header records the basics anyone picking up the form needs:
Below the header sit the four task sections:
Each line is a task to work through rather than a field to complete. That keeps the form short enough to print and carry through the whole move.
The template is a coordination checklist rather than a packing list. Its only belongings-related task is to downsize, keeping what is necessary and loved.
The checklist works best when one copy is shared rather than several kept separately. These five steps match how families and facility staff usually divide the work.
The template is written for anyone with a role in the move, not only the family.
Pre-move-in is the longest section on the form and the one that carries the most consequence. It starts with researching and selecting a facility that genuinely matches the resident’s care needs, then visiting to confirm the fit.
The contract review deserves unhurried attention. Read what services the monthly fee includes, what counts as an additional charge, and how costs change if care needs increase.
Coordinating the medical records transfer is the step families most often leave late. Ask the current providers what they need in writing, and confirm the facility has received everything before arrival.
Downsizing and arranging safe transport of belongings come next. Involve the resident in those decisions wherever possible, since the choices are personal and the process is tiring.
Finally, set up power of attorney or any other legal arrangement the move requires. Facilities collect directives and authorization forms at admission, so having them signed in advance keeps the day straightforward.
Move-in day is short, and the checklist keeps it focused on five things rather than on unpacking speed.
Check the room or apartment is clean, safe, and ready to occupy before anything is carried in. Then set the space up with personal touches, which does more for the first night than perfect organization.
Introduce the resident to staff and to other residents. Those first introductions start the social side of the move, which is usually the slowest part to take hold.
Walk through the daily schedule and the available amenities together. Confirm that the medication and care plans are understood by facility staff rather than simply handed over. Clear patient education at this point prevents medication confusion in the first week.
The after-moving-in section is where a checklist earns its place, because attention naturally drops once the boxes are gone.
Keep regular communication going with facility staff so you can see how the adjustment is progressing. Visit often, both for emotional support and to observe the quality of care first-hand.
Encourage participation in activities and social events. Engagement tends to build slowly, and a resident who has been to two events is far more likely to attend a third.
Monitor health and well-being, and raise anything that concerns you with healthcare professionals rather than waiting for a scheduled review. Reduced mobility, swelling, or poor poor circulation are worth flagging early. Then reassess, at intervals, whether the facility still meets the resident’s needs. Software for primary care practices links the recall to the result, which is where manual systems lose patients.
The final section of the template collects the longer-horizon items that no single move-in date resolves.
For many seniors the move represents a loss of independence and the end of a long-held home. The checklist covers the tasks, but families carry the emotional side.
Validate feelings without dismissing them. Sadness, anger, and anxiety are all normal responses. Saying that you know this is hard acknowledges the experience, where relentless cheerfulness usually lands as dismissive.
Involve the resident in decisions. Let them choose what to keep, what goes on the walls, and how the room is arranged. Small choices preserve dignity and improve engagement with the move.
Set a visiting routine. Predictable visits give the resident something to anticipate. Sharing a meal, walking the grounds, or joining a facility event beats an open-ended promise to visit soon.
Talk to the staff. Share the resident’s history, routines, and preferences so care can be personalized. Families who collaborate on care management and stay informed tend to report better outcomes.
Most of what the checklist’s header asks for is collected again at admission, then again by the care team, and often on paper each time. That repetition is where details get lost.
Practice management software like Pabau replaces that with digital intake forms. A resident’s details, emergency contacts, medication list, and signed authorizations are captured once and filed straight into their record.
Automated workflows then chase what is still outstanding, so admissions staff are not emailing families to ask which form is missing. Every subscription includes these tools, with nothing held back on lower plans.
The result is a single record per resident. A care review, a family question, or a regulator inquiry can be answered from it without a search through folders.
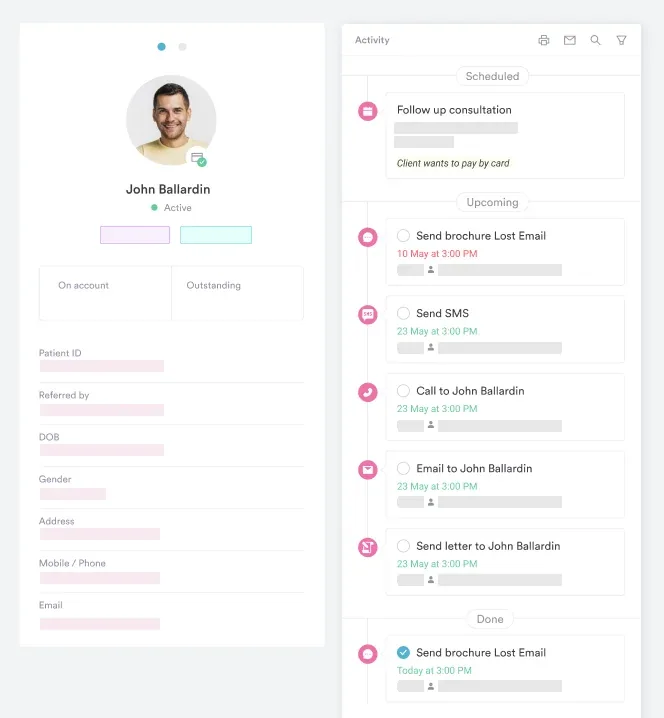

Pabau’s digital forms collect resident details, contacts, and signed authorizations at the first visit, then file them straight into the client record. Your team stops re-keying admissions paperwork and can find any document during a care review.

A move-in checklist earns its keep by making every task, decision, and outstanding document visible to the family and the facility at the same time.
Download the template, fill in the header, and work the four sections in order. Add whatever your facility requires on top, since rules on furniture, pets, and personal items vary from building to building.
Once the move is done, the paperwork still has to live somewhere findable. Book a demo to see how Pabau keeps resident records, consents, and contact details in one place.

Managing a resident’s controlled medications? controlled substance agreement template covers patient responsibilities, drug testing consent, refill rules, and monitoring requirements.
Watching a resident’s health after the move? Circulation assessment explains the checks that flag mobility and vascular problems early.
Planning a resident’s daily routine? daily care plan for elderly patients covers routines, ADL and IADL assessments, medication tracking, and care coordination for older adults.
Completing intake for a child starting daycare? daycare physical form covers exam findings, immunization dates, allergies, and activity restrictions before enrollment.
Assessing a patient’s nerve distribution? dermatome map template maps the 30 dermatomes to support consistent sensory testing and diagnosis of radiculopathy.
It is a task list that breaks the move into phases so families and facility staff can track progress. This template uses four: pre-move-in, during the move-in, after moving in, and other important considerations.
Two pages. A resident details header for name, date of birth, age, emergency contact and healthcare provider. Then four task sections covering the move from facility research to ongoing advocacy. A blank notes page follows.
No. It is a coordination checklist rather than a packing guide, and its only belongings-related task is to downsize, keeping what is necessary and loved. Ask your facility for its own rules on furniture, appliances and personal items.
Start as soon as facility research begins. The pre-move-in section alone covers contract review, medical records transfer, downsizing and power of attorney, and each of those takes time to arrange properly.
Whoever is coordinating the move, working from a single shared copy. Families, the resident, and the facility’s admissions contact all have tasks on it, so duplicate versions are how items get missed.
Validate their feelings, involve them in decisions about the room, keep a predictable visiting routine, and share their history and preferences with staff. The checklist prompts this in its after moving in section.