Facial skin treatment consent form template: Microneedling and phi-ion
A facial skin treatment consent form is the signed proof that a patient was scre...

2
Last Updated: Oct 21, 2026

A beauty salon floor plan is a scaled overhead diagram showing where reception, styling stations, shampoo, color, and storage sit in your footprint.
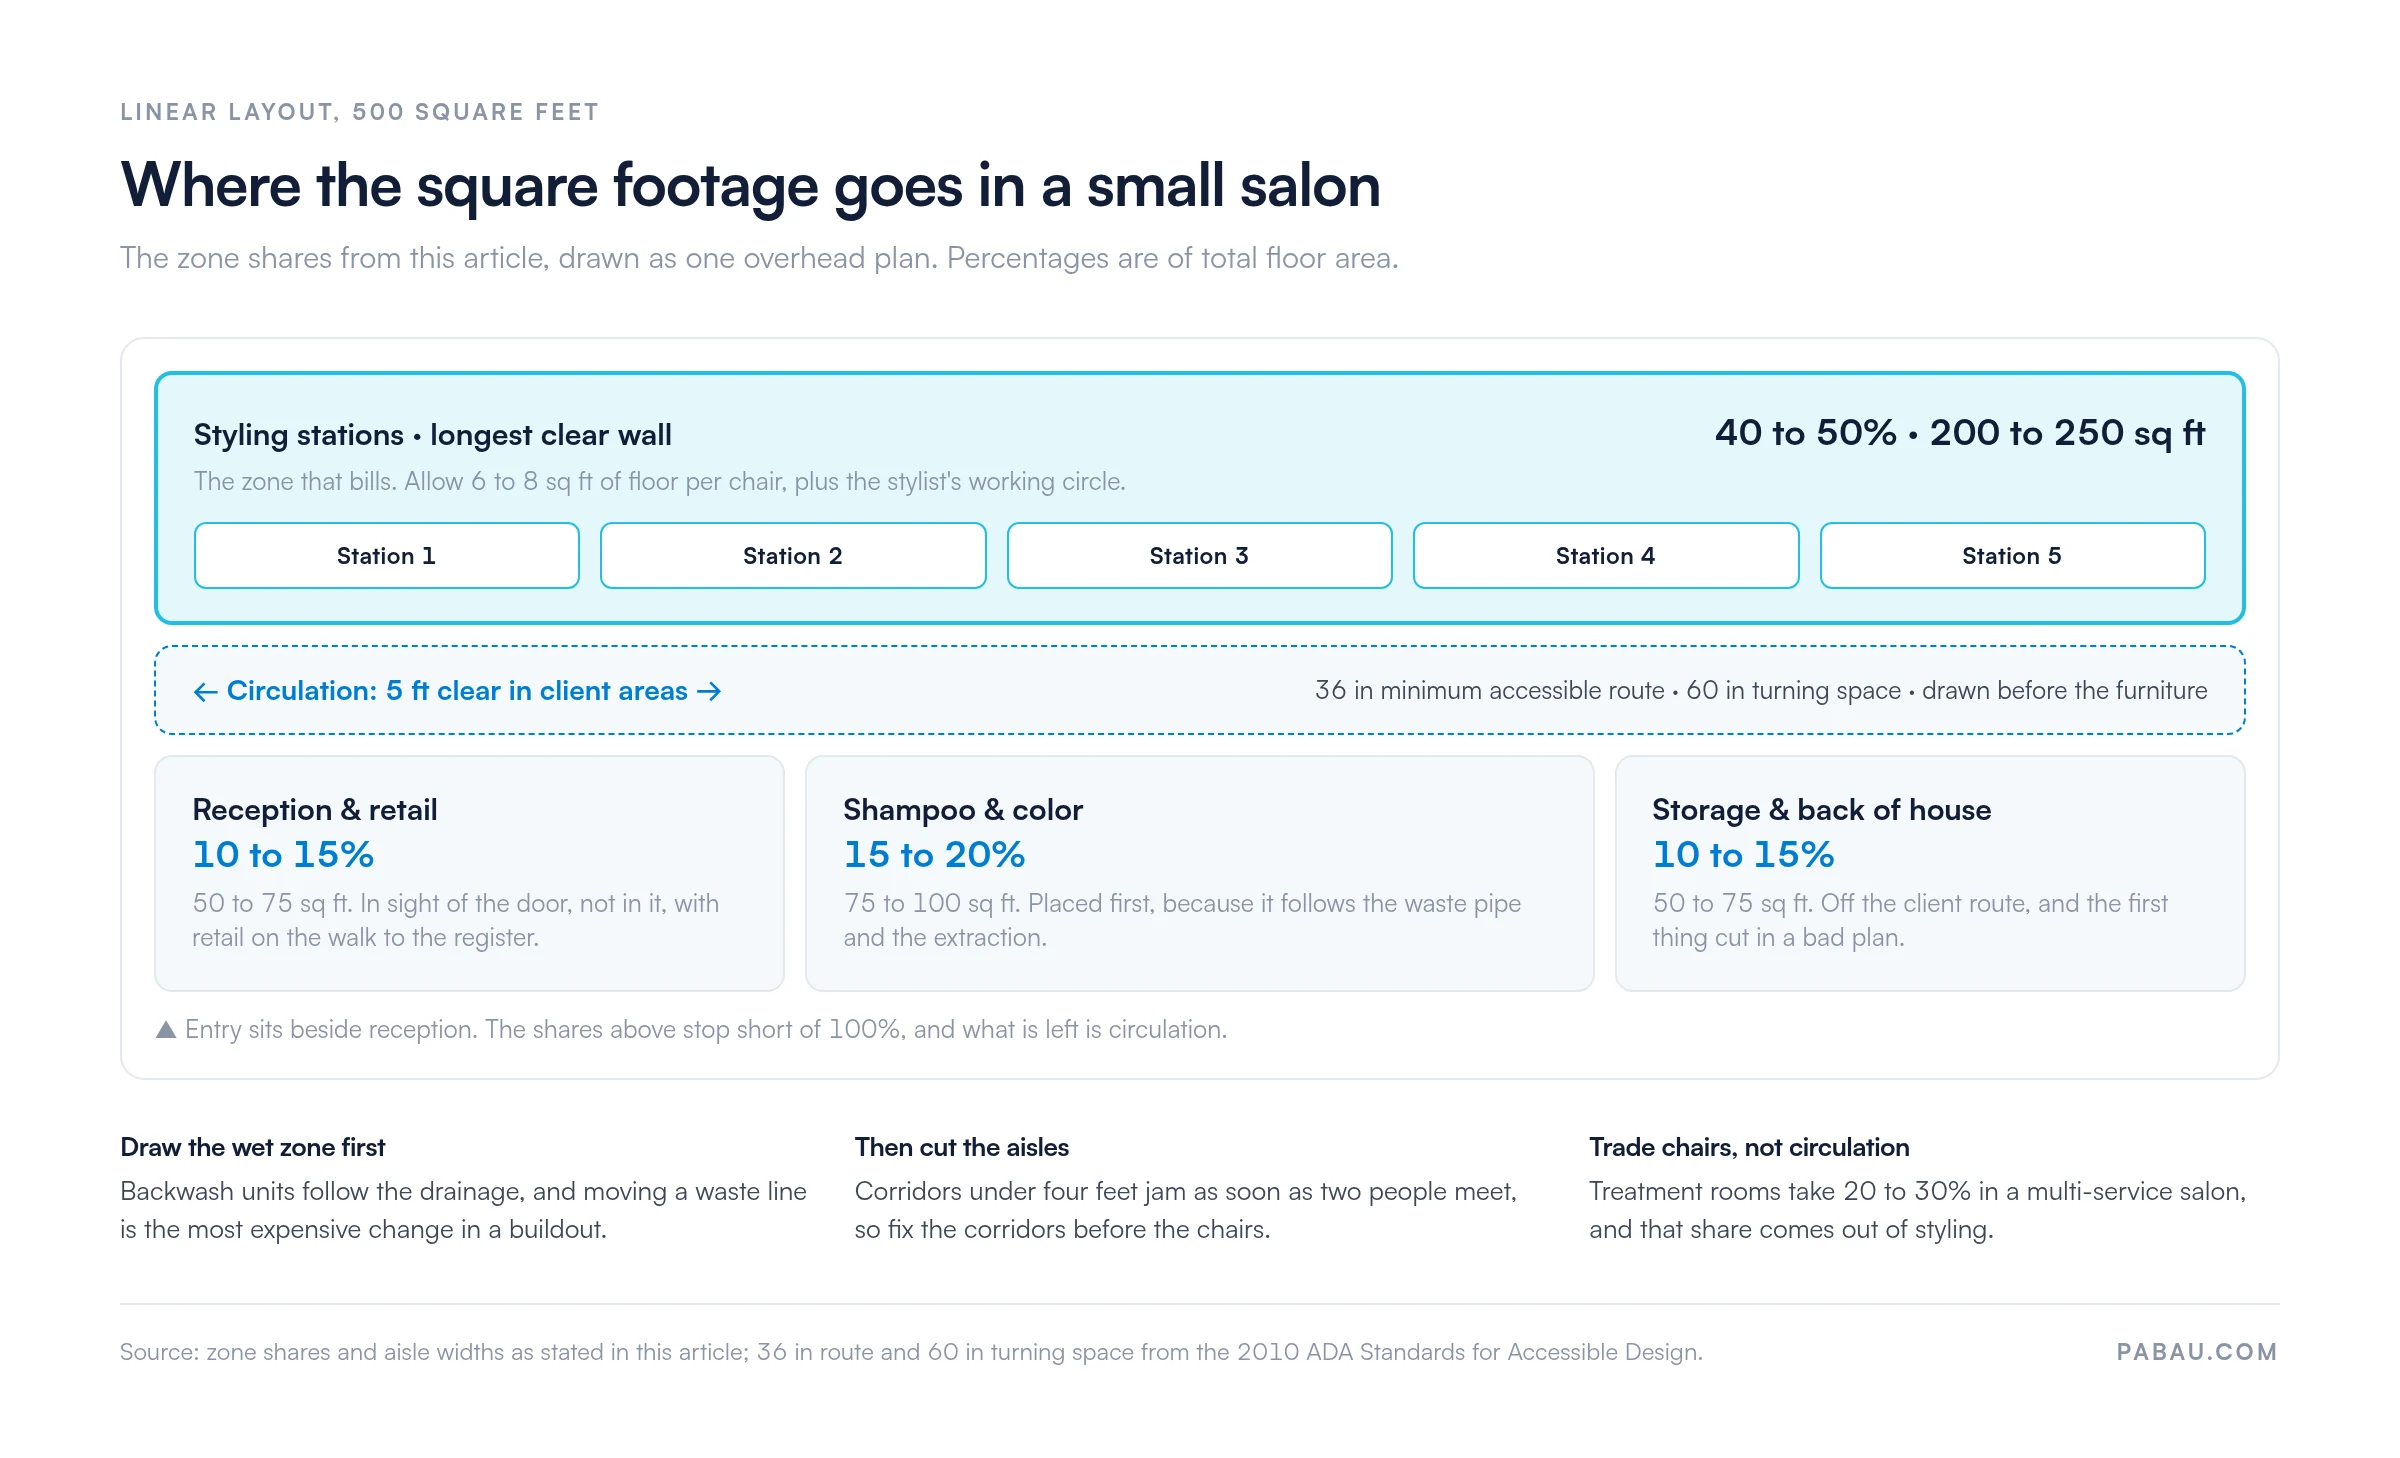
Zone allocation decides how much the space can earn. Styling stations take 40 to 50 percent of the floor, with 10 to 15 percent each for reception and storage.
Linear, island, L-shaped, U-shaped, open-plan, private-room, and hybrid layouts each suit a different salon model and footprint.
The 2010 ADA Standards set a 36-inch minimum clear width on an accessible route, so draw your aisles before you place any furniture.
Salon management software like Pabau makes each room and station bookable, so the calendar cannot sell the same space twice.
A beauty salon floor plan is a scaled overhead drawing of your space. It decides how fast the salon runs, long before the first chair arrives. Two salons can fit eight chairs into the same 600 square feet and still work at different speeds. The difference is where the wash zone sits and how wide the aisles ended up.
One rule drives the rest. The wet zone goes on the plan first, because backwash units follow the waste pipe. Draw the chairs first instead, and you pay a plumber to move drainage later.
Below are the zone sizes, the square-footage splits, seven layout types, and the clearances you cannot design around.
The drawing fixes the position of furniture, equipment, and every functional zone. That means reception desks, styling stations, shampoo bowls, color and treatment areas, storage, and the paths between them.
Drawn before a buildout or a remodel, it forces every decision into the open while changes still cost nothing.
A strong plan answers two questions at once. Staff need short, uncrossed routes between the zones they use most.
Clients need to get from the door to a chair and back to the register without passing through a stockroom. Both answers have to fit inside the local building code, the accessibility clearances, and the fire and egress rules for your premises.
Most salon owners draw the layout themselves, then hand it to a designer or contractor. Graph paper at a quarter inch to the foot is enough.
What you are producing is a decision document, not a permit drawing, and every later quote gets priced against it.
Professional salons organize space into functional zones, each with its own purpose and its own minimum size.
Naming the zones before you hand out square footage stops you from sizing them by eye. Guesswork is what produces a crowded styling area and a stockroom nobody can reach.
Those figures are per zone. The next check is how they sit against each other, as a share of the whole floor.
Percentages are the fastest way to sanity-check a plan. For a hair-led salon, aim for this split of the total floor area:
Whatever you allocate, the shares still have to add up to 100. A multi-service salon might give 20 to 30 percent over to private treatment rooms.
That share has to come out of styling, not out of circulation. Squeeze the aisles instead and two stylists cannot pass behind a seated client.
So decide the trade before you draw. Fewer chairs and two treatment rooms is a different business from eight chairs and none. The staffing is different, the average ticket is different, and the floor plan is where that choice gets made concrete.
The diagram below shows the same shares as one 500 square foot plan, with the circulation drawn in rather than left over.
Layout is the arrangement of the zones you just sized. Each of these seven puts the styling stations somewhere different, and each one buys you something at a cost.
Most salons under 500 square feet end up linear or compact island, on cost and efficiency. Above 800 square feet, hybrid layouts pay for themselves, because a private treatment room carries a higher ticket than a styling chair.
Renting stations out changes the drawing again, since every renter needs an equal, self-contained spot. The choice between booth rental and commission decides how many of those you have to fit.
In a small salon, every square foot has to earn its place. Start from the hair-led split above, with roughly half the floor going to styling. What makes a compact plan work is doubling up.
Reception can carry the retail display. One backwash unit can serve hair clients and skincare prep, as long as the two are never booked into it at once.
Three moves buy back the most floor in a tight space. Take storage up the wall, so shelving replaces cabinets. Check which way every door swings, because an inward swing takes a patch of usable floor out of play. Then keep the aisle you drew, even when a fourth chair looks like it would fit.
Small salons also lose money to double-booked spaces faster than large ones, because there is no spare room to move anyone into.
Appointment scheduling that mirrors the room layout stops that, since a room can then only be sold once.
Work in this order. Each step removes options from the next one, which keeps you from redrawing the whole plan once the plumber prices the job.
Before you sign off, tape the plan out at full size on the empty floor with painter’s tape and stand a chair in each station. A layout that looks generous at a quarter inch to the foot can lose most of an aisle once real furniture is in it. Fixing that on the floor costs a roll of tape. Fixing it after the plumbing is in costs a second buildout.
Six checks take ten minutes on paper and save a change order later.
Client flow is the path a client takes from the door to the exit. It sets how long a visit feels, how much staff time goes on directing people, and where queues form. A good flow moves in one direction and never doubles back.
Corridors under four feet create congestion the moment two people meet. Aim for five feet of clear width in client areas, and more where a client waits while another passes.
Name the rooms as well, so clients can find their own way instead of asking at the desk. Room-based salon software keeps the two in step, because the room the calendar sold is the room on the door.
Some dimensions are not yours to choose. Get these into the drawing early, because they change how many chairs the room holds.
None of this replaces a check with your local building department. Ask before the buildout, not after, and get the answer in writing where the plan depends on it.
A hair-led salon spends its plan on backwash infrastructure and on ventilation for color work. Styling stations dominate the floor, and the whole layout is built around the wash zone.
A beauty salon selling facials, waxing, microblading, or injectables needs enclosed rooms instead. Those services ask the client to undress, lie down, or be photographed, so privacy becomes a design requirement rather than a nice touch.
Rooms also need somewhere secure for the consent forms and treatment records they generate. In a med spa handling patient data, that turns into a compliance question.
A hybrid salon has to fund both halves. The shampoo zone gets smaller but stays essential, and the treatment rooms take their share out of the styling allocation.
Separate the two halves as well, so dryer noise does not carry into a facial. Digital intake forms take pressure off the layout, because the paperwork gets done before the client arrives rather than in the room.

Bad salon layouts tend to fail in the same handful of ways. Each of these is cheap to fix on paper and expensive to fix once the space is built.
A floor plan is only worth what your booking system enforces. In most salons the layout lives in the manager’s head.
That means two color chairs, one facial room, and a note that the room is unusable while the laundry runs. Such knowledge does not survive a busy Saturday or a new receptionist, so the same room gets sold twice.
Practice management software like Pabau fixes that by making rooms and equipment bookable in their own right. Each treatment room, styling station, and piece of shared kit becomes a resource on the calendar.
A service that needs the facial room cannot be booked while the room is taken. You can also filter the calendar by room, by staff member, or by location, which turns your drawing into something the front desk can see.
Over a few months that record also tells you where to spend next. If the color chair is booked solid while a styling station sits idle, the next remodel has an obvious answer.
That answer comes from your own booking data rather than a guess.

Pabau makes every room, station, and piece of equipment bookable in its own right. Your calendar reflects the floor plan you drew, so the same space never gets sold twice.

A salon floor plan is a set of trades. Every chair you add takes space from an aisle, a stockroom, or a treatment room. The plan is where you decide which of those pays better. Make the trades deliberately and the space works for years. Make them by eye during a buildout and you live with them just as long.
So start with the shell and the services that cannot move, allocate the zones by percentage, then protect the circulation you drew. Check the accessible route widths and your state board rules before you order furniture, because those two force a redraw.
Then make sure the booking system knows the layout, or the plan stops being true the first week you are fully booked. Book a demo to see how Pabau makes each room and station bookable, so your calendar always matches the floor plan.

Ready to match the calendar to the plan? Beauty salon booking software in the US compares the systems that book by room and station rather than by stylist alone.
Building the business case for the space? The esthetician business plan template walks through the numbers behind the treatment rooms you are drawing.
Adding private rooms to the layout? The esthetician client intake form covers the paperwork those rooms have to collect and store.
Wondering what the retail walk is worth? How to increase average ticket size in a spa shows what the route past retail can add to each visit.
Renting stations out instead of hiring? Booth rental vs commission sets out how each model changes the station count your plan has to carry.
Free browser-based floor planners cover most salon jobs. Tools like SketchUp Free and Floorplanner let you draw walls to scale, then drop furniture in. Graph paper works too, as long as you hold one scale throughout. Contractors mainly need dimensions they can price.
Usually yes, once the work touches structure, drainage, or exit routes. Moving a wall or adding a backwash unit normally needs permit drawings and an inspection. Rearranging furniture inside an existing shell does not. Ask your local building department before you order anything.
Give every renter an equal, self-contained station with its own mirror, storage, and power. Keep shared backwash and laundry in a neutral zone that no renter controls. Then write the shared-zone rules into the rental agreement, because the layout alone will not settle them.
Along a wall where you can add local extraction, and away from the dryers and the wash zone. Nail work produces dust and vapor, so it needs its own air path and a wipeable surround. Leave room for a second seat, since manicures often run alongside another service.
A sealed, slip-resistant floor that survives water, hair, and color spills. Vinyl plank and sealed concrete both sweep clean, which matters most around the chairs and the wash zone. Skip grout lines and carpet in wet areas, and check the slip rating before you commit.