GLP-1 diet plan
A GLP-1 diet plan is a structured eating framework for patients taking semagluti...

2
Last Updated: Oct 13, 2026

The talar tilt test assesses calcaneofibular ligament integrity through controlled inversion stress, and can implicate the ATFL when both ligaments are torn.
A positive test means excessive talar tilt against the other ankle, a soft end-feel, or pain on inversion stress.
Published evidence puts sensitivity at 17-66% and specificity at 82-100%, so the test confirms CFL injury better than it excludes one.
Hold the ankle in neutral or slight dorsiflexion, because plantar flexion shifts the stress onto the ATFL.
Practice management software like Pabau standardizes ankle assessment records, so every practitioner captures the same values.
The talar tilt test is a hands-on assessment of the calcaneofibular ligament (CFL), performed by applying a controlled inversion stress to the hindfoot.
A positive result means the talus tilts further than it should, the end-feel goes soft, or the inversion reproduces the patient’s lateral ankle pain.
A 2022 systematic review published in PubMed Central reports specificity of 82-100% for CFL injury. That makes the test a reliable way to confirm a suspected tear. Sensitivity is far weaker, at 17-66%, so a negative result settles very little on its own.
This guide covers positioning, technique, the thresholds that define a positive finding, and where the test belongs in an ankle instability workup.
The talar tilt test evaluates the lateral ankle ligaments by loading the hindfoot into inversion and measuring how far the talus moves. Its primary target is the calcaneofibular ligament (CFL), which runs from the fibula to the lateral calcaneus. The CFL resists inversion across both the ankle and the subtalar joint.
When the CFL is disrupted, inversion stress produces abnormal talar tilt within the ankle mortise. The examiner detects that through movement quantity and end-feel quality. In more severe injuries involving combined CFL and ATFL disruption, the test may also reflect anterior talofibular ligament laxity.
Physical therapists, podiatrists, and sports medicine clinicians use it mainly to isolate CFL status rather than to screen for multi-ligament injury.
Understanding which structures you are stressing matters before applying any inversion load to the ankle. The lateral ankle complex contains three main ligaments.
The CFL’s orientation means testing is most informative when the ankle sits in neutral or slight dorsiflexion. In that position the CFL is under tension, so a disruption produces measurable inversion laxity. Moving the foot into plantar flexion shifts stress toward the ATFL instead. Small changes in ankle position therefore alter which ligament you are evaluating.
The procedure follows a consistent sequence. Variation in technique is the largest source of inter-rater disagreement, so it is worth standardizing each step across your practice.
Position the patient supine or seated with the foot unsupported and hanging freely off the edge of the treatment table. The ankle should sit in neutral or slight dorsiflexion. Avoid plantar flexion, which shifts stress toward the ATFL rather than the CFL.
The patient should be relaxed. Muscle guarding from pain or apprehension confounds the test by limiting the inversion range you can assess. Apply gentle passive movement to the ankle first, so the peroneal muscles let go.
The examiner places one hand around the distal tibia and fibula to stabilize the leg. The other hand cups the calcaneus, with the thumb and index finger positioned to sense calcaneal movement. Apply a slow, controlled inversion force to the calcaneus, tilting the heel medially while the tibia stays stabilized.
Avoid applying force through the forefoot or midfoot, which shifts the mechanical axis of the test. The inversion force should be directed through the hindfoot. Note both the range of tilt achieved and the quality of the end-feel at maximum inversion.
Always repeat on the contralateral ankle using identical technique before interpreting results. The comparison is the clinical reference point, not an absolute degree value.
Interpretation depends on both absolute angle thresholds and the side-to-side comparison. Neither criterion alone is enough.
The thresholds above are commonly cited reference values from clinical literature rather than absolute diagnostic cutoffs. Published sources present both the 10-degree threshold and the 3-5 degree side-to-side difference as ranges. Individual variation in ankle anatomy means the contralateral comparison carries more weight than any single number.
A positive talar tilt test is present when inversion stress produces at least one of the following findings, confirmed against the contralateral side.
A single positive criterion should be interpreted cautiously. Excessive tilt, a soft end-feel, and pain reproduction together give stronger evidence of CFL involvement than any one sign alone.
The diagnostic accuracy of the talar tilt test has been evaluated in several studies. A systematic review published in PubMed Central (PMC9109591) pools the evidence for ankle ligament clinical tests. Its figures show where each test is reliable and where it is not.
High specificity is what makes a positive talar tilt test worth acting on. It points strongly toward CFL pathology. Sensitivity as low as 17% means a negative result excludes very little, so a normal test does not close the question.
Many confirmed CFL tears still produce a negative talar tilt test. That happens most in the acute setting, where muscle guarding stops the examiner stressing the ligament adequately.
The two tests target different ligaments, which is why experienced clinicians run both rather than relying on either alone.
The anterior drawer test assesses the ATFL, with a pooled sensitivity of 54% and a pooled specificity of 87%. The talar tilt test assesses the CFL, and its specificity of 82-100% makes it the stronger confirmatory test of the two. Neither one has the sensitivity to rule an injury out.
In practice, the sequence matters. The ATFL tears first in most lateral ankle sprains, and the CFL is additionally compromised in higher-grade injuries.
Running the anterior drawer test first screens for ATFL involvement, and a positive talar tilt test then raises suspicion of a combined CFL-ATFL tear. A positive talar tilt test with a negative anterior drawer test is an atypical presentation worth investigating further.
Laid out in order, the workup runs from fracture exclusion through to the imaging decision, with the two ligament tests in between.
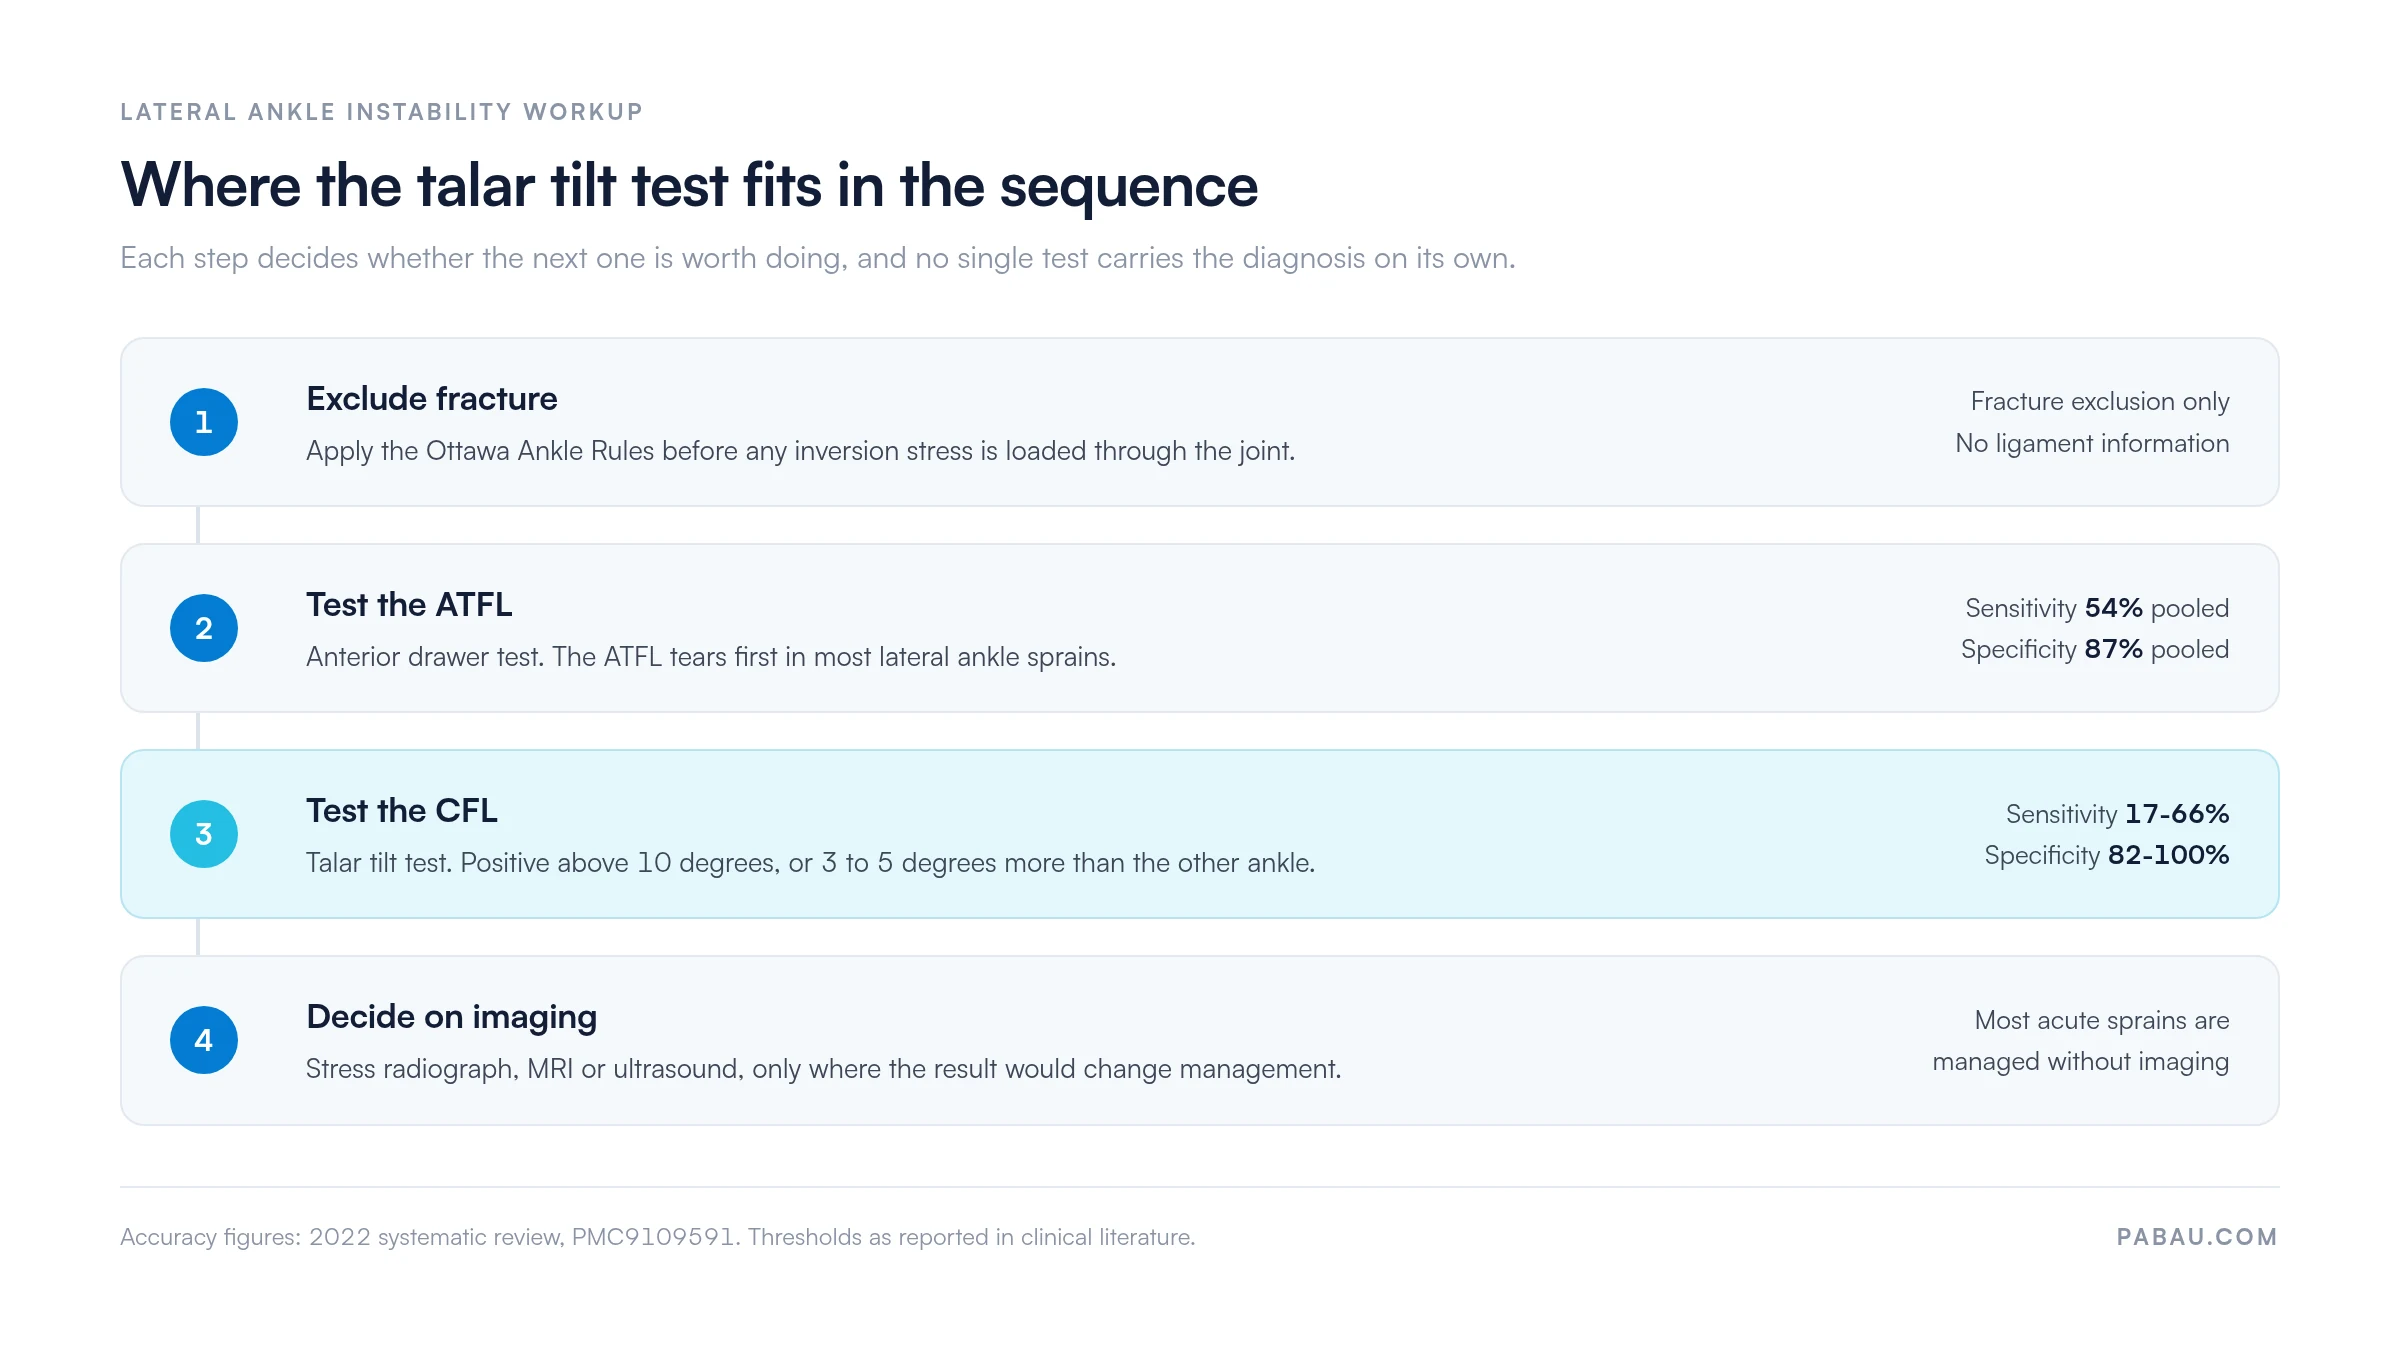
Physical therapists working in sports medicine practices usually document both tests in the same clinical episode. The record then shows lateral ankle ligament status before a management plan is set.
The talar tilt test has limitations that change how much weight its findings deserve, especially in the acute injury phase. Recording those limitations in the clinical note protects the practitioner when the findings are inconclusive.
Test the contralateral ankle first when there is any uncertainty about the patient’s baseline laxity. Establishing that individual’s end-feel before you test the symptomatic side makes a soft end-feel far easier to detect.
A positive talar tilt test alone does not mandate imaging. The decision depends on clinical context, injury severity, and whether fracture has been excluded. Clinicians managing these presentations in physical therapy practices should follow a structured decision pathway rather than ordering imaging reflexively.
Use the Ottawa Ankle Rules first to exclude fracture. Our Ottawa Ankle Rules calculator walks through the criteria step by step. The rules apply to fracture exclusion only, and they carry no information about ligament integrity.
Imaging changes management most often when the clinical decision is borderline. That includes chronic lateral ankle instability that has not settled with rehabilitation, and cases where surgical referral is under consideration. Most acute lateral ankle sprains with a positive talar tilt test are managed conservatively without imaging.
Once the technique is settled, a second question lands on the practice owner. How do you make sure every clinician performs and documents the test the same way? Technique variability is one of the test’s known limitations, and it compounds in busy practices where different staff assess the same returning patient.
Structured documentation solves a meaningful part of this. When the assessment form captures the specific values recorded, the next clinician reviewing that record can compare rather than start fresh. Those values are the talar tilt angle, the side-to-side difference, the end-feel quality, and whether the Ottawa Rules were applied.
Practice management software like Pabau supports this with digital intake forms you can build into standardized assessment templates. Each template prompts the practitioner through every step, which cuts omissions and leaves the team an auditable record. Findings stay attached to one patient profile, so someone seen at two sites is compared against their own earlier measurements.
Choosing the platform matters as much as choosing the form. Practices comparing physiotherapy clinic management software should confirm that custom assessment templates and longitudinal client records are supported before committing.

Pabau captures structured assessment findings, tracks outcomes, and keeps complete patient records without the paperwork. Your team documents the same values the same way, at every site.

The talar tilt test earns its place as a confirmatory test for CFL injury, read alongside the anterior drawer test. Interpret it against the contralateral side every time. Its weakness in the acute phase, where guarding drives sensitivity down, means it should inform your clinical decision rather than settle it.
For practices carrying musculoskeletal caseloads, the harder problem is consistency. Every clinician needs to document the test the same way, capture comparable values, and leave a record the next practitioner can build on.
Pabau’s digital forms and client records give physical therapy and sports medicine practices that structure. Book a demo to see how your team can standardize ankle assessment documentation.

Managing the rehab phase after a lateral ankle sprain? Return-to-running protocol in physical therapy sets out the criteria and timelines for getting a patient back to load.
Need a fracture decision tool at the point of care? The Ottawa Ankle Rules calculator walks through the exclusion criteria step by step, alongside your clinical exam findings.
Planning to open or scale a physical therapy practice? Opening a physiotherapy clinic covers the compliance, documentation, and operational decisions to get right from day one.
Documenting to a regulator’s standard? Mandatory compliance for physiotherapy clinics sets out the record-keeping requirements that apply to musculoskeletal practices.
The talar tilt test is a clinical assessment of calcaneofibular ligament (CFL) integrity. The examiner applies a controlled inversion stress to the hindfoot. Physical therapists, podiatrists, and sports medicine clinicians use it to detect lateral ankle ligament laxity. It is most often applied after an ankle sprain, or in chronic lateral ankle instability.
A positive talar tilt test shows excessive inversion range against the contralateral side, typically more than 3-5 degrees of asymmetry. A soft or absent end-feel at maximum inversion also counts, as does reproduction of the patient’s familiar lateral ankle pain. All three findings together give stronger evidence of CFL injury than any single one.
Normal talar tilt is generally cited as less than 5 degrees, and values above 10 degrees are commonly considered pathological. A side-to-side difference of more than 3-5 degrees is clinically significant, even when both ankles fall within the normal range. These thresholds vary in the literature, so weigh the contralateral comparison above any single cutoff.
The talar tilt test targets the CFL, with sensitivity of 17-66% and specificity of 82-100%. The anterior drawer test targets the ATFL, with a pooled sensitivity of 54% and a pooled specificity of 87%. Clinicians use both together because they assess different ligaments, and neither has the sensitivity to exclude injury on its own.
Image when fracture cannot be clinically excluded, applying the Ottawa Ankle Rules first. Image also when the presentation suggests complete CFL rupture needing surgical planning, or when chronic instability has not settled with rehabilitation. Stress radiograph measures talar tilt under inversion load, while MRI is preferred for soft tissue grading. Most acute lateral ankle sprains are managed conservatively without imaging.
No, the Ottawa Ankle Rules apply to fracture exclusion only. They identify which patients need a plain radiograph to rule out malleolar or midfoot fracture. The rules do not assess ligament integrity, so they cannot tell you whether a ligament test is needed. Both the Ottawa Rules and the clinical ligament tests serve different decision points in the ankle injury workup.