GLP-1 diet plan
A GLP-1 diet plan is a structured eating framework for patients taking semagluti...

2
Last Updated: Oct 13, 2026
A shoulder mobility test measures how far the shoulder travels through flexion, abduction, and rotation, then sets that result against clinical benchmarks.
Three screens cover most of what a non-specialist needs: the Apley scratch test, the Functional Movement Screen, and the wall angel.
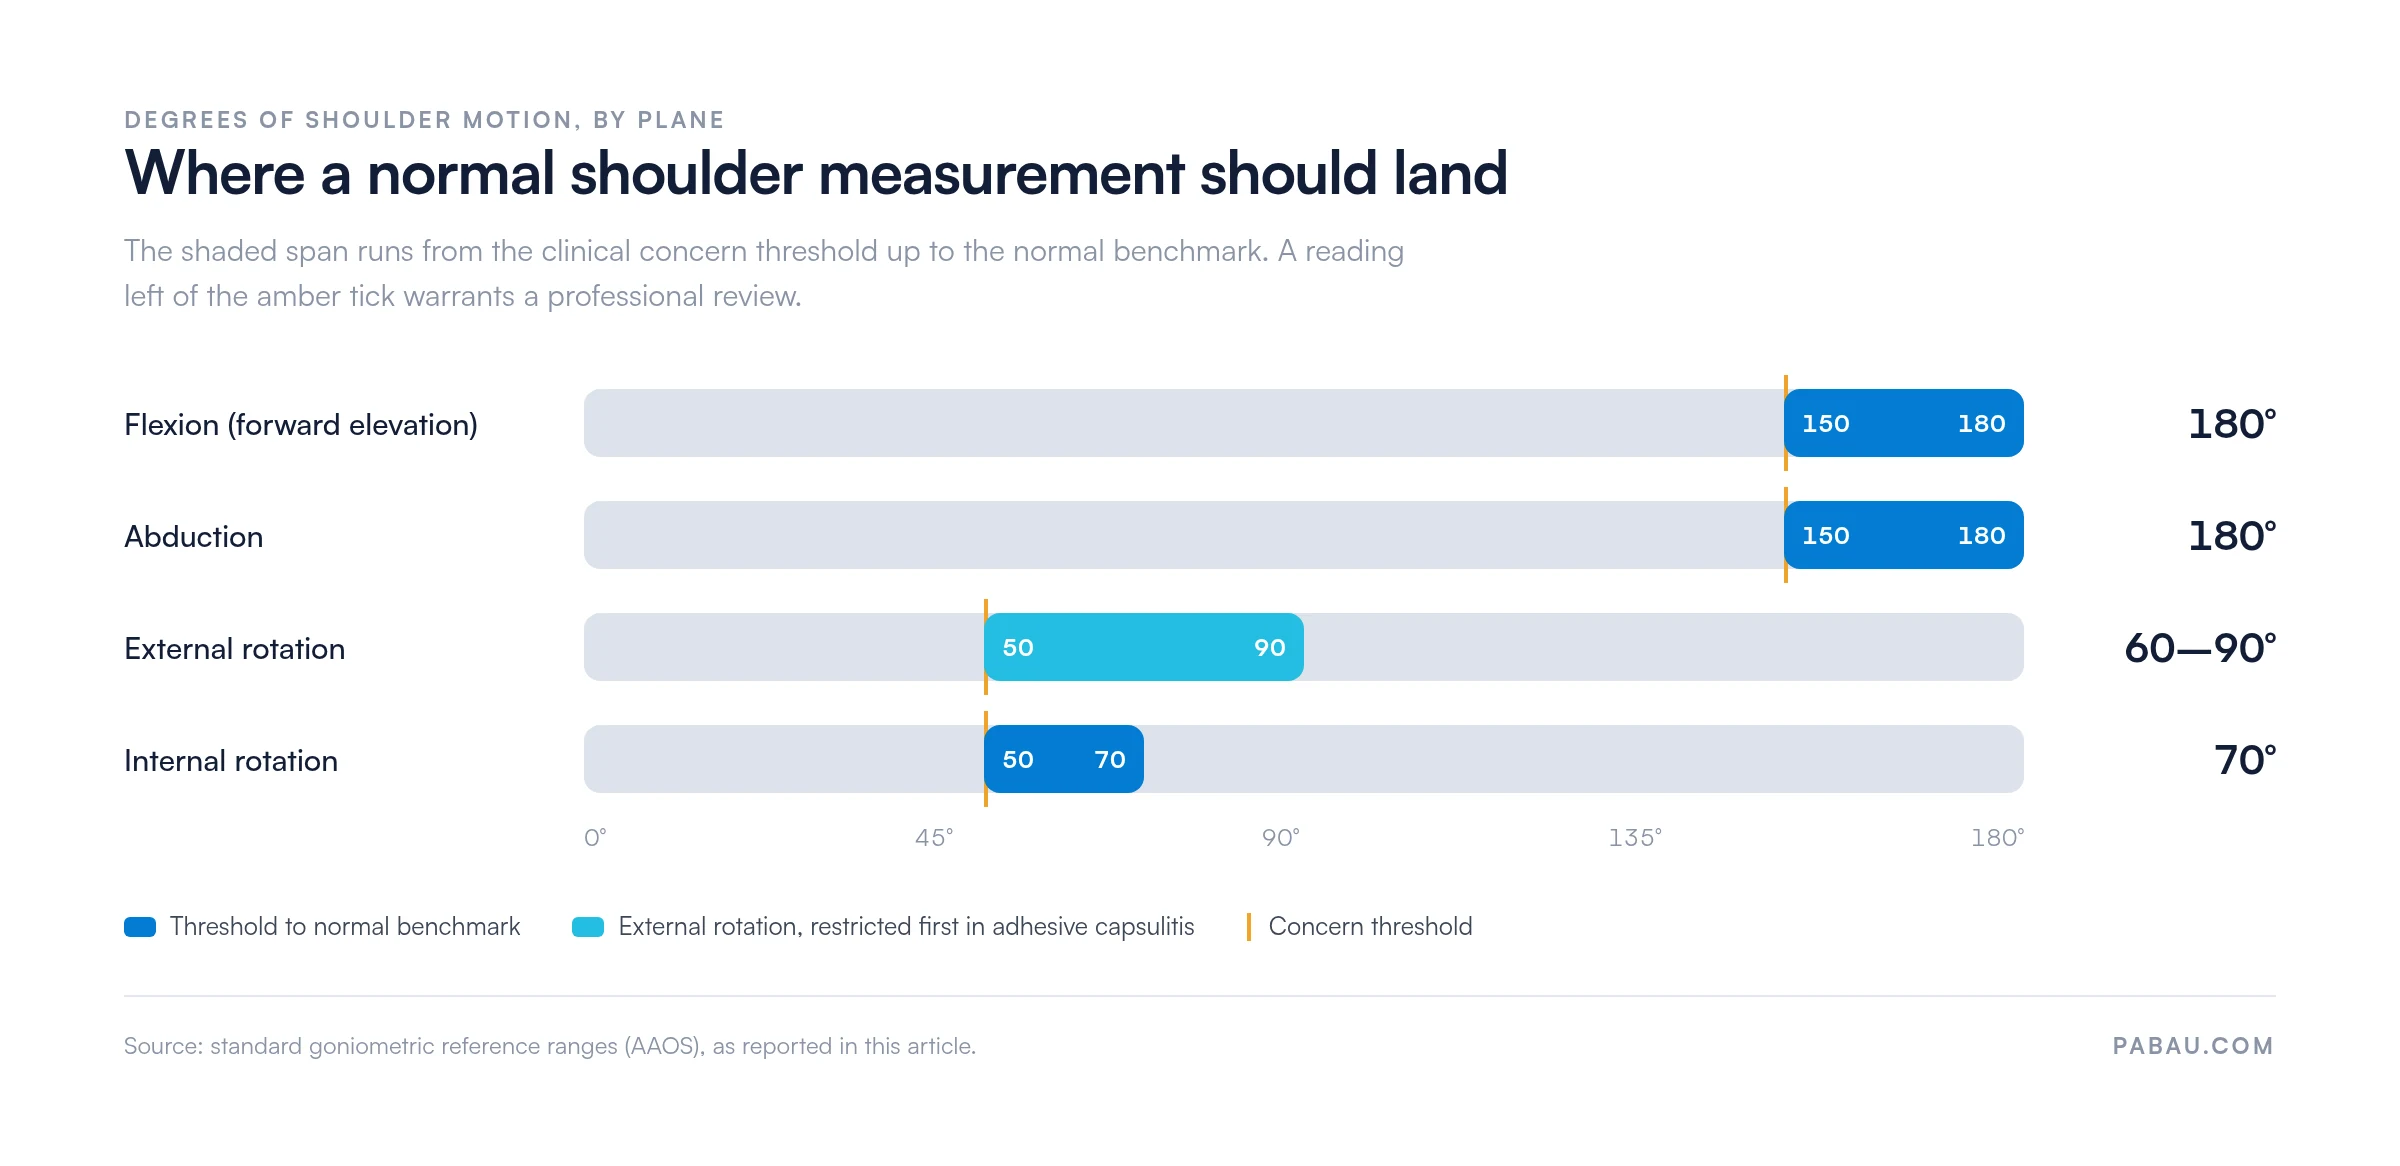
The reference values are 180° of flexion, 180° of abduction, 60-90° of external rotation, and 70° of internal rotation. A reading well below those figures, or a side-to-side difference above 15-20°, is worth a professional review.
This guide gives you the protocol and scoring for each test, then what a restricted pattern usually points to. Practitioners screening patients will also find where the result belongs in the record. If you are still choosing that system, our guide to physiotherapy practice software covers the options.

A shoulder mobility test measures how far the shoulder moves through flexion, abduction, and rotation, which often reveals restrictions before pain appears.
Normal reference values are flexion 180°, abduction 180°, external rotation 60-90°, and internal rotation 70°.
The Apley scratch test and the FMS shoulder screen are the most accessible self-tests, while clinical tests such as Hawkins-Kennedy need a trained practitioner.
Practice management software like Pabau lets physiotherapy and sports medicine practices log ROM scores at each visit and compare them between sessions.
A shoulder mobility test is a clinical or functional screen that measures the glenohumeral joint’s capacity to move through defined planes of motion. The glenohumeral joint is the most mobile joint in the human body. Its ball-and-socket structure depends on a precise balance between flexibility and rotator cuff stability to work without pain or impingement.
Restrictions in shoulder mobility rarely appear in isolation. They often reflect tightness in the posterior capsule, rotator cuff weakness, thoracic stiffness, or early pathology such as subacromial impingement. Catching those restrictions before they become symptomatic is the clinical value of routine screening.
Active range of motion (AROM) is the arc the shoulder moves through using the patient’s own muscle effort. Passive range of motion (PROM) is the arc achieved when an external force, typically a clinician’s hand, moves the joint instead. Comparing the two arcs is what turns a measurement into a finding.
When AROM falls well short of PROM, the limitation is more likely muscular, neurological, or pain-inhibited than capsular. When AROM and PROM are equally reduced, the deficit points to a structural cause such as adhesive capsulitis. There the capsule itself limits movement, whoever creates the force.
Normal shoulder ROM values are the benchmarks an individual result gets measured against. The figures below follow standard goniometric reference ranges for the shoulder, consistent with American Academy of Orthopaedic Surgeons (AAOS) guidance on joint motion measurement. They describe typical adults, and individual values shift with age, sex, and training history.
A goniometer or inclinometer is the standard tool for clinical measurement. Without instruments, comparing the affected side against the unaffected side is a practical starting point. Plotted on one scale, the four planes sit a long way apart, which is why a single number never describes shoulder mobility on its own.
These self-test protocols are screening tools, not diagnostic instruments. Restricted movement, pain, or asymmetry means you should seek a professional assessment, not that you have a confirmed diagnosis. Perform each test on both sides and compare.
The Apley scratch test combines shoulder flexion, abduction, external rotation, and internal rotation into two complementary movements. It is widely used as a quick screen in both clinical and fitness settings.
The Functional Movement Screen (FMS) shoulder mobility test was developed by Gray Cook and colleagues. It assesses combined flexion, abduction, external rotation, and internal rotation through a bilateral fist-placement test. Athletic trainers, physiotherapists, and strength coaches use it as part of the wider FMS system.
The FMS scoring system uses hand-length as a normalized measure, so the threshold adjusts proportionally to body size. That is one reason athletic screening prefers it over a fixed centimeter cutoff.
The wall angel test screens thoracic extension and shoulder mobility together. It catches restrictions that isolated ROM tests can miss, because it loads the shoulder in a posturally realistic position.
The wall angel earns its place because it separates two things the other screens blur together. Someone can reach full glenohumeral range in isolation and still lose wall contact, because thoracic kyphosis blocks the overhead position under postural load. That distinction changes what you prescribe next.
Clinical special tests go beyond basic ROM screening by targeting specific structures and pathologies. A physiotherapist runs several together, then reads the cluster of results against the patient’s history rather than acting on one positive finding. Recording each result on a shoulder ROM chart is what lets a pattern show up across appointments. The sensitivity and specificity figures below come from the NIH PMC clinical shoulder assessment review.
None of these tests is definitive in isolation. The Hawkins-Kennedy test has reasonable sensitivity for impingement but modest specificity, so a positive result raises suspicion without confirming pathology. A cluster of positive findings, combined with history and imaging where indicated, is what clinical decisions rest on. These tests are listed for practitioner reference and should not be self-administered.
Interpreting a shoulder mobility test means comparing your result against the normal ROM benchmarks above, then reading the pattern of deficit. Restricted movement alone does not identify a cause. The plane affected, the side, and whether the movement hurts are what guide the interpretation.
A single reading is a starting point, not a conclusion. Reassess after four to six weeks of targeted mobility work. If the restriction persists or worsens, a professional assessment is the appropriate next step.
Record a numeric score and a date every time you screen, rather than a pass or fail note. Comparing 70° of external rotation at baseline against 85° at eight weeks is the evidence that justifies continuing or changing an intervention. A spreadsheet works, and a practice system with built-in measurement tracking does the same job without the extra admin step.
Self-testing is a useful screen, but some findings call for a referral rather than a home exercise program. Physiotherapy and sports medicine practices use structured examination protocols that go well beyond what self-assessment can reach.
Frozen shoulder (adhesive capsulitis) deserves a specific note. Do not try to push through pain-limited ROM to force the restriction open, because that is counterproductive and potentially harmful. A physiotherapist can stage the condition and prescribe the appropriate intervention.
Where a restriction is muscular or capsular rather than structural, targeted mobility work improves ROM in most cases. The key principle is specificity: address the plane that is restricted instead of stretching generally. Consult a physiotherapist before starting if you had pain during the test or have known shoulder pathology.
Progress is measured in weeks to months, not days. A reasonable target is 10-15° of improvement in the restricted planes over four to six weeks of consistent exercise. Practitioners prescribing this alongside a caseload usually track it in software for physical therapists. The next session then starts from the last measurement rather than from memory.
In most practices a ROM score is typed into the free-text box of a session note. Six weeks later, nobody can pull those four numbers back out without reading every note in between. The screen was done properly and the measurement still fails to earn anything.
Pabau, our practice management software, stores those readings as structured values instead. Patient measurement tracking holds flexion, abduction, and both rotations as their own fields on the patient record, so each visit writes to the same place. The record then shows the series rather than a scatter of notes.
That gives a physiotherapist three concrete things, and nobody has to re-measure because the last number went missing.


Pabau’s measurement tracking lets physiotherapy and sports medicine practices log range of motion findings, compare results between sessions, and flag changes automatically. No spreadsheets, and no trends missed between appointments.

Screen both shoulders, write the numbers down, and put a date on them. A single reading tells you very little, but two readings six weeks apart tell you whether what you are doing works.
The trade-off worth remembering is that these screens are sensitive to restriction and poor at naming its cause. They are good at telling you something has changed and weak at telling you why. Treat a positive finding as a reason to look further, not as a diagnosis you can act on alone.
For a practice running this at scale, the limiting factor is rarely the testing. It is whether the results stay comparable six months later. Book a demo to see how Pabau keeps ROM measurements on the patient record and in a form you can still read at discharge.

Want the impingement test in full? Neer’s test walks through the positioning, the positive sign, and how it pairs with Hawkins-Kennedy.
Need to isolate the rotator cuff? Infraspinatus test covers the external rotation strength screen that sits alongside the empty can test.
Assessing other joints the same way? Range of motion assessment sets out goniometry technique and normal values across the major joints.
Looking for somewhere to record the numbers? Shoulder range of motion template is a printable chart for logging each plane at every visit.
A shoulder mobility test is a structured assessment of how far the glenohumeral joint moves through flexion, abduction, internal rotation, and external rotation. It may be a self-administered screen such as the Apley scratch test, or a clinician-performed evaluation using goniometric measurement. Either way, it is used to identify restrictions, asymmetries, and pathological movement patterns.
Perform the Apley scratch test on both sides, note how far your fingertip sits from the opposite shoulder blade, then compare the two. For a rough flexion and abduction check, stand in front of a mirror and watch how high each arm reaches. A difference you can see usually corresponds to an asymmetry of 20° or more. A goniometer gives precise readings but is not required for a basic self-screen.
The FMS shoulder mobility screen is a bilateral fist-placement test from the Functional Movement Screen system. It scores combined flexion, abduction, external rotation, and internal rotation on a 0-3 scale. A score of 3 means the knuckles reach within one hand-length of each other. A score of 1 means they sit more than 1.5 hand-lengths apart. A 0 is given if pain occurs during the test.
A shoulder clearing test is a pain-provocation screen used within the FMS protocol to rule out painful shoulder pathology before the mobility test is scored. The patient places one hand on the opposite shoulder while gentle overpressure is applied into internal rotation. If that produces pain, the protocol assigns a score of 0 and flags the shoulder for professional assessment.
See a physiotherapist or orthopedic clinician if you have pain at rest or at night. The same applies to asymmetry above 20° between sides, or restriction that worsens over weeks. Book an assessment too for a sense of instability or clicking. The same goes for neurological symptoms into the arm, or no ROM improvement after six weeks of consistent work.
Active range of motion is the arc the shoulder moves through using the patient’s own muscles. Passive range of motion is the arc achieved when a clinician or external force moves the joint without muscular effort. When active ROM is much less than passive ROM, the limitation is typically muscular or pain-related. When both are equally reduced, a structural or capsular restriction such as adhesive capsulitis is more likely.