Physician credentialing checklist
A physician credentialing checklist lists every license, certificate, verificati...

Last Updated: Oct 23, 2026

A microneedling depth chart maps needle depth in millimeters to skin concern, facial zone, body area and device speed setting.
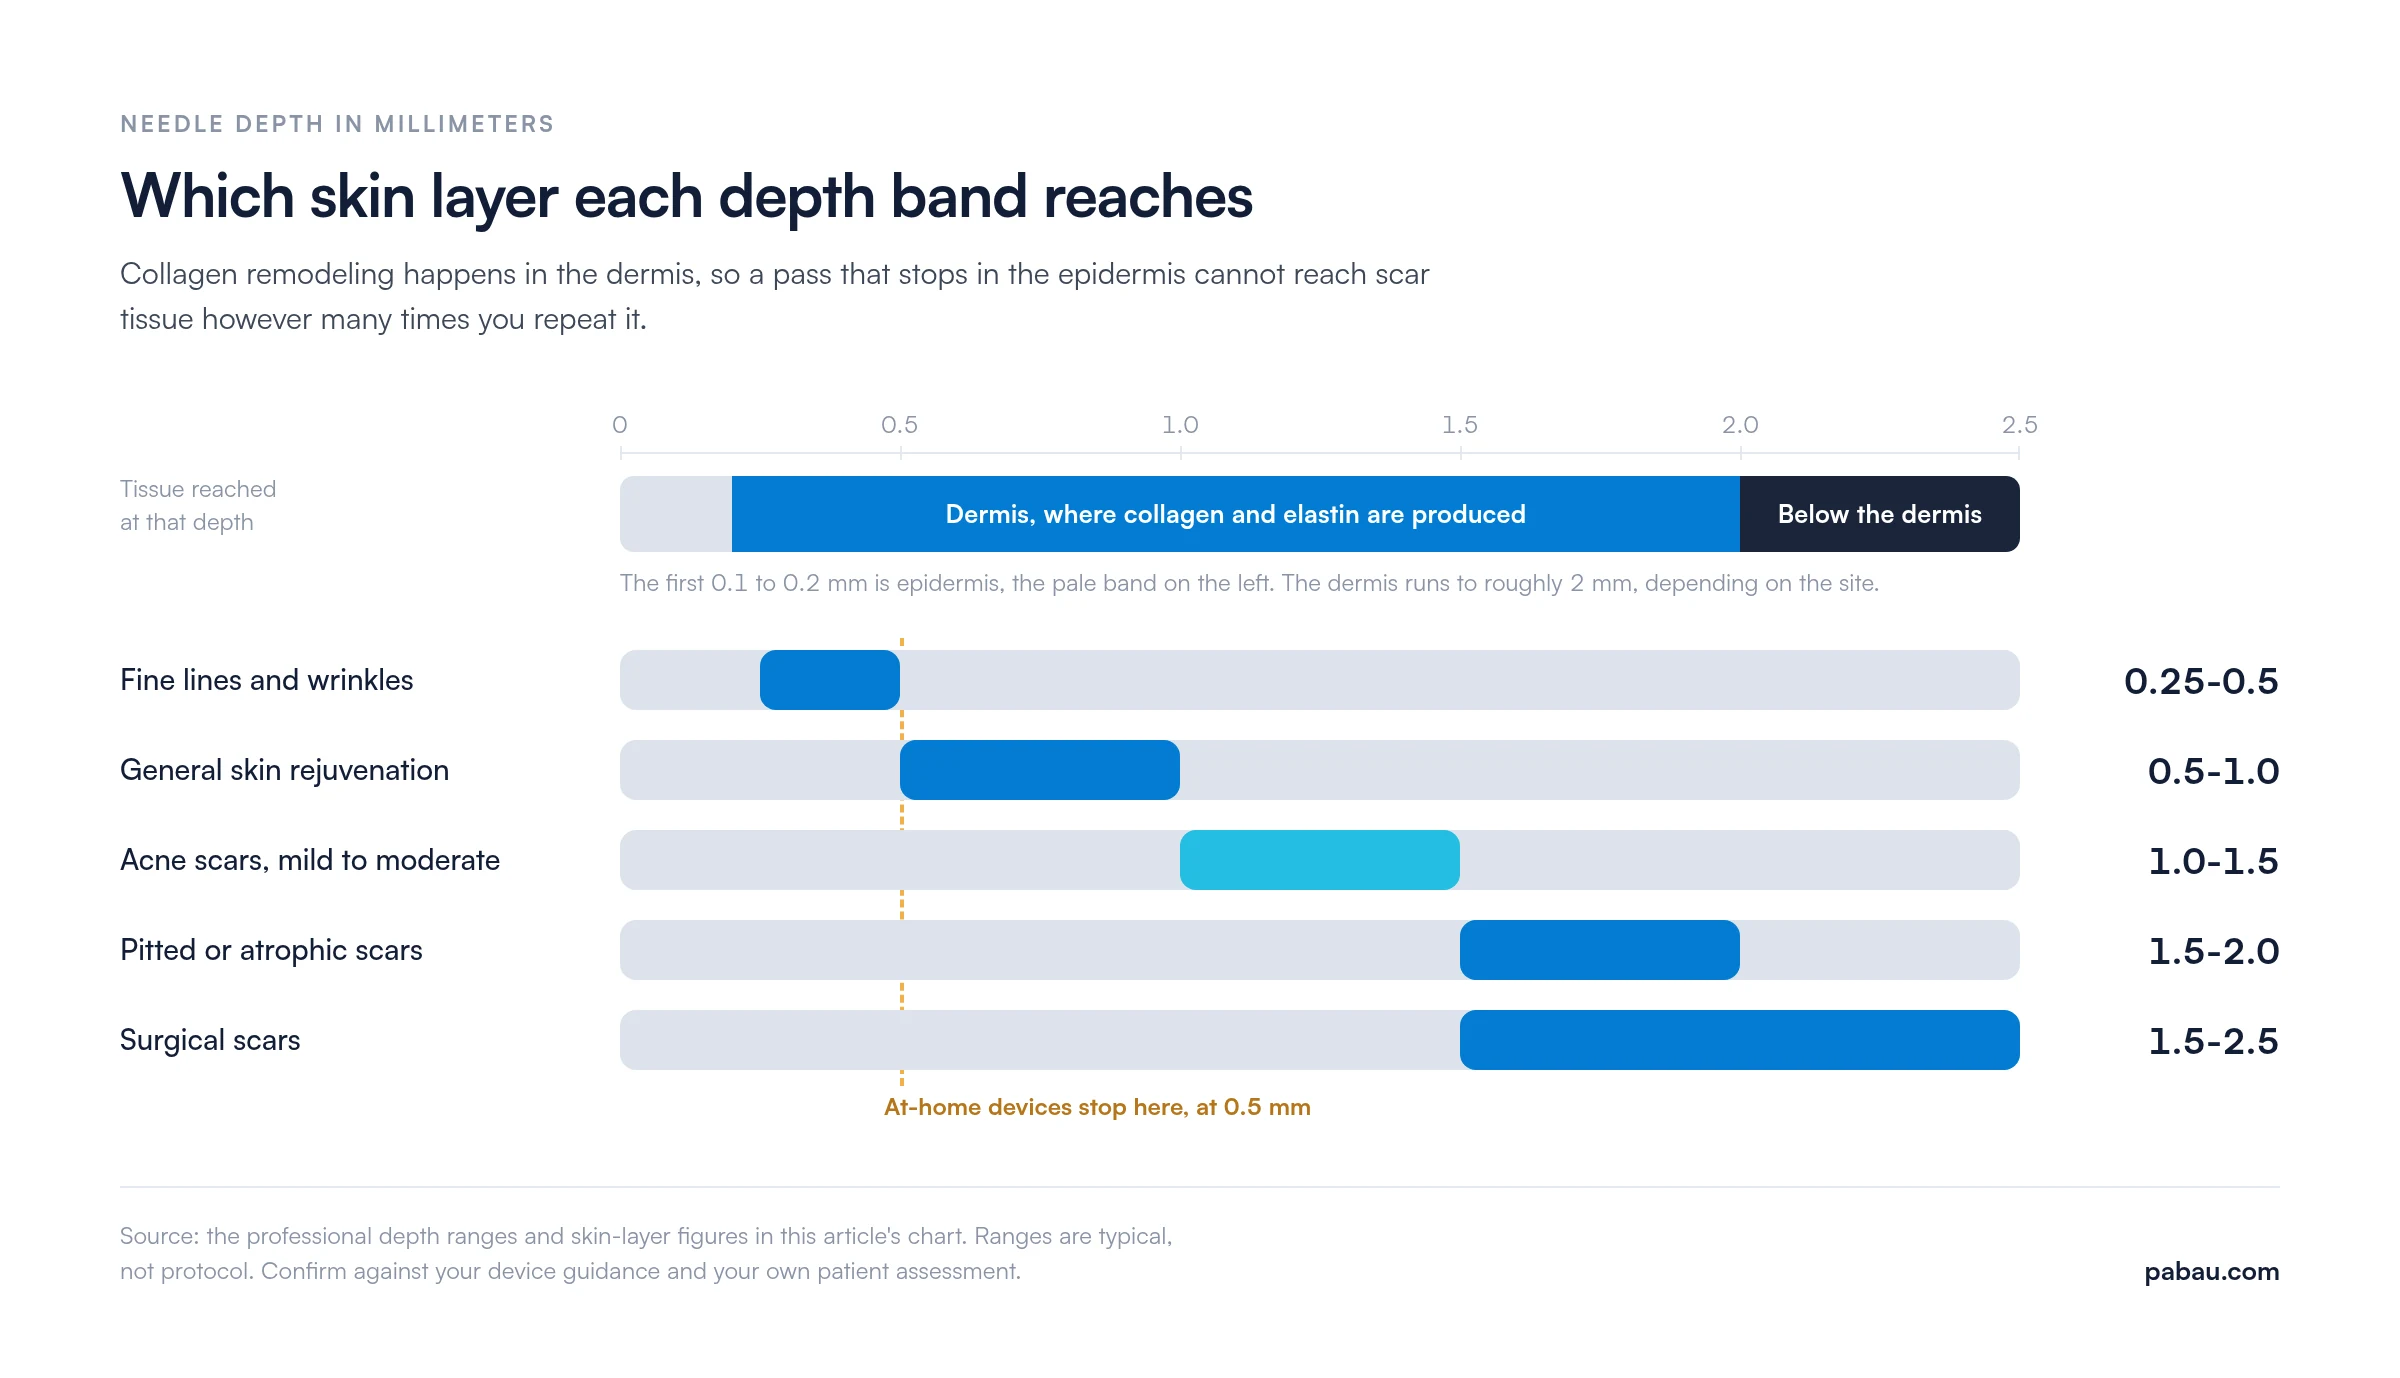
The epidermis sits in the first 0.1 to 0.2 mm, and the dermis runs to roughly 2 mm. Collagen remodeling needs a pass of at least 0.5 mm.
At-home devices stop at 0.5 mm. Professional treatment for scarring runs 1.0 to 2.5 mm, subject to patient assessment.
Fitzpatrick types IV to VI usually need 0.25 to 0.5 mm less depth than the chart’s standard values.
Log the depth, speed and pass count against the client record, so the next session starts from what the skin already tolerated.
Five reference tables across two pages, covering depth by skin concern, facial zone, speed setting, Fitzpatrick adjustment and aftercare window. A session record block at the end gives you somewhere to log depth, speed and pass count for each patient.
Download templateA microneedling depth chart tells you how far to set the needle, in millimeters, for the concern in front of you. The figure worth memorizing is 0.5 mm. Below that, a pass barely reaches the dermis. Past it, the needle starts doing the remodeling the patient booked in for.
The tables here set out depth by concern, facial zone, speed setting and Fitzpatrick type. There is also a checklist to run before you treat.
The chart maps needle depth in millimeters to a skin concern, a facial zone, a body area and a device speed setting. In practice, that replaces a remembered number with a documented starting point you can hand to any practitioner on the team.
The epidermis occupies roughly the first 0.1 to 0.2 mm. Below it, the dermis runs to about 2 mm depending on the site, and that is where collagen and elastin are produced. So a pass has to reach the dermis before it can change a scar.
Treat the chart as a starting point rather than a protocol. Patient assessment, device quality and your own training all move the number. The ranges here reflect commonly cited clinical guidance, so apply your own judgment and your training standards on top.
Skin concern decides the target layer, so it decides the depth. Fine lines sit in the upper dermis. Deep atrophic scars need the mid-to-lower dermis, which means a different setting and more passes.
The table below pairs each concern with a depth range, a typical pass count and a clinical note.
Most faces present more than one concern, and they do not average out. Acne scarring on the cheeks with fine lines on the forehead is two depths in one appointment. An average serves neither.
Skin thickness varies enough across one face to change the setting three or four times in a single session. The forehead and cheeks tolerate deeper passes. The periorbital zone and the upper lip do not, because the tissue is thin and the bone is close underneath.
Write the zone-by-zone plan down before you start. The skin assessment tools you already use at consultation are the natural home for it. The plan then sits on the record instead of in your head.
Speed changes what a given depth does to the tissue. A deep needle moving fast creates more trauma per unit area than the same depth at a lower speed. Most professional pens run a 1 to 6 scale, or the equivalent in RPM.
Here is how that plays out. Two practitioners treat cheek acne scarring at the same 1.2 mm. One works in slow overlapping passes at speed 3. The other runs speed 6 to finish sooner, and drives more epidermal disruption for no extra dermal benefit.
The depth in both records reads the same, which is exactly why speed belongs in the record too. Log both against the session while the patient is still in the chair.
Speed scales are not standardized across manufacturers. The values above assume a generalized 1 to 6 scale, so check your own device guidance before you lean on them.
Needle depth on a pen is set at the cartridge. A worn or bent needle will not reach the depth on the dial. Change cartridges between patients as a matter of course, and check the needle tips before a deep pass. A pen set to 2.0 mm that is delivering less looks like a poor responder in the notes.
Reduce depth by 0.25 to 0.5 mm against the standard values for Fitzpatrick IV to VI. Skin type is the variable that decides post-inflammatory hyperpigmentation risk, and it belongs in the depth decision.
A conservative first session with a documented outcome gives you more to work from than an aggressive one that triggers PIH. Capture Fitzpatrick type alongside treatment history at consultation, and session two starts from evidence rather than a default.
At-home devices should not exceed 0.5 mm, while professional treatment for scarring typically reaches 1.0 to 2.5 mm subject to assessment. Hardware is only part of that difference.
Behind the higher depth sits clinical judgment, patient assessment and the ability to manage an adverse event when one happens.
Patients arriving from an at-home pen are worth flagging before the first professional session. Skin conditioned to shallow passes can respond differently, and you want that baseline written down rather than recalled later.

Depth is the last decision of the pre-treatment sequence, not the first. Work through the list below before the pen touches skin, and the setting you picked is defensible if anyone asks later.

Four patterns account for most of the disappointing outcomes practitioners bring to a review appointment. All four are documentation problems as much as technique problems.
No depth is safe on the wrong patient, so the contraindication screen comes first. The medical spa compliance checklist your practice follows should place that screen at every consultation, not only the first one.
The conditions below are widely recognized as contraindications or cautions across dermatology literature, including guidance from the British Association of Dermatologists.
Aftercare intensity tracks depth. A patient treated at 0.25 mm for fine lines needs different instructions from one treated at 2.0 mm for atrophic scarring. One generic sheet serves neither of them well.
Downtime ranges are typical rather than guaranteed. Healing speed, skin type and pass count all move them. Give the advice verbally and in writing. Keep a copy alongside the skin needling consent form for that session.
Use the PDF as a chairside reference, or laminate it for the treatment room. The sequence below is how the chart fits a standard pen microneedling appointment, start to finish.
Most practices record the depth somewhere. The problem is the where. A paper card in the treatment room, a note in someone’s phone, or a spreadsheet nobody opens. When a different practitioner takes the follow-up, the setting that worked is a guess.
Practice management software like Pabau keeps that detail on the client record instead. Depth, speed, pass count, Fitzpatrick type and the topicals applied all sit against the session. The before-and-after photos from the same day sit next to them.
Digital forms capture the consent and the contraindication screen in the same place. The record for a 2.0 mm session is then complete before the patient leaves. Nobody reconstructs it a week later from memory.
For a practice running microneedling courses across several practitioners, that is the difference between a course of treatments and six unrelated appointments. Pabau is all-in-one med spa software, so the booking, the notes, the photographs and the aftercare message belong to one client file.

Pabau logs depth, speed, pass count and aftercare against each microneedling session, next to the consent and the photos. Your next practitioner starts from what the skin already tolerated.

Depth is a clinical decision, and the chart exists so it stops being a memory test. Print it, keep it where the pen lives, and treat each range as an opening position rather than the answer.
A course of microneedling improves session to session when the record behind it is complete. If you can state the last depth, the last speed and the pass count, the next decision has something to stand on. Add how the skin responded and you have a plan rather than a repeat.
Want the consent, the depth log and the aftercare on one client record? Book a demo to see how Pabau handles microneedling documentation from first consultation through to review.

Need the consent paperwork for this exact treatment? Skin needling consent form covers the disclosures and signature fields to get in place before a deeper course starts.
Standardizing how your team grades skin? Using skin assessment tools compares the approaches practices use at the first appointment.
Want the assessment on paper before the pen comes out? Full skin assessment template gives you a printable sheet for the pre-treatment review.
Building out the consultation itself? Facial consultation form walks through the fields to capture before any treatment decision gets made.
Treating acne scarring at depth? Acne treatment consent sets out what to explain to the patient before a course of deeper passes.
Four to six weeks is the usual spacing, with most courses running three to six sessions. The interval matters more than the count, because collagen remodeling carries on for weeks after a pass. Treating again too soon adds trauma without adding benefit.
Not always. Passes under about 0.5 mm are usually comfortable without one. Above that, most practitioners apply a topical anesthetic 20 to 30 minutes beforehand, then remove it before treating. Build that wait into the appointment slot rather than rushing it.
Pinpoint bleeding is the expected endpoint at dermal depths. Streaming blood, immediate bruising, or redness past the aftercare window all suggest the pass went deeper than the tissue needed. Note it and drop 0.25 mm next session.
Only up to a point. Channels at 0.25 to 0.5 mm already improve topical uptake, so extra depth adds risk rather than absorption. Apply only products cleared for use straight after microneedling, since open channels carry them into the dermis.