Slocum test: How to perform, interpret and record it
The Slocum test is a knee drawer test performed with the tibia rotated. It check...

3
Last Updated: Oct 21, 2026
A lymphatic massage chart is a visual body map of lymph node locations, drainage pathways, and hand-placement sequences for manual lymphatic drainage (MLD) massage. Therapists and wellness practitioners use it as a reference during treatment, and patients can use it as a take-home guide for self-massage between appointments.
This guide maps the four regions of an MLD session, from the cervical nodes in the neck to the inguinal nodes in the groin. It also covers pressure, stroke direction, sequence and contraindications, so you can train staff and educate patients from one reference.
A printable protocol sheet with rows for each technique, range notes, the source you checked and a sign-off field. It also includes a dated log for recording who treated the patient and when.
Download template
A lymphatic massage chart maps node locations and drainage territories, helping therapists apply correct technique and patients perform safe self-massage.
Manual lymphatic drainage uses light skin-stretching touch (not deep pressure) and always begins proximally to stimulate the axillary and inguinal nodes first.
The chart divides the body into four key regions: head and neck, upper body and axillary, abdominal, and lower body and inguinal. Facial mapping is added for aesthetic practitioners.
Screen every patient for contraindications such as active infection, deep vein thrombosis and congestive heart failure before the first session.
Practice software such as Pabau attaches the chart to digital intake forms and sends it home through the Client Portal for self-care.
A lymphatic massage chart is an anatomy reference showing where lymph nodes cluster, which way lymph flows, and where to place your hands. It turns textbook anatomy into a map you can follow at the treatment table.
Practitioners use a chart because lymphatic drainage technique is precise. Direction, pressure and sequence all matter. Starting at the wrong node or pressing too hard works against the system you’re trying to help, and the session achieves little. A chart keeps staff consistent and shows patients there’s a logical method behind every stroke.
Lymphatic drainage massage depends on three anatomical facts: where the nodes sit, how the fluid flows, and which techniques activate the system. A chart translates these facts into a step-by-step map.
Lymph node clusters. The body has six main node groups: cervical (neck), axillary (armpit), inguinal (groin), thoracic, abdominal, and popliteal (behind the knee). Each cluster drains a specific body territory.
Drainage direction. Lymph always flows toward the nearest major node, then toward the thoracic duct and subclavian vein. A chart shows this as directional arrows or shading. Therapists clear the proximal axillary and inguinal nodes first. Then they work distally down the limbs, with strokes aimed back toward those nodes.
Light-touch technique. MLD uses skin stretching rather than deep pressure. The therapist’s hand gently stretches the skin in the direction of lymph flow, releases, and repeats. This rhythmic motion stimulates the smooth-muscle walls of the lymphangions, the pumping segments of collecting lymphatic vessels, to contract rhythmically and move fluid forward. A chart shows hand placement so new therapists learn the correct contact point and angle.
The map below condenses the four regions into one reference. It shows the node group to clear first, the territory it drains, and each stroke’s direction.
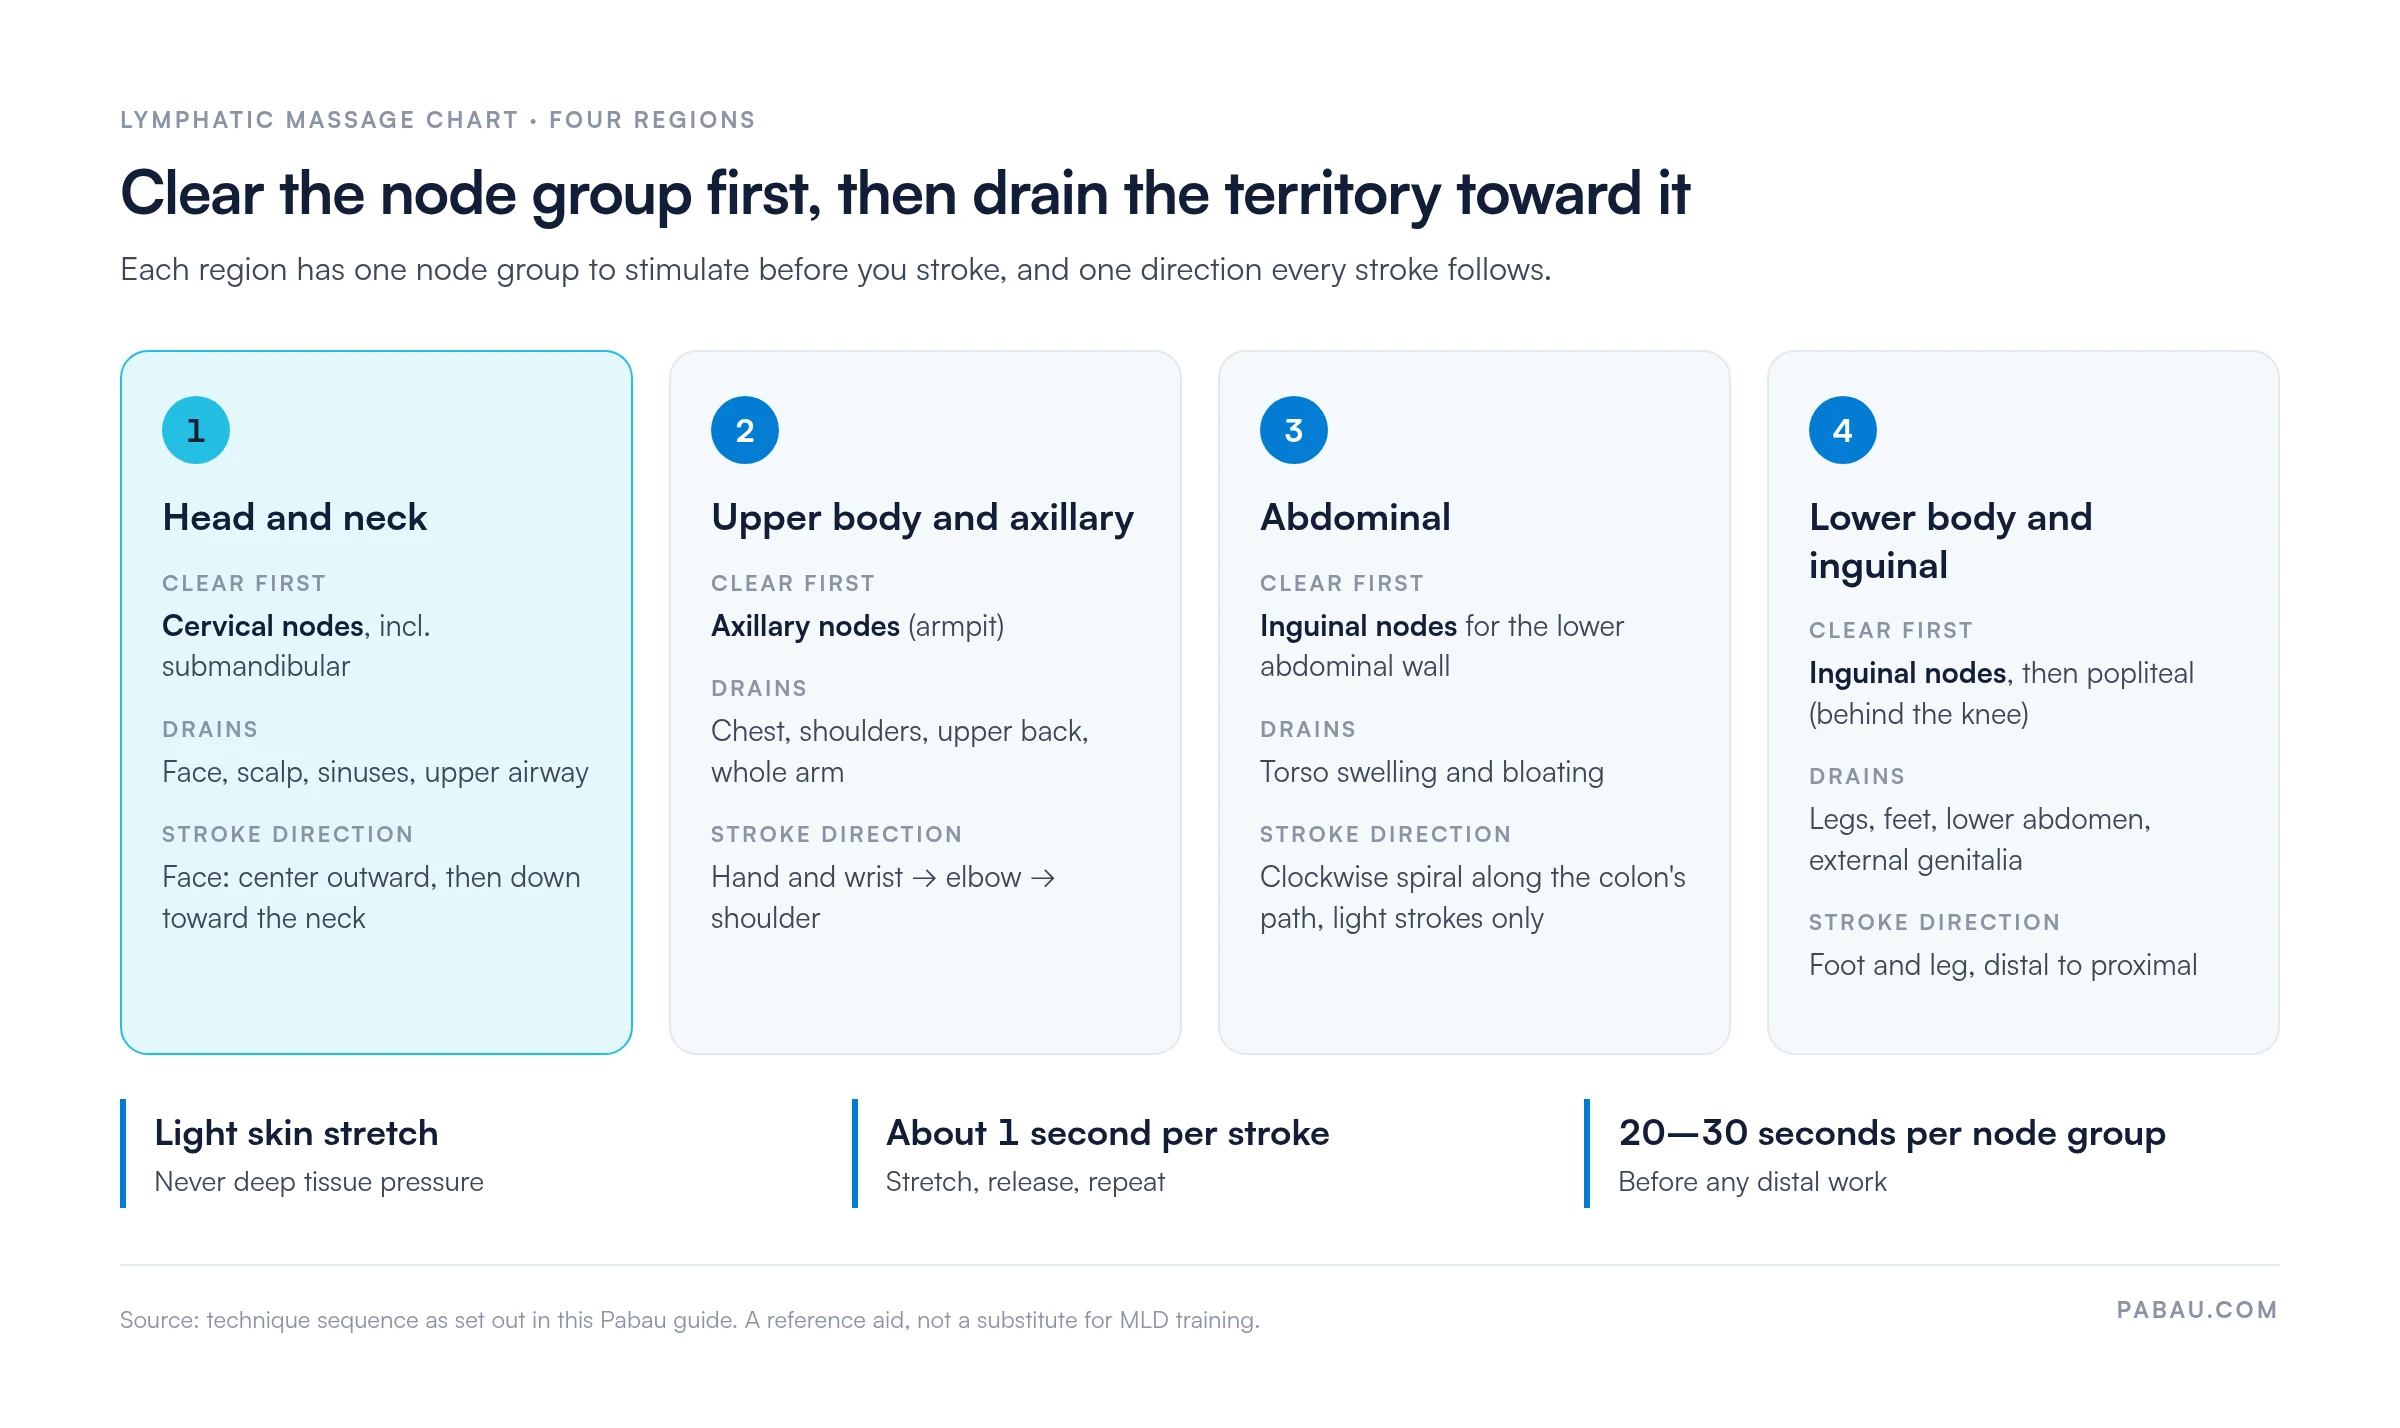
The head and neck region contains the cervical lymph nodes, which drain the face, scalp, sinuses, and upper airway. This is often the first area to address in a full-body sequence. It’s also the region most often treated by aesthetic practitioners and for athletes and patients with facial swelling.
The face drains toward the cervical nodes via multiple pathways, and a chart shows these as zones. The forehead drains toward the temple and ear, and the cheeks drain toward the lower jaw and neck.
The lips and chin drain straight down toward the submandibular nodes. Therapists work from the center outward and downward, following the chart. This technique helps reduce post-procedure swelling after injectables, lasers, or microneedling.
The axillary (armpit) lymph nodes drain the chest, shoulders, upper back, and entire arm. A chart shows the node cluster location and the direction to work. Stroke from the hand and wrist toward the elbow, then toward the shoulder, where the nodes sit just under the armpit.
This region is crucial in any full-body drainage sequence because the axillary nodes are the primary drainage point for the upper body. Therapists always stimulate the axillary nodes first (before working distally on the arm) so the nodes are ready to receive fluid.
Abdominal lymphatic drainage addresses swelling in the torso and can ease bloating. A chart maps the abdominal lymph nodes and the drainage direction. Fluid from the lower abdominal wall drains down toward the inguinal nodes, while deep abdominal lymph moves up toward the thoracic duct.
Therapists work in a clockwise spiral pattern (following the colon’s path) with light, skin-stretching strokes. The chart clarifies hand placement so practitioners avoid deep pressure on internal organs and instead work the fascial layer just beneath the skin.
The inguinal (groin) lymph nodes drain the legs, feet, lower abdomen, and external genitalia. A chart shows where the inguinal nodes sit and the order to work in. Clear the inguinal nodes first, then the popliteal nodes behind the knee, then stroke the foot and leg from distal to proximal.
This is the longest drainage pathway on the body and is often the most congested. Athletes, post-surgical patients, and anyone with lower-body edema benefit from detailed inguinal mapping, so therapists can work systematically without skipping sections.
The chart conveys four rules that keep the technique correct:
Patients benefit from simplified self-massage instructions that complement the chart. A therapist can attach the chart to a post-care handout and add a few written steps, so patients perform safe drainage at home between appointments.
The instructions follow the same proximal-to-distal logic. Patients start at the axillary or inguinal nodes with 20–30 gentle, rhythmic circles. Then they work down the affected limb or region with light skin-stretching strokes toward the nearest node.
Patients should avoid deep pressure and never massage over infected areas, active inflammation, or suspicious lumps. Ask about these red flags on your massage intake form so you catch them before the first session.
Manual lymphatic drainage has clinical evidence behind it in several settings. Studies indexed on PubMed report that MLD reduces swelling in post-surgical patients and supports symptom management in lymphedema care. The National Lymphedema Network (NLN) and American Massage Therapy Association (AMTA) both recognize MLD as a foundational technique when trained practitioners perform it.
Avoid overstating outcomes. MLD supports swelling reduction and comfort, but it does not cure lymphedema or replace medical treatment. A chart helps practitioners stay within their scope by giving them a clear, consistent reference for safe technique.
Physical therapists, sports medicine practitioners, massage therapists, and aesthetic clinicians all benefit from a structured chart. It works for orthopedic recovery (post-surgery swelling), sports performance (recovery and injury prevention), and aesthetic aftercare (swelling after injections or laser treatments).
Practices with several staff members benefit most because the chart enforces consistency. New therapists learn the anatomy faster, and patients get the same quality of treatment whichever practitioner is in the room. Pair it with massage therapy SOAP notes so each session records the regions treated and how the patient responded.
Many practices hand the chart out on paper or email a PDF after the session. Handouts get lost, staff forget to send them, and nobody can tell which patients received the self-massage steps.
Pabau, the practice management platform we build, attaches the chart to your digital intake forms, so patients see the anatomy before their first appointment. Aftercare messages then send the self-massage steps automatically after each session. Patients can reopen the handout anytime from their patient portal.
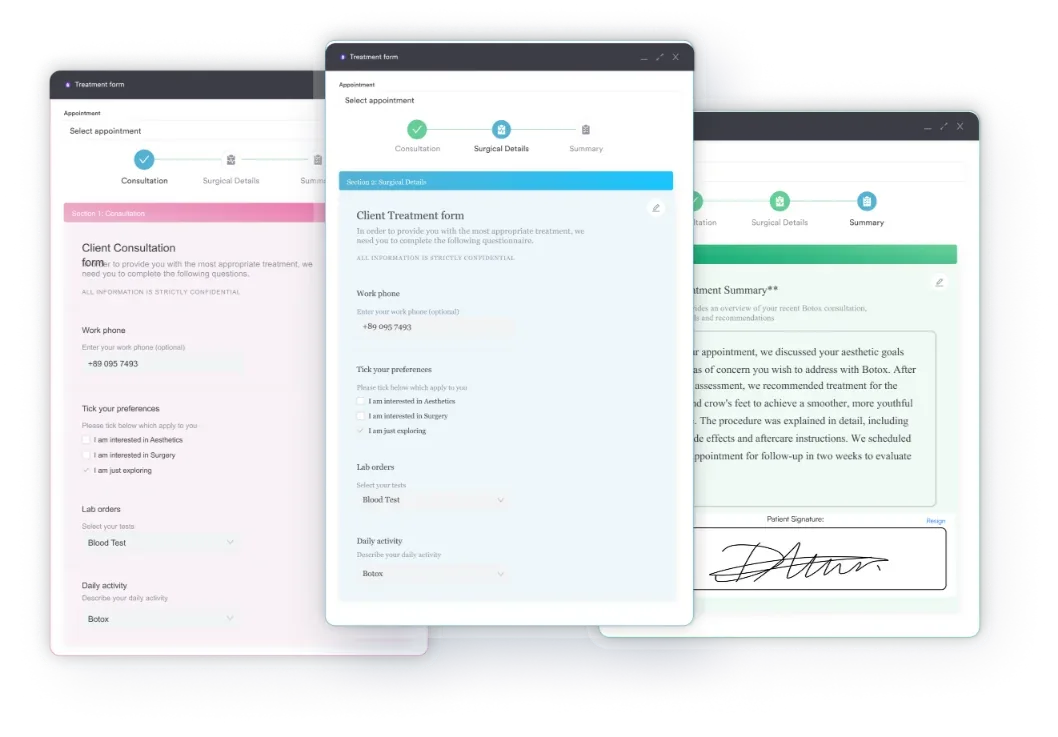
Day spas and wellness centers running Pabau as their spa software keep the chart, consent form and treatment note on one patient record. Every therapist follows the same anatomy-based protocol, and your front desk stops re-sending handouts by email.

Pabau attaches the lymphatic chart to intake forms and aftercare messages, so every patient gets the same self-massage guidance between sessions.

A lymphatic massage chart pays off when the whole team works from it. One shared map means every therapist clears the same nodes in the same order, and every patient goes home with the same steps.
The trade-off is that a chart can’t teach touch or catch a contraindication. Keep hands-on MLD training and intake screening in place, and let the chart carry the sequence.
Start by downloading the chart and adding it to your intake and aftercare. Book a demo to see how Pabau sends it to every lymphatic drainage patient automatically, with no handout to chase.

Working with reflex points too? Foot reflexology charts map the reflex zones of the feet for therapists who combine reflexology with massage.
Tracking treatments over time? Massage log template records dates, techniques and notes across a course of sessions.
Light touch using skin stretching is the correct pressure, not deep tissue massage. The therapist’s hand gently stretches the skin in the direction of lymph flow, releases, and repeats in a 1-second rhythm. Deep pressure does not activate lymphatic vessels and can override the gentle mechanism that the system depends on.
Always start proximally by stimulating the main nodes (axillary and inguinal) first, then work distally toward those nodes. This prepares the nodes to receive fluid and prevents backing up fluid in the limbs. The proximal-to-distal sequence is the core principle of MLD technique.
Yes, with correct instruction. Provide patients with the chart and written self-massage steps that emphasize light touch and the proximal-to-distal sequence. Advise them to avoid massaging over infection, active inflammation, swollen lymph nodes, or suspicious lumps, and to contact you if swelling worsens.
A typical session ranges from 30 to 60 minutes depending on the body area covered and the patient’s condition. Begin with shorter sessions and adjust based on patient response. The chart helps you allocate time to each region so you do not rush or over-treat any one area.
Do not perform MLD on patients with active infection, deep vein thrombosis, congestive heart failure, active malignancy, or recent surgery without medical clearance. Always screen for these conditions during intake and consult with the patient’s physician if in doubt.