PCS pain catastrophizing scale: Scoring, cutoffs, and free template
The PCS pain catastrophizing scale is a 13-item self-report questionnaire that m...

2
Last Updated: Oct 15, 2026
The heel thump test is a clinical provocation test for syndesmotic ankle sprain, better known as a high ankle sprain. The examiner strikes the heel so axial force travels up through the calcaneus and loads the distal tibiofibular syndesmosis. Pain reproduced at the anterolateral ankle, above the joint line, is a positive result.
Lindenfeld and Parikh described the technique in a 2005 clinical tip in Foot & Ankle International (26(5):406-408). It helps separate syndesmotic injury from a lateral ankle sprain or a bone stress injury. This guide covers how to perform the test and how to read the result. It also shows where the test belongs in an ankle assessment battery.

The heel thump test loads the distal tibiofibular syndesmosis by axial percussion at the heel, rather than stressing the lateral ligaments.
The original technique seats the patient with the ankle relaxed in plantarflexion, not supine with the ankle dorsiflexed.
A positive result is pain at the anterolateral ankle above the joint line, and it warrants companion testing and usually imaging.
The evidence base is thin, so the test earns its place inside a battery alongside the squeeze test and Kleiger’s test.
Practice management software like Pabau lets physical therapy and sports medicine practices record special test findings at the point of care.
The heel thump test is a passive provocative examination for injury to the distal tibiofibular syndesmosis. That ligamentous complex binds the tibia and fibula just above the ankle mortise. Lindenfeld and Parikh first described the test in Foot & Ankle International in 2005.
The mechanism is simple. A firm axial percussion force applied to the heel travels through the calcaneus and talus. It compresses the mortise and loads the syndesmotic ligaments. Where those ligaments are disrupted or irritated, the patient reports pain at the front of the ankle above the joint line.
Roughly 10 to 17% of all ankle sprains seen in sports medicine are syndesmotic, according to the Journal of Orthopaedic and Sports Physical Therapy. They heal far more slowly than lateral ankle sprains. They also carry a higher risk of chronic instability when they are missed, which is what makes an early bedside screen worth running.
Knowing what you are loading helps you place the result in context. The distal tibiofibular syndesmosis is made up of four structures.
Together they hold the mortise at a fixed width. They also resist talar rotation and lateral displacement of the fibula.
When axial force travels up from the heel, the talus acts as a wedge inside the mortise. That wedging spreads the tibia and fibula apart and loads the AITFL and the interosseous membrane. Where a syndesmotic tear is present, the load reproduces pain. In a simple lateral sprain of the ATFL or CFL, axial compression rarely provokes the same response. That difference is what gives the test its discriminatory value.
The heel thump test takes under 60 seconds and needs no equipment. Patient position, hand placement, and consistent force delivery are what decide whether the result means anything.
Seat the patient on the edge of the treatment table with the knee flexed and the lower leg hanging free. The ankle rests in relaxed plantarflexion, the gravity equinus position described in the original clinical tip. Nothing should support the heel from below, so the strike meets no counter-pressure from the table.
A supine patient with the ankle held at 90 degrees is a common misdescription of this test. Dorsiflexion already wedges the wider anterior talus into the mortise before the strike lands. The starting tension on the syndesmosis is then not the one the test was designed around.
Ask the patient to point out the area of maximum tenderness before you test. That gives you a reference for the pain location they report during the provocation.
Cup the posterior calcaneus lightly with your non-dominant hand to steady the foot and prevent reflexive withdrawal. With your dominant hand formed into a fist, deliver a firm but controlled axial strike to the plantar surface of the heel. The force should travel in line with the tibial shaft. Three consistent strikes at matched intensity is the approach described in the original clinical tip.
Watch the patient’s face rather than the ankle. A positive test often produces an involuntary facial response before the patient can put the pain into words. Afterward, ask where they felt it. Pain that is vague or spread across the foot tells you little. Pain localized to the anterior ankle crease, above the mortise line, is the finding you want.
Interpretation depends on the presence of pain and on where the patient locates it. A finding only carries weight when the patient can describe precisely where they felt it.
A positive heel thump test is pain reproduced at the distal tibiofibular syndesmosis. That means the anterolateral aspect of the ankle, above the joint line, between the tibia and fibula. It raises clinical suspicion for a syndesmotic ankle sprain.
A positive result warrants further workup. Combine the test with at least one other syndesmosis provocation test, then apply the Ottawa Ankle Rules to decide whether plain radiographs are indicated. If imaging is ordered, weight-bearing mortise views and an external rotation stress X-ray are the standard first steps. MRI is reserved for cases where surgery is being planned.
No pain with axial percussion does not rule out syndesmotic injury. Sensitivity data are limited, so a negative result lowers clinical suspicion without eliminating it. External rotation, forced dorsiflexion, and high-energy impact all point at the syndesmosis. Where the mechanism matches one of those, run the companion tests and consider imaging anyway.
Pain reproduced in the plantar heel, at the metatarsal heads, or spread across the foot points elsewhere. A calcaneal stress fracture, plantar fascia pathology, and Lisfranc involvement each send the assessment down a different pathway.
The evidence base is thin, but it exists. Lindenfeld and Parikh reported the test as a clinical tip rather than in a formal diagnostic accuracy study. Published sensitivity and specificity figures therefore vary across secondary sources.
Most clinical reference databases place sensitivity in the 70 to 85% range, with specificity somewhat lower. Treat those figures cautiously. No large prospective study has tested them against arthroscopic or MRI-confirmed syndesmotic injury as a reference standard.
What the evidence does support consistently is that no single clinical test confirms or excludes a syndesmotic ankle sprain. A 2021 systematic review with meta-analysis was published in Physical Therapy in Sport. It found that combining two or more special tests improves diagnostic accuracy over any single test. The heel thump earns its clinical value inside that battery.
The squeeze test, sometimes called the fibular squeeze test, is usually described alongside the heel thump in syndesmosis protocols. Both target the same injury, but they reach it by different mechanical routes.
One principle is worth carrying into the room. If the squeeze test is positive and the heel thump is negative, suspect involvement of the interosseous membrane higher up the leg. If both are positive, the probability of a complete syndesmotic disruption rises sharply and imaging is generally indicated.
The heel thump sits within a broader cluster of syndesmosis-specific stress tests. In practice, most clinicians combine two or three of them to raise confidence in the diagnosis.
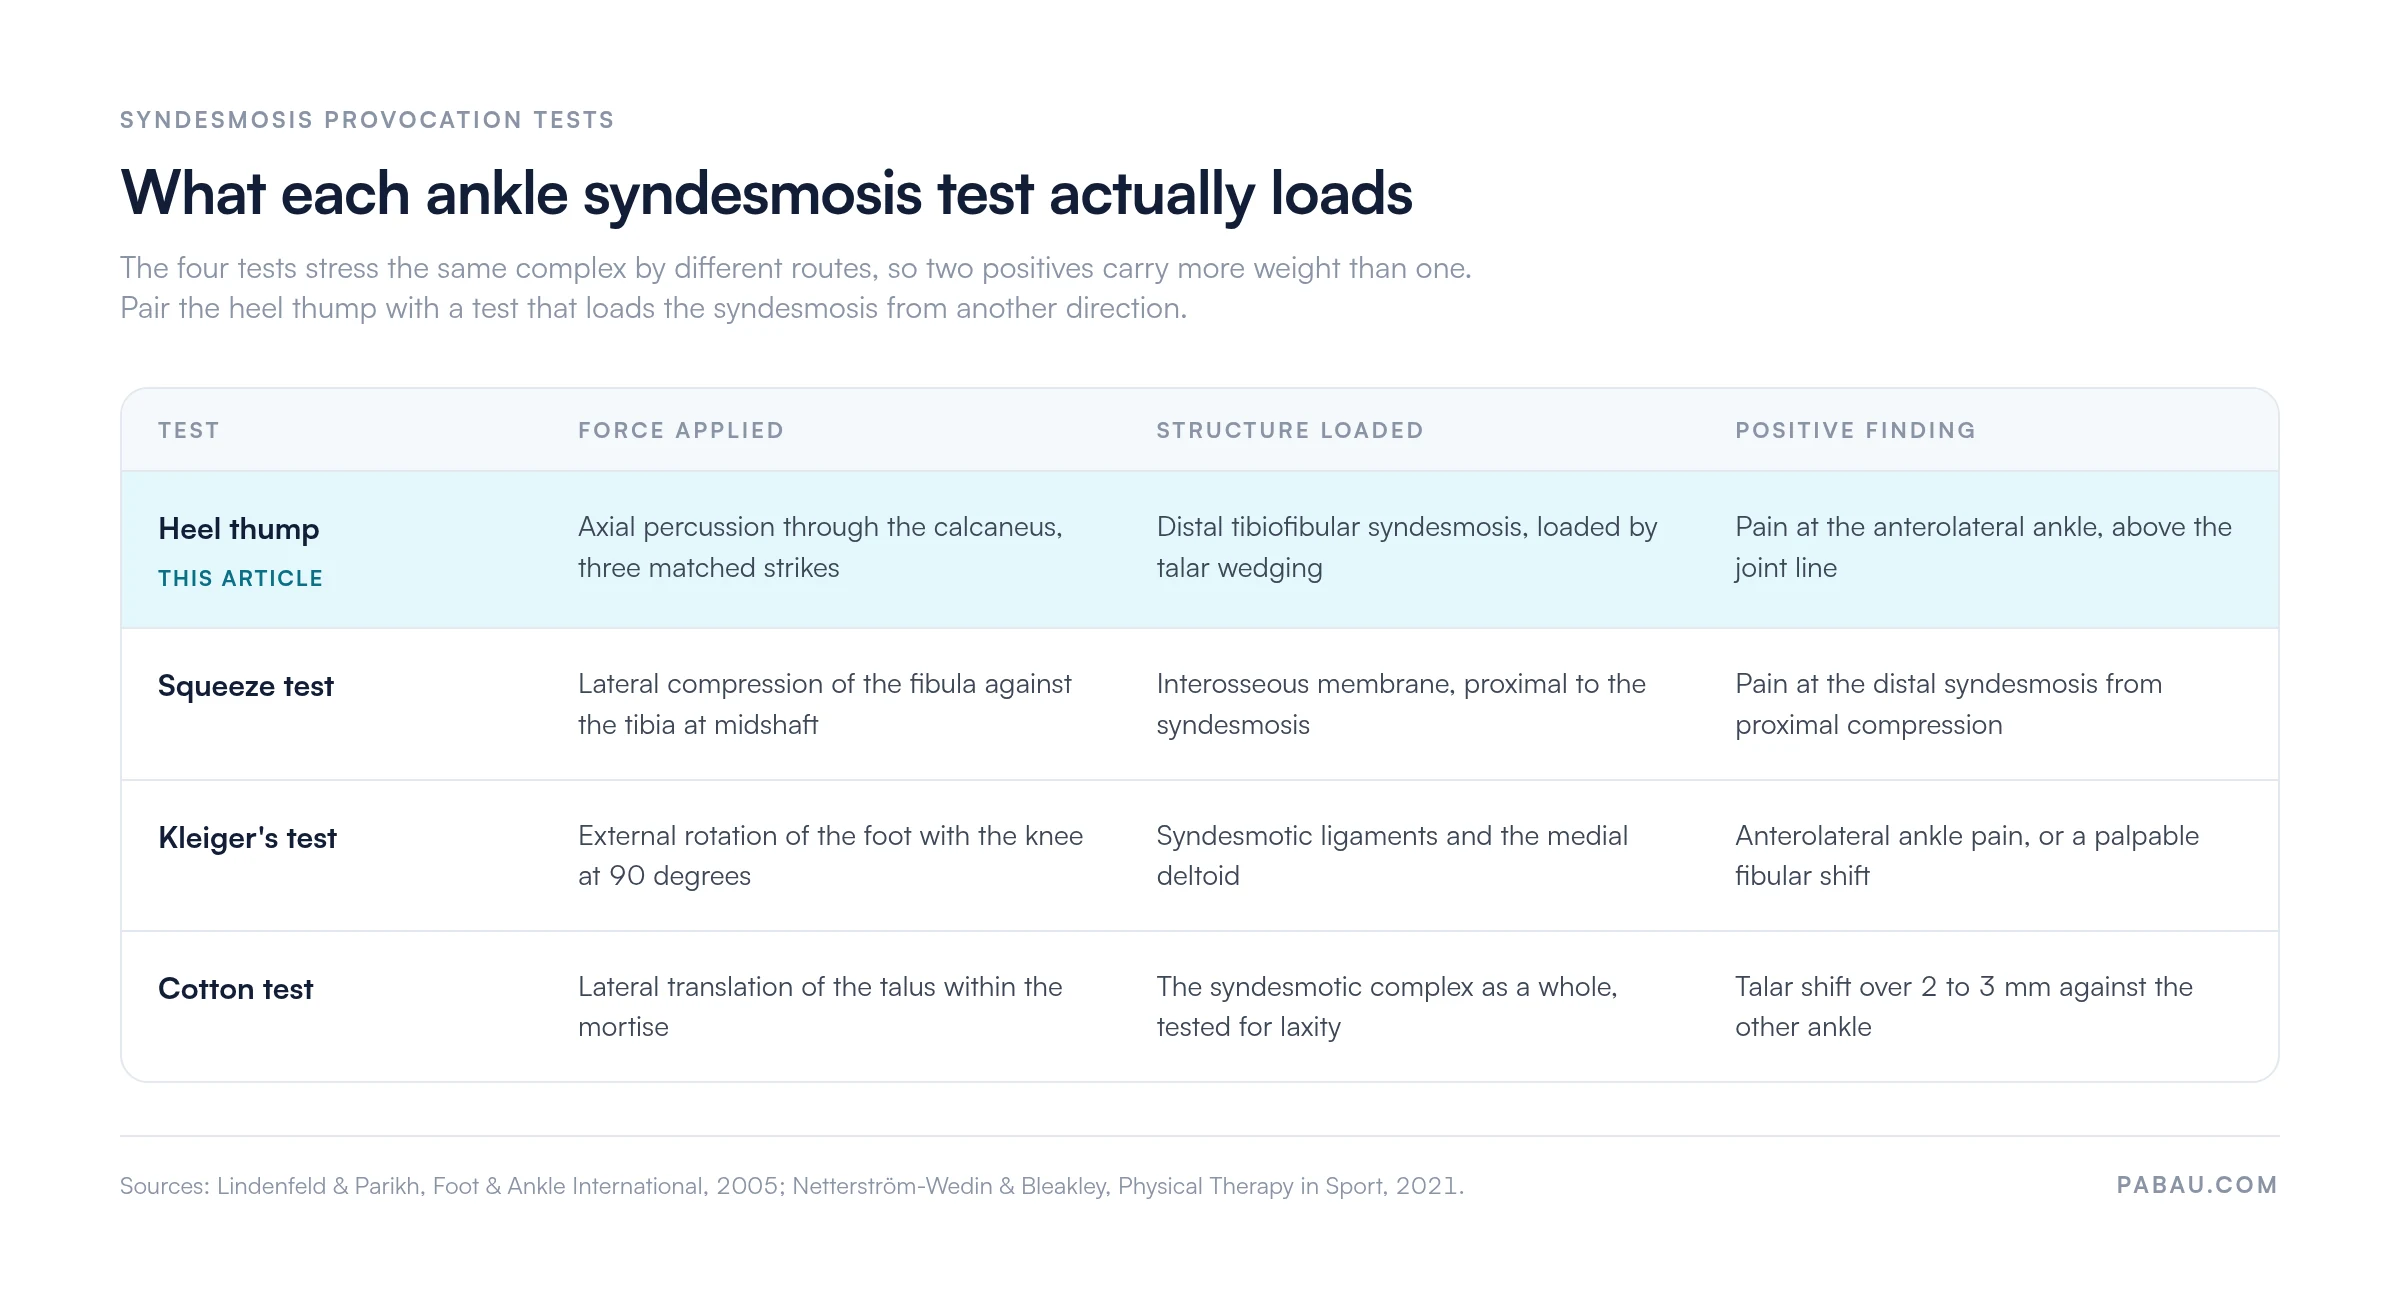
Clinicians in sports medicine usually apply two or three of these rather than resting on a single finding. Together, two positive findings from the heel thump, squeeze, and Kleiger cluster call for an imaging referral.
Run the heel thump test before the squeeze test in your assessment sequence. Compression from the squeeze test can leave enough discomfort to muddy a heel thump result taken right after. Starting with the lower-load axial percussion keeps your findings cleaner.
Not every ankle sprain presentation needs a heel thump test. Select it on mechanism and on your initial findings.
The heel thump test drives a meaningful percussive force through the skeletal axis. There are situations where that force is contraindicated, or where the test should be modified.
Accurate documentation of special test findings matters for medicolegal reasons, for tracking progress across visits, and for handover to imaging and surgical colleagues. A note that records only “positive heel thump test” leaves the next clinician guessing.
A stronger note captures five things.
Free-text boxes rarely capture all five consistently across a team, which makes audit and visit-to-visit comparison harder than it needs to be.
Practice management software like Pabau lets you build an ankle assessment template with a structured field for each test in the battery. The heel thump result, the pain descriptor, and the bilateral comparison all land in the patient record. Every clinician then sees the same baseline when the patient returns.
That structure is what separates a physical therapy EMR from a notes box. Practices comparing physiotherapy clinic management systems should check whether assessment templates can be built per condition, rather than shipped as one generic intake form.


Pabau gives physical therapy and sports medicine practices structured digital forms for capturing assessment findings during the visit, so clinical records stay accurate and audit-ready.

The heel thump test is a fast, equipment-free screen for syndesmotic ankle sprain. Its value comes from the tests you run alongside it, particularly the squeeze test and Kleiger’s test.
Two decisions follow from the result. A positive test sends the patient toward imaging. A negative test in a suspicious presentation does not clear them, and the mechanism should still drive what you do next.
A useful note carries the detail around the finding, not just the verdict. Record the position, the force, the pain location, and the companion tests you ran. Pabau’s structured forms capture those fields during the visit and carry them across the rehabilitation episode. Book a demo to see how Pabau handles clinical documentation for physical therapy and sports medicine practices.

Need a decision aid before you order films? Ottawa Ankle Rules calculator walks through the criteria that decide whether an acute ankle injury needs radiographs.
Want the next test in the battery? Talar tilt test covers the inversion and eversion variants and what laxity tells you about the deltoid ligament.
Chasing a syndesmosis finding further? Fibular translation test explains how fibular glide is graded against the uninjured side.
Ruling out a bone stress injury? Foot stress fracture test sets out the findings that redirect the assessment away from the syndesmosis.
Returning an athlete to sport? Return-to-running protocol covers staged progression criteria and functional milestones after ankle injury.
The heel thump test screens for syndesmotic ankle sprain by applying axial percussion through the heel to stress the distal tibiofibular ligament complex. Pain reproduced at the anterolateral ankle above the mortise line is a positive result and points to a possible syndesmotic injury that needs further assessment.
A positive heel thump test points to likely disruption of the distal tibiofibular syndesmosis. Pain has to be localized to the anterolateral ankle above the joint line to mean anything, so diffuse foot pain is not a positive result. A positive finding warrants companion testing and application of the Ottawa Ankle Rules to decide whether imaging is needed.
Published sensitivity estimates for the heel thump test run from roughly 70 to 85%. The evidence base is limited, and no large prospective diagnostic accuracy study has used arthroscopic confirmation as its reference standard. The test is most accurate when it is combined with two or more syndesmosis-specific tests rather than used alone.
Avoid the heel thump test where a calcaneal, tibial, or fibular fracture is suspected, and where acute swelling prevents accurate pain localization. Avoid it in skeletally immature patients with possible Salter-Harris injuries, and in the early post-operative period after syndesmotic fixation. Imaging should precede provocative testing in all of these situations.